French Toast Roll Ups: Sweet and Crispy
- Time: 10 min active + 10 min cooking = Total 20 minutes
- Flavor/Texture Hook: Shatter crisp exterior with a velvety, melted cinnamon center
- Perfect for: Lazy weekend brunches, kid friendly treats, or a cheap craving fix
The smell of cinnamon and sizzling butter hitting a hot pan is the only way I want to wake up on a Saturday. I remember one particular morning when the fridge was basically empty, except for a loaf of cheap white bread and a couple of eggs.
I wanted something that felt like a treat but didn't want to drive to the store or spend twenty bucks on "artisanal" bread. I grabbed a rolling pin, flattened some bread, and realized that you don't need fancy ingredients to get a result that tastes like a bakery.
Trust me on this, the magic isn't in the bread brand. It's in how you handle it. By treating sandwich bread like a pastry dough, you get these tight, neat little cylinders that hold onto the filling and crisp up beautifully. These French Toast Roll Ups are basically the "cheat code" of breakfast.
You get the comfort of cinnamon rolls but with a fraction of the effort and cost.
Right then, let's get into it. I've stripped this down to the bare essentials so you can make it with whatever you've got in the cupboard. No fancy equipment, no restrictive rules, just a few simple steps to get a result that's velvety on the inside and crunchy on the outside.
Quick French Toast Roll Ups
The secret to making these work is all in the prep. Most people just try to roll the bread as is, but that leads to cracks and leaking filling. If you flatten the bread first, you're essentially rearranging the structure of the slice, making it more pliable and less likely to snap.
It's a simple trick that makes the difference between a messy pile of toast and a neat, professional looking roll.
Since we're keeping things budget friendly, we're using standard white sandwich bread. You don't need a sourdough or a challah here because the custard and the cinnamon sugar coating do all the heavy lifting.
This recipe is designed to be fast, meaning you can go from craving to eating in exactly 20 minutes. It's the kind of meal that makes you feel like you've put in way more effort than you actually did.
But what about the sogginess? That's the biggest fear with any French toast. We avoid that by using a very quick dip and a over high heat sear. If you leave the bread in the egg mixture too long, it turns into a sponge.
But if you hit it for just a second or two and then drop it into a shimmering pan of butter, you get that mahogany crust that protects the soft center.
How It Actually Works
I've always wondered why some French toast feels like a wet cake while others have that distinct crunch. After a few "learning experiences" (read: burnt pans), I figured out the mechanics of this specific dish.
- Texture Shift: Using a rolling pin breaks down the air pockets in the bread, creating a denser surface that rolls tighter and prevents the filling from leaking.
- The Custard Seal: A quick dip creates a thin protein film around the roll, which fries quickly to lock the filling inside.
- Sugar Crystallization: Tossing the rolls in sugar while they're still hot allows the granules to adhere and slightly melt, creating a thin, shatter like crust.
- Seam Searing: Frying the rolls seam side down first uses the heat to "glue" the edge of the bread to itself, so they don't unravel in the pan.
Before you start, you might be wondering if the stovetop is the only way. While I prefer the pan for that immediate sizzle, some people like the oven. Here is how they stack up.
| Method | Time | Texture | Best For |
|---|---|---|---|
| Stovetop | 10 mins | Shatter crisp edges | Small batches, maximum crunch |
| Oven | 15 mins | Evenly golden | Large crowds, hands off cooking |
Ingredient Breakdown
When you're cooking on a budget, you have to make every ingredient work double duty. Here's why we use these specific items.
| Ingredient | Science Role | Pro Secret |
|---|---|---|
| White Bread | Structural Base | Use slightly stale bread for a firmer roll |
| Eggs | Protein Binder | Room temperature eggs whisk smoother |
| Whole Milk | Moisture/Fat | Adds the velvety interior texture |
| Brown Sugar | Caramelizer | Provides a deeper, molasses flavor than white sugar |
Essential Minimal Tools
You don't need a kitchen full of gadgets for this. I've made these using the bare minimum. All you really need is a non stick skillet and a rolling pin. If you don't have a rolling pin, a clean wine bottle or a heavy drinking glass works just as well. The goal is just to flatten that bread.
I highly recommend a medium mixing bowl for the custard and a small bowl for the cinnamon sugar. If you're really trying to save on cleanup, you can use the same bowl for the sugar once you've fried the rolls, just give it a quick rinse. Keeping tools minimal means you spend more time eating and less time scrubbing.
Chef Note: If your non stick pan is looking a bit worn, add an extra teaspoon of butter. We want the rolls to slide, not stick, otherwise you'll tear the delicate crust.
From Prep to Plate

Let's crack on with the assembly. Remember, speed is key once the rolls hit the custard.
Step 1: Constructing the Rolls
Trim the crusts off each slice of bread. Use your rolling pin to flatten the bread until it is thin and uniform. Mix 2 tbsp softened butter, 2 tbsp light brown sugar, and 1/2 tsp cinnamon. Spread the mixture evenly across the surface of each flattened bread slice and roll tightly from one side to the other.
Step 2: The Golden Dip
In a medium mixing bowl, whisk together 2 large eggs, 1/4 cup whole milk, 1 tsp vanilla extract, and 1/4 tsp cinnamon. Quickly dip each roll up into the custard mixture for no more than 2 seconds per side. Note: Dipping too long makes the bread tear.
Step 3: Searing to Perfection
Melt 1 tbsp butter in a large non stick skillet over medium heat. Place rolls seam side down first to lock them in place and fry for 2-3 minutes per side until mahogany colored and sizzling.
Step 4: The Final Crunch
Combine 2 tbsp granulated sugar and 1 tsp cinnamon in a small bowl. Immediately toss the hot rolls in the mixture until evenly coated. The heat from the bread will help the sugar stick.
| Original Ingredient | Substitute | Why It Works |
|---|---|---|
| White Bread | Brioche | Richer flavor. Note: Higher fat means it browns faster |
| Whole Milk | Almond Milk | Similar liquid consistency. Note: Lacks the creamy richness of dairy |
| Brown Sugar | Maple Syrup | Same sweetness. Note: Makes the filling wetter and harder to roll |
For a similar vibe with a different texture, you might enjoy my Homemade Cinnamon Rolls, though those take a bit more time and patience.
Common Fixes
Even with a simple recipe, things can go sideways. Usually, it's a matter of heat management or timing.
Troubleshooting Common Issues
| Issue | Solution |
|---|---|
| Why Your Rolls Unroll | If your rolls are popping open in the pan, it's usually because the seam wasn't placed down first. The heat needs to "set" that edge immediately. Also, make sure you're rolling them tightly; if there' |
| Why the Bread is Soggy | Sogginess comes from over dipping. According to Serious Eats, the amount of liquid absorbed by the bread determines the final texture. If you soak them, they steam from |
| Why the Sugar Burnt | If your cinnamon sugar coating turns black or bitter, your pan was likely too hot when you started, or you left them in the pan too long after they were done. Toss them in the sugar in a separate bowl |
Quick Checklist for Success:
- ✓ Bread is flattened completely thin
- ✓ Rolls are placed seam side down first
- ✓ Dip time is strictly under 3 seconds
- ✓ Butter is shimmering before adding rolls
- ✓ Sugar toss happens while rolls are piping hot
Creative Flavor Twists
Once you've got the basics down, you can play with the fillings. I've found that a small amount of cream cheese mixed into the butter and brown sugar creates a "cheesecake" center that's absolutely killer. Just don't overfill them, or they'll burst.
If you're feeling fancy, you can add a thin slice of banana inside the roll. This pairs naturally with the cinnamon and gives the dish a bit more substance. For those who want to skip the stovetop, these work great in an air fryer at 350°C for about 5-7 minutes, though you lose a bit of that butter fried flavor.
If you love the combo of fruit and cinnamon, you might also like my Bread Recipe with Walnuts, which uses similar warm spices.
Decision Shortcut:
- If you want a creamy center, add 1 tbsp cream cheese to the filling.
- If you want more crunch, double coat the sugar at the end.
- If you're in a rush, use a wide skillet to fry all rolls at once.
Storage And Freshness
These are best eaten fresh, but if you have leftovers, you can keep them in an airtight container in the fridge for up to 3 days. To reheat, avoid the microwave if you can, as it makes the bread rubbery. Instead, pop them back in a dry skillet over medium heat for 2 minutes per side.
This brings back that shatter crisp exterior.
You can also freeze these! Just freeze them on a baking sheet first so they don't stick together, then toss them in a freezer bag for up to 1 month. Reheat them in a toaster oven or air fryer.
For zero waste, don't throw away those bread crusts you trimmed off. Toss them in a bit of melted butter and cinnamon sugar and bake them at 180°C for 5 minutes to make "cinnamon croutons" for your yogurt or cereal.
Serving Ideas
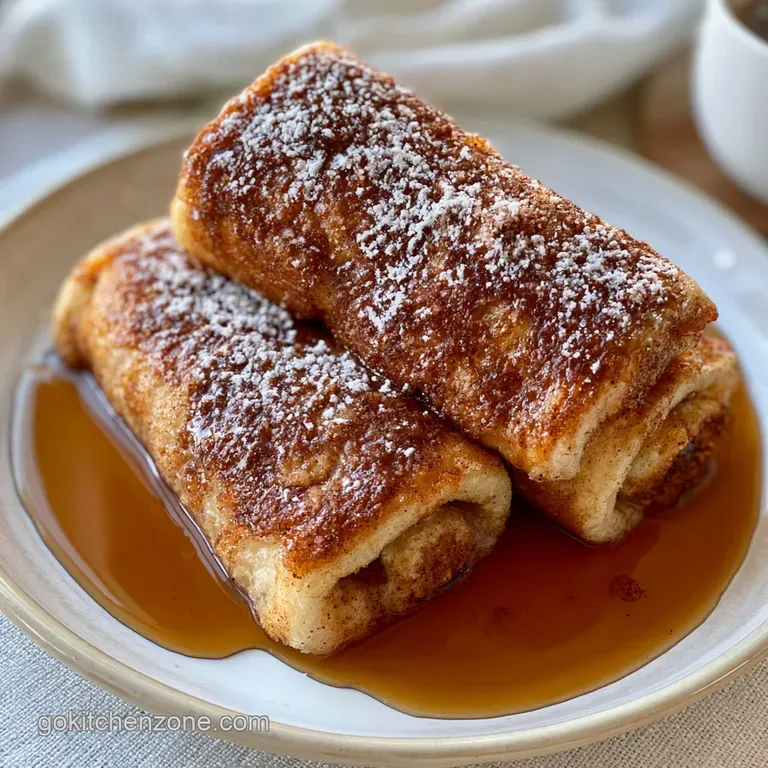
I usually keep it simple with a drizzle of maple syrup or a dusting of powdered sugar. But if you're serving these for a brunch, a side of fresh berries or sliced peaches cuts through the richness of the butter and sugar.
If you want to turn this into a full meal, pair it with some crispy bacon or a couple of poached eggs. The saltiness of the meat balances out the sugar french toast roll ups perfectly. It's a budget friendly way to make a plate look like it cost twenty dollars at a cafe.
Right then, that's it! Now you've got a way to turn a few cheap pantry staples into something that tastes like a treat. Just remember: flatten the bread, dip quickly, and sear that seam. Enjoy!
Recipe FAQs
How to prevent the roll ups from unrolling in the pan?
Place the rolls seam side down first. This allows the heat to set the edge immediately and lock the roll in place.
Why is the bread turning out soggy?
You are over dipping the bread. Dip each roll for no more than 2 seconds per side to prevent the custard from soaking in too deeply.
Can I freeze these roll ups?
Yes, you can. Freeze them on a baking sheet first so they don't stick together, then transfer them to a freezer bag for up to 1 month.
How to reheat leftovers to keep them crisp?
Heat them in a dry skillet over medium heat. Toast for 2 minutes per side to restore the shatter crisp exterior, as microwaves make the bread rubbery.
Is it true I should soak the bread in custard for several minutes?
No, this is a common misconception. Soaking causes the bread to steam and become mushy; a quick dip is essential for the correct texture.
How to achieve a mahogany color on the rolls?
Fry in melted butter over medium heat. Cook for 2-3 minutes per side until the sugars caramelize into a deep golden brown.
Can I use a different type of bread for this recipe?
Stick with white sandwich bread. Its soft structure is ideal for flattening; if you enjoyed working with doughs like our soft flatbread, you'll appreciate how crucial elasticity is for these rolls.
French Toast Roll Ups

