No Bake Oreo Yum Yum: Silky and Cool

- Time: Active 20 minutes, Passive 240 minutes, Total 260 minutes
- Flavor/Texture Hook: Shattering chocolate crust with a silky, cool cream center
- Perfect for: High energy potlucks or stress free summer hosting
- Reasons You Will Crave This No Bake Oreo Yum Yum
- The Secret Mechanics of Chilled Desserts
- Component Deep Dive and Analysis
- Essential Shopping List and Alternatives
- Kitchen Tools for Oreo Success
- Step by Step Masterclass Instructions
- Perfecting the Set and Slice
- Adjusting for Any Crowd Size
- Culinary Facts and Fiction
- Smart Storage and Sustainability
- Best Presentation and Serving Ideas
- Recipe FAQs
- 📝 Recipe Card
Reasons You Will Crave This No Bake Oreo Yum Yum
Imagine the sound of a food processor whirring, transforming brittle dark cookies into a fine, aromatic dust that smells like pure cocoa. That's the start of this journey. The first time I put this together, I was honestly surprised at how the simple act of folding light, airy topping into dense cream cheese created something that felt so fancy.
When you press that buttery crust into the pan, it looks like dark, wet soil, but it tastes like a dream. It's the kind of dish that disappears from the table before you've even had a chance to set your own fork down.
We've all been there where a dessert looks great but feels like a brick in your stomach. This one is different. It’s light, it’s refreshing, and it has that perfect crunch to cream ratio that keeps you coming back for "just one more sliver." There’s no hovering over a hot stove or worrying about a cheesecake cracking in the middle.
You just mix, spread, and let the refrigerator do the heavy lifting. It's a feel good classic that turns a few pantry staples into a vibrant, colorful center piece.
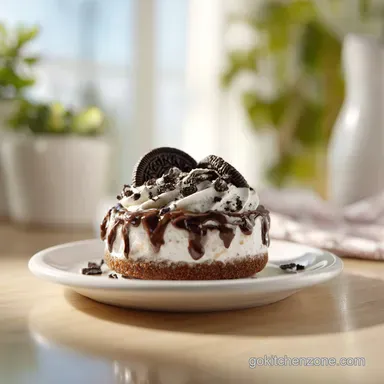
Right then, let's talk about that moment when you pull it out of the fridge. The chocolate sauce has slightly set, the chopped cookies on top are still crisp, and the white filling is pristine. It’s a fusion of childhood nostalgia and grown up indulgence.
You don't need to be a professional pastry chef to get these results. I've made the mistakes, like not softening the cream cheese enough (lumps are the enemy!), so you don't have to. We're going for a silky, crave worthy finish every single time.
The Secret Mechanics of Chilled Desserts
Understanding what happens inside the bowl helps you avoid a runny mess. Here is why the textures behave the way they do in this recipe:
- Structural Integrity: The high fat content in the cream cheese acts as a stabilizer once chilled, allowing the dessert to hold its shape without gelatin.
- Cold Binding: Melted butter seeps into the cookie crumbs and then solidifies in the freezer, creating a "glue" that prevents the crust from crumbling when sliced.
- Aeration Preservation: Folding the whipped topping gently keeps the air bubbles intact, which is what gives the filling its signature cloud like lift.
- Sugar Hydration: Sifting the powdered sugar ensures it dissolves instantly into the moisture of the cheese, preventing a grainy or sandy mouthfeel.
| Servings | Oreo Cookies (Crust) | Cream Cheese | Pan Size |
|---|---|---|---|
| 6 People | 18 Cookies | 8 oz | 8x8 inch square |
| 12 People | 36 Cookies | 16 oz | 9x13 inch rectangle |
| 24 People | 72 Cookies | 32 oz | Two 9x13 pans |
This table helps you scale the recipe for anything from a quiet family night to a massive neighborhood block party. Using the right pan size is crucial because it dictates the thickness of your layers.
If you try to put the 12 person quantities into a smaller pan, the crust will be too thick to bite through comfortably, and the filling might overflow.
Component Deep Dive and Analysis
Choosing the right elements is the difference between a "good" dessert and a "crave worthy" one. We aren't just throwing things in a bowl; we are building layers of flavor.
| Component | Role in Dish | Pro Secret |
|---|---|---|
| Cream Cheese | Provides the tangy, structural base for the velvety filling. | Always use full fat bricks for the best set and richest flavor. |
| Oreo Cookies | Functions as both the structural floor and the crunchy garnish. | Pulse until they look like coarse sand for a tighter, less crumbly base. |
| Whipped Topping | Injects air and lightens the dense cheese mixture. | Thaw it completely in the fridge before folding to avoid icy pockets. |
This combination is what creates the "yum yum" factor. The saltiness of the butter in the crust cuts through the sugar, while the vanilla extract adds a floral note that makes the chocolate pop. If you've ever enjoyed a creamy rice pudding recipe, you'll recognize that same satisfying, mouth coating richness here, just in a much more chocolate forward format.
Essential Shopping List and Alternatives
Before you head to the store, check your pantry for these essentials. I always recommend getting the best quality vanilla you can find because it really carries the aroma of the white layer.
- 36 Oreo Cookies (approx. 400g): These are for the crust.
- Substitute: Chocolate graham crackers. Why this? Offers a similar dark cocoa flavor with a slightly lighter crunch.
- 6 tbsp Unsalted Butter (85g): Melted to bind the crust.
- Substitute: Salted butter. Why this? Adds a savory kick; just omit the extra pinch of salt.
- 1 pinch Flaky Sea Salt: Enhances the chocolate notes.
- Substitute: Table salt. Why this? Distributes more evenly, though you lose the occasional salt crunch.
- 16 oz Cream Cheese (450g): Softened to room temperature.
- Substitute: Neufchâtel cheese. Why this? Lower fat content but still provides the necessary tang and structure.
- 1 cup Powdered Sugar (120g): Sifted for smoothness.
- Substitute: Granulated sugar (processed in a blender). Why this? Mimics the fine texture if you've run out of the powdered stuff.
- 1 tsp Vanilla Extract: For that classic dessert aroma.
- Substitute: Vanilla bean paste. Why this? Adds beautiful black flecks and a more intense, floral fragrance.
- 12 oz Whipped Topping (340g): The fluff factor.
- Substitute: Stabilized whipped cream. Why this? Offers a more natural dairy flavor with a similar airy texture.
- 7 Oreo Cookies (approx. 80g): Roughly chopped for garnish.
- Substitute: Mini chocolate chips. Why this? Provides a different style of crunch and keeps the garnish uniform.
- 2 tbsp Chocolate Sauce: For the final drizzle.
- Substitute: Melted dark chocolate. Why this? Sets firmer and provides a more bitter contrast to the sweet filling.
Kitchen Tools for Oreo Success
You don't need a kitchen full of gadgets, but a few specific tools make the process much smoother and the results more professional.
- Food Processor: This is the fastest way to get that coarse sand texture for the crust. If you don't have one, a heavy rolling pin and a sealed freezer bag work for a bit of a workout.
- Electric Hand Mixer: Essential for getting the cream cheese completely smooth. Trying to do this by hand usually results in tiny lumps that never truly disappear.
- Offset Spatula: This is my favorite tool for spreading the filling. It allows you to get perfectly flat layers without your knuckles dipping into the cream.
- 9x13 Inch Baking Dish: Glass or ceramic works best here. A glass dish lets you see those beautiful black and white layers from the side.
- Fine Mesh Sieve: Don't skip sifting the powdered sugar. Even small clumps can ruin the velvety feel of the yum yum.
step-by-step Masterclass Instructions

Follow these steps exactly to ensure your dessert sets properly and looks as good as it tastes. Pay close attention to the sensory cues!
1. Build the Foundation
Pulse 36 cookies in a food processor until they reach the consistency of coarse sand. Mix these crumbs with the melted butter and sea salt in a medium bowl. The mixture should look and feel like wet soil, holding together when you pinch it between your fingers.
2. Form the Crust
Firmly press the cookie mixture into the bottom of a 9x13 inch baking dish. Note: Use the bottom of a flat measuring cup to get an even, compacted surface. Freeze this for 10 minutes to set while you prepare the next layer.
3. Cream the Base
In a large bowl, beat the 16 oz of softened cream cheese with an electric mixer for 3 minutes. You are looking for a completely smooth, glossy appearance with no visible lumps.
4. Sweeten and Scents
Sift in 1 cup of powdered sugar and add the 1 tsp of vanilla extract. Beat the mixture again until it becomes light and fluffy. You should smell the sweet, floral vanilla cutting through the tang of the cheese.
5. Aerate the Filling
Gently fold the 12 oz of whipped topping into the cream cheese mixture using a rubber spatula. Do this slowly until no white streaks remain. Avoid over mixing, or you will lose the air that makes it feel like a cloud.
6. Layer the Cream
Spread the filling evenly over the chilled crust. Use your offset spatula to smooth the top from edge to edge, creating a flat, professional looking surface.
7. Add Texture
Top the filling with the 7 roughly chopped cookies. I like to leave some bigger chunks for a dramatic look. Drizzle the 2 tbsp of chocolate sauce in a zig zag pattern over the top.
8. The Patience Phase
Refrigerate the dish for at least 4 hours. Note: This time is non negotiable as it allows the fats to stabilize for clean slicing.
9. Final Check
After 4 hours, the center should feel firm to a light touch and shouldn't jiggle when you gently shake the pan.
Perfecting the Set and Slice
Even the simplest recipes can have a few hurdles. Here is how to handle the most common issues that might pop up during your prep.
Why Your Center Stays Soft
If your filling seems more like a pudding than a sliceable cake, the culprit is usually temperature. If the cream cheese was too warm or the whipped topping was still slightly frozen when folded, the structure breaks down. Also, check your fridge temperature; it needs to be consistently cold to set the fats properly.
| Problem | Root Cause | Solution |
|---|---|---|
| Crumbly Base | Not enough butter or pressure | Press harder with a flat cup; add 1 tbsp extra butter next time. |
| Lumpy Filling | Cold cream cheese | Ensure cheese is room temp (leave out for 2 hours) before beating. |
| Soupy Texture | Over mixing the topping | Use a "cut and fold" motion with a spatula, never use the mixer for this step. |
Sometimes you need a quick fix in the kitchen, much like when you need a brown gravy recipe to save a dry roast. If your yum yum is too soft to slice after 4 hours, pop it in the freezer for 30 minutes. This will firm up the edges and make it much easier to get clean squares.
Common Mistakes Checklist
- ✓ Soften cream cheese for at least 2 hours before starting (prevents lumps).
- ✓ Sift the powdered sugar to ensure a velvety, smooth mouthfeel.
- ✓ Don't skip the 10 minute freezer set for the crust (prevents the layers from mixing).
- ✓ Use a hot knife (dipped in warm water and wiped dry) for the cleanest slices.
- ✓ Keep the dessert refrigerated until the very moment of serving.
Adjusting for Any Crowd Size
Scaling this recipe is straightforward, but you have to keep an eye on the ratios. Because this is a no bake dish, you don't have to worry about the complex leavening chemistry of a cake, but the "set" is still vital.
If you are cutting the recipe in half, use an 8x8 inch square pan. This keeps the height of the layers consistent. For a half batch, you can use one whole egg's worth of liquid if a recipe called for it, but here, simply halving the weights works perfectly.
When doubling for a big party, it’s actually better to make two separate 9x13 pans rather than one giant deep dish. A deeper dish will take much longer to set in the middle, and you risk the edges getting too hard before the center is ready.
When scaling up, you can be a bit more conservative with the vanilla and salt. Use about 1.5x the amount of spices for a 2x batch to keep the flavors balanced without becoming overwhelming. The chocolate sauce drizzle can also be scaled visually just cover the top until it looks beautiful!
Culinary Facts and Fiction
Let's clear up some common misconceptions about no bake desserts and cookie based treats.
One big myth is that you can substitute cream cheese spread (the kind in the tub) for the brick style cream cheese. This is a mistake! The tub version has more air and moisture whipped into it, which means your yum yum will never fully set and will likely stay "soupy." Always stick to the blocks for structural integrity.
Another myth is that "no bake" means "instant." While you save time on the oven, the refrigeration phase is actually part of the "cooking" process. It's during those 4 hours that the sugar fully hydrates and the fats realign into a solid structure.
If you cut it too early, you aren't getting the intended experience.
| Method | Total Time | Texture | Best For |
|---|---|---|---|
| Classic Fridge Set | 4 hours 20 mins | Velvety and soft | Traditional texture lovers |
| Quick Freezer Set | 1 hour 30 mins | Firm and ice cream like | Hot summer days |
| Overnight Rest | 12 hours | Dense and developed | Making ahead for parties |
Smart Storage and Sustainability
Keeping your no bake oreo yum yum fresh is all about preventing it from absorbing other "fridge smells." Because of the high fat content in the cream cheese and butter, it will pick up the scent of onions or leftovers very quickly if not sealed.
Storage GuidelinesFridge: Keep it in an airtight container for up to 5 days. The crust will slowly soften over time as it absorbs moisture from the filling, so it's best enjoyed within the first 48 hours for maximum crunch.
Freezer: This dessert freezes beautifully. Wrap the entire dish (or individual slices) in plastic wrap and then foil. It will stay fresh for up to 2 months. Eat it slightly thawed for a texture that mimics a high end ice cream cake.
Zero Waste Tips If you find yourself with leftover Oreo crumbs that didn't make it into the crust, don't throw them away! Save them in a jar to sprinkle over morning yogurt or blend them into a milkshake.
If the dessert gets a little too soft at the end of a party, scoop the leftovers into small glasses, top with extra whipped cream, and serve them as "Oreo parfaits" the next day. Even the chocolate sauce bottle can be rinsed with a little warm milk to create a quick hot cocoa so nothing goes to waste.
Best Presentation and Serving Ideas
When it's time to serve, think about color and contrast. This is a very dark and white dessert, so a pop of color can make it look even more vibrant.
- Fresh Berries: A few raspberries or halved strawberries on the side add a bright acidity that cuts through the rich cream.
- Mint Garnish: A single sprig of fresh mint provides a refreshing aroma and a beautiful green contrast to the chocolate.
- Glassware Matters: If you want to be extra fancy, you can assemble individual "yum yums" in wine glasses or mason jars. It makes the portioning easier and looks stunning on a dessert table.
If you want a cleaner look, do these three things: Wipe your knife clean between every single cut. Ensure the chocolate drizzle is done from a height to get thin, elegant lines. Add the chopped cookie garnish after the chill time so they stay as crunchy as possible.
This dish is all about the joy of sharing. Whether it's a birthday, a holiday, or just a Tuesday that needs a little extra sparkle, this Oreo creation always delivers. It’s fusion food at its most fun taking a world famous cookie and turning it into a silky, decadent masterpiece that feels good to eat and even better to share.
Enjoy the process, and don't forget to lick the spatula that’s the best part!

Recipe FAQs
Is it true I can use a stand mixer to process the cookies?
No, this is a common misconception. A food processor is necessary to break the cookies down into the fine, uniform consistency of coarse sand required for a stable crust.
How to ensure the cream cheese filling is perfectly smooth?
Beat the softened cream cheese with an electric mixer for exactly 3 minutes. If you enjoyed mastering this creamy texture here, see how we apply the same principles to our Easy Cheesecake Cups for a similar result.
Should I use cold cream cheese to speed up the process?
No, never use cold cream cheese. Softening the cheese to room temperature is essential for achieving a lump free, fluffy texture when combined with powdered sugar.
How to prevent the dessert from falling apart when slicing?
Refrigerate the dessert for the full 4 hours before serving. This chilling time allows the structure to firm up, ensuring clean, sharp squares when you cut into it.
Is it possible to skip the 10-minute freezer step for the crust?
No, do not skip this step. Freezing the crust after pressing it into the dish ensures it is firm enough to support the filling without crumbling.
How to properly incorporate the whipped topping?
Gently fold the topping into the cream cheese mixture using a rubber spatula. This technique maintains the aeration you created in the previous steps and prevents the filling from becoming dense.
Can I use a larger pan if I want thinner squares?
No, stick to the 9x13 inch baking dish. Using a different pan size alters the crust-to-filling ratio and prevents the layers from setting to the correct thickness.
No Bake Oreo Yum Yum
Ingredients:
Instructions:
Nutrition Facts:
| Calories | 496 kcal |
|---|---|
| Protein | 4.2 g |
| Fat | 31.8 g |
| Carbs | 49.9 g |
| Fiber | 0.8 g |
| Sugar | 33.6 g |
| Sodium | 321 mg |
