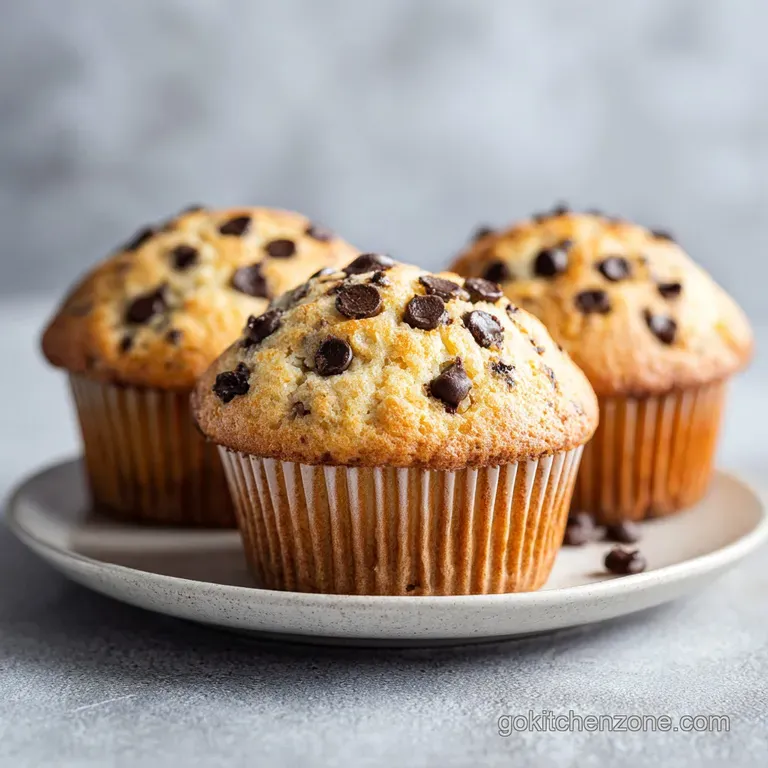
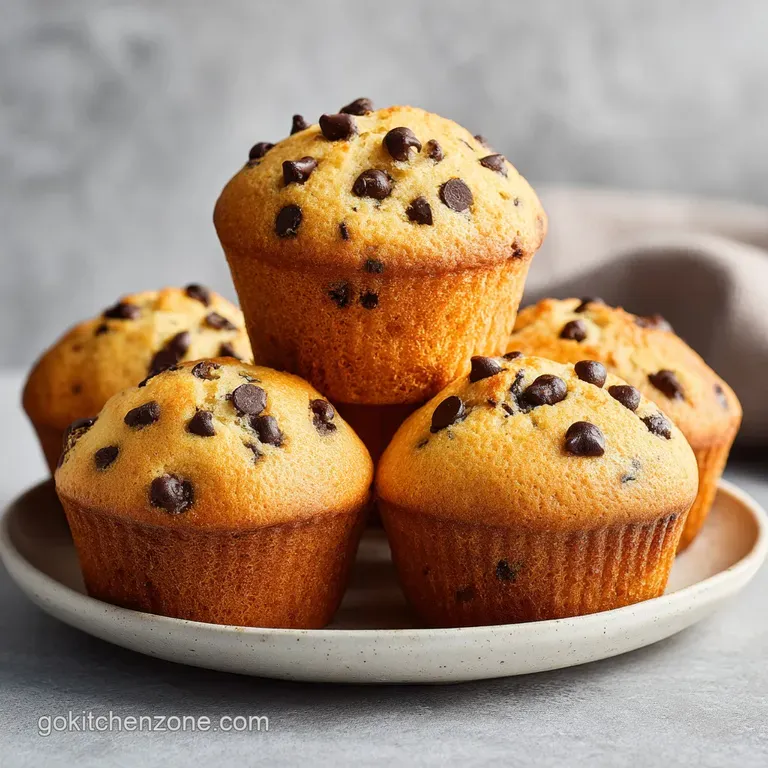
Bakery Style Chocolate Chip Muffins
- Time: Active 15 minutes, Passive 20 minutes, Total 35 minutes
- Flavor/Texture Hook: Golden, shatter crisp tops with a dense, buttery crumb and molten chocolate centers.
- Perfect for: Busy mornings, budget-friendly meal prep, or a quick weekend treat.
- The Secret Behind the Texture
- Quick Reference Cooking Specs
- Selecting Your Pantry Essentials
- The Simple Kitchen Toolkit
- Mastering the Two Stage Bake
- Fixing Common Baking Mistakes
- Swaps for Every Budget
- Storing Your Baked Goods
- Perfect Pairings and Snacks
- Muffin Myths and Truths
- Recipe FAQs
- 📝 Recipe Card
Forget everything you have been told about needing a fancy stand mixer or expensive specialty pastry flour to get those massive, puffy tops you see at high end cafes. I used to think that the secret lived in some industrial sized oven or a $500 appliance, but honestly, those expensive tools often lead to overmixing, which turns a potentially tender muffin into a rubbery hockey puck.
The real trick is actually much cheaper and way faster: it’s all about thermal shock and a simple bowl and whisk.
We are going to bust the myth that you need to be a professional pastry chef to master these. You don't need to spend 2 hours in the kitchen, and you definitely don't need to break the bank on "premium" ingredients.
We’re going to use basic pantry staples and one specific temperature hack that makes the batter jump in the oven, creating that iconic muffin top without any extra effort.
You’ll get that classic aroma of toasted vanilla and melting bittersweet chocolate wafting through your house in about 35 minutes total. It’s the kind of smell that brings everyone into the kitchen before the timer even goes off.
We’re aiming for a texture that is velvety on the tongue but provides a slight "shatter" when you bite into the golden brown crust on top. Let's get into how we make that happen with minimal tools and a very small budget.
The Secret Behind the Texture
The reason this recipe works so well isn't just luck: it's about the way we manage moisture and heat. By using a combination of melted butter and full fat Greek yogurt, we create a fat rich environment that prevents the flour from developing too much gluten, which is the main culprit behind tough muffins.
- Thermal Shock: Starting at 425°F (218°C) causes a rapid expansion of gases from the baking powder and soda, forcing the batter upward instantly before the crust sets.
- Acid Base Reaction: The lactic acid in the Greek yogurt reacts immediately with the baking soda, creating tiny air bubbles that result in a lighter, more velvety crumb.
- Starch Gelatinization: The small amount of whole milk helps the flour starches swell quickly, which locks in moisture so the muffins don't dry out while cooling.
- Fat Coating: Melted butter coats the flour proteins more effectively than softened butter, which limits gluten strands and ensures the center stays tender.
| Baking Method | Top Shape | Interior Texture | Best For |
|---|---|---|---|
| Standard 350°F | Flat or slightly domed | Uniform and soft | Cupcakes or delicate cakes |
| Two Stage (425°F to 350°F) | High, peaked dome | Dense but airy with crisp edges | Professional bakery style muffins |
| Low & Slow (325°F) | Sunken or pale | Dry and crumbly | Not recommended for this recipe |
The two stage method is a total survival hack for the home cook. It gives you that "wow" factor without needing to buy a specialized muffin tin or use a convection setting. Just remember: do not open that oven door when you drop the temp.
If you peek, you lose the pressure, and those domes will deflate faster than a popped balloon.
Quick Reference Cooking Specs
When you're trying to save time and money, you need clear targets. No one wants to guess if their breakfast is done while the kids are screaming or you're trying to start your workday. These specs are the "goldilocks" zone for this specific batter weight.
Precision Checkpoints
- Batter Weight: Each muffin cup should be filled to the very brim (roughly 75-80g of batter) to ensure they have enough mass to climb high.
- Internal Temp: If you have a probe thermometer, look for 200°F (93°C) in the center of the muffin for the perfect balance of moisture and structure.
- The 5 Minute Rule: The first 5 minutes at high heat are the most critical. This is when the "lift" happens. Set a separate timer just for this stage.
| Component | Component Role | Pro Secret |
|---|---|---|
| Greek Yogurt | Moisture and acidity | Use full fat for the most velvety mouthfeel. |
| Melted Butter | Richness and fat | Cool it slightly so it doesn't scramble the eggs. |
| All Purpose Flour | Structural framework | Weigh it (250g) to avoid the "dry muffin" trap. |
| Bittersweet Chips | Flavor and texture | Toss in a pinch of flour to prevent them from sinking. |
Using Greek yogurt is a budget friendly way to add both fat and acid without needing to buy expensive buttermilk that you’ll only use half of. If you've ever wondered why cafe muffins are so much more satisfying than store-bought ones, it's usually because they aren't afraid of fat. In this case, the 115g of butter and 180g of yogurt do the heavy lifting. If you prefer a flatter, crispier snack, these chocolate chip cookies use a similar fat to sugar logic but with much less hydration.
Selecting Your Pantry Essentials
For these Chocolate Chip Muffins, we are looking for high impact, low cost ingredients. You don't need "artisanal" salt or "organic" sugar to make these taste like a million bucks. You just need to know how the basics interact with each other.
- 250g All purpose flour: Standard plain flour is perfect here. Why this? Provides enough protein for structure without being too "bready" like bread flour.
- 100g Coconut sugar (or light brown): Why this? Adds a hint of caramel flavor and keeps the crumb moist.
- 2 tsp Baking powder & 0.5 tsp Baking soda: Why this? The double lift ensures the domes stay high after they rise.
- 0.5 tsp Fine sea salt: Why this? Cuts through the sugar to make the chocolate flavor "pop".
- 180g Plain full fat Greek yogurt: Why this? Provides the thick consistency needed for a tall standing batter.
- 115g Unsalted butter (melted): Why this? Liquid fat ensures a more tender bite than creamed butter.
- 2 Large eggs (room temp): Why this? They emulsify better into the fats when they aren't cold from the fridge.
- 1 tbsp Pure vanilla extract: Why this? A high dose of vanilla mimics that "bakery" scent perfectly.
- 60ml Whole milk: Why this? Thins the batter just enough to make it pourable but still thick.
- 175g Bittersweet chocolate chips: Why this? 60% cacao provides a sophisticated bitterness against the sweet batter.
Chef Tip: If your eggs are cold, put them in a bowl of warm water for 5 minutes. Cold eggs will cause your melted butter to seize up into little clumps, which ruins the velvety texture of the batter.
| Original Ingredient | Substitute | Why It Works |
|---|---|---|
| Greek Yogurt (180g) | Sour Cream (180g) | Similar acidity and fat. Note: Result will be slightly richer. |
| Coconut Sugar | White Sugar + 1 tsp Molasses | Mimics the depth and moisture of unrefined sugar. |
| Whole Milk | Soy or Oat Milk | Similar hydration level. Note: Avoid watery nut milks. |
The Simple Kitchen Toolkit
One of the best things about this recipe is that you can survive without a cupboard full of gadgets. I actually prefer making these with minimal tools because it forces you to be gentle with the batter. Over handling is the enemy of the muffin.
You’ll need one large bowl for the dry stuff and one medium bowl for the wet ingredients. A simple whisk is great for the dry ingredients to get the clumps out, but for the actual mixing, grab a silicone spatula or a big wooden spoon.
If you use a whisk for the final mix, you’ll end up with batter stuck inside the wires and probably overwork the gluten in the process.
The only "non negotiable" is a standard 12 cup muffin tin. You can use paper liners or just grease the heck out of the tin with extra butter. If you're on a budget, greasing the tin works fine, but liners make cleanup a breeze and help the muffins stay moist while they sit on the counter.
Mastering the Two Stage Bake
This is where the magic happens. We aren't just "cooking" these; we are engineered a specific rise. Follow these steps exactly, and don't try to take shortcuts with the temperature.
- Preheat to 425°F (218°C). Line your 12 cup tin.
- Whisk wet: Combine melted butter, yogurt, eggs, milk, and vanilla in the smaller bowl. Make sure it’s smooth and pale yellow.
- Sift dry: In the large bowl, combine flour, sugar, baking powder, soda, and salt. Whisk vigorously to distribute the leavening.
- The Merge: Pour wet into dry.
- Fold gently: Use a spatula to fold. Stop when a few streaks of flour remain.Note: This prevents toughness.
- Prep chips: Toss 175g chocolate chips with a pinch of flour.
- Final fold: Mix in chips with just 2-3 final strokes.
- Fill high: Fill liners to the very top. They should look overfilled.
- Initial Blast: Bake at 425°F for 5 minutes until the tops are starting to peak.
- The Drop: Turn oven down to 350°F (177°C). Bake 13-15 minutes more until a toothpick is clean.
- Cool down: Rest in the tin for 5 minutes, then move to a rack to prevent soggy bottoms.
High Domes and Shatter Crusts
The reason we fill the liners to the very top is that the thick batter has enough structure to hold itself up as it rises. If you only fill them halfway, they’ll never reach that glorious "mushroom" shape.
The sugar on the surface caramelizes quickly at 425°F, creating that slightly crunchy, shatter like crust that everyone fights over.
Ensuring a Velvety Crumb
The "stop when streaks remain" rule is the most important part of the process. If your batter is perfectly smooth and glossy before you add the chips, you have already overmixed it. You want a lumpy, ugly batter.
Those lumps disappear in the oven, leaving behind a crumb that is tender and soft rather than chewy and bread like.
Even Chocolate Distribution
Have you ever bitten into a muffin only to find all the chocolate huddled at the bottom? It's a tragedy. Tossing the chips in a teaspoon of flour creates a rough surface that allows them to "grip" the batter. This keeps them suspended in the middle of the muffin rather than sinking through the liquid as it heats up.
Fixing Common Baking Mistakes
Even the best of us have bad days in the kitchen. Usually, if something goes wrong with these, it's a simple fix for the next batch. Don't throw them out! Even a "failed" muffin is usually great when toasted with a bit of butter.
Why Your Muffins Stayed Flat
If your domes didn't rise, one of two things happened: your baking powder is old, or your oven wasn't hot enough. Baking powder loses its "oomph" after about six months. To test it, drop a half teaspoon into some hot water. If it doesn't fizz aggressively, it's dead.
Also, make sure you actually waited for the oven to hit 425°F before putting the tray in. A "cold start" will result in flat, dense cakes.
Solving Soggy Bottom Issues
If the bottoms of your muffins feel wet or greasy, it’s usually because they sat in the metal tin for too long after coming out of the oven. The metal holds heat and creates steam, which then gets trapped between the muffin and the liner.
| Problem | Root Cause | Solution |
|---|---|---|
| Tough/Rubbery | Overmixed batter | Fold by hand only until "just" combined. |
| Dry/Crumbly | Too much flour | Spoon flour into the measuring cup; don't pack it. |
| Burned Bottoms | Thin baking sheet | Place the muffin tin on a larger cookie sheet for insulation. |
Common Mistakes Checklist
- ✓ Check your leavening: Ensure baking powder and soda are less than 6 months old.
- ✓ Don't overmix: Lumpy batter is your friend; stop before it looks "perfect."
- ✓ Room temp eggs: Prevents the fat from seizing and ensures a smooth emulsion.
- ✓ Fill to the brim: Don't be afraid to overfill the cups for those high domes.
- ✓ No peeking: Keep the oven door closed when you lower the temperature.
Swaps for Every Budget
I’m a huge fan of "pantry raiding." You don't always have a perfectly stocked fridge, and you shouldn't have to run to the store for one item. If you're out of Greek yogurt, sour cream is an amazing substitute.
If you're out of butter, you can use oil, though you’ll lose that specific "buttery" flavor.
| Premium Option | Budget Alternative | Flavor Impact | Savings |
|---|---|---|---|
| Pure Vanilla Bean | Vanilla Extract | Minor (mostly visual) | $15+ |
| 70% Cacao Chunks | Semi sweet Chips | Sweeter, less "dark" | $3-5 |
| Grass fed Butter | Standard Store Brand | Slightly less rich | $2-4 |
Wholesome Fiber Boost
If you want to feel a bit better about eating these for breakfast, you can swap 100g of the all purpose flour for whole wheat flour. Just be aware that whole wheat absorbs more moisture, so you might need an extra tablespoon of milk to keep the batter from becoming a dry paste.
dairy-free Muffin Alternatives
To make these dairy-free, use a thick coconut yogurt and a neutral oil like avocado or melted coconut oil instead of butter. Use almond or oat milk for the 60ml of liquid. If you're doing this, I highly recommend adding an extra half teaspoon of vanilla to compensate for the missing butter flavor. If you're looking for a fruit forward variation, my Muffins in 35 Minutes recipe are naturally very moist and work great with dairy-free swaps.
Storing Your Baked Goods
Because of the high moisture content from the yogurt and the coconut sugar, these muffins actually stay "velvety" longer than most. However, you still need to treat them right once they cool down.
Storage: Keep them in an airtight container at room temperature for up to 3 days. Do not put them in the fridge! The refrigerator actually speeds up the staling process in bread and muffins by causing the starch molecules to recrystallize.
If you need them to last longer, the freezer is your best friend.
Freezing: These freeze beautifully. Wrap them individually in plastic wrap and stick them in a freezer bag. They’ll stay fresh for 2-3 months. To eat, just microwave for 30-45 seconds or let them thaw on the counter for an hour.
Zero Waste Tip: If you have a few muffins that have gone a bit stale (maybe you left the lid off the container), don't toss them. Slice them in half, slather them with butter, and sear them face down in a pan until they're golden and crispy.
It’s like muffin style French toast, and it is honestly a revelation. You can also crumble stale muffins over vanilla ice cream for a quick "muffin crumble" sundae.
Perfect Pairings and Snacks
These muffins are pretty rich, so they pair best with things that offer a bit of contrast. A strong, black coffee or a cold glass of milk is the classic choice for a reason. The bitterness of the coffee cuts right through the bittersweet chocolate and the buttery crumb.
The Ultimate Brunch Spread
If you’re hosting people, I love serving these alongside a big bowl of fresh berries and some salty protein like bacon or sausage. The "sweet and salty" combo is a total crowd pleaser.
You can even set out a small jar of sea salt flakes for people to sprinkle on top of their muffins it makes the chocolate taste incredibly deep and sophisticated.
Kid Friendly Afternoon Snacks
For a faster version that’s great for lunchboxes, you can use this same batter in a mini muffin tin. Just reduce the baking time to about 10-12 minutes total (still do the over high heat blast for the first 3 minutes).
They become these perfect little two bite snacks that don't crumble as much as the big ones.
If you’ve enjoyed mastering these, you might want to try something even more decadent for a special occasion. This Peanut Butter Pie uses a similar "no fuss" approach but leans into a much richer flavor profile.
Muffin Myths and Truths
We need to clear the air about a few things that people get wrong in the kitchen. Most of these "rules" are just habits passed down that don't actually help your baking.
Myth 1: You must sift your flour three times. Truth: Unless your flour is literally full of massive clumps, a vigorous whisking in the bowl is more than enough to aerate it and distribute the baking powder. Save yourself the dishes.
Myth 2: Searing the top at high heat dries out the center. Truth: It's actually the opposite. The quick "crust" formation acts as an insulator, trapping the moisture inside the muffin while the rest of the crumb cooks at a lower temperature. This is why the centers stay so velvety.
Myth 3: More chocolate is always better. Truth: There is a "saturation point" for muffin batter. If you add more than 175g-200g of chips, there won't be enough batter to hold them all together. Your muffins will fall apart when you try to peel off the liner. Balance is key to survival in the kitchen!
At the end of the day, these muffins are about giving yourself a win. They are fast, they are cheap, and they taste better than anything you can buy at a drive thru. Give them a shot, don't be afraid of the high heat, and let me know how they turn out.
There is nothing quite like that first bite of a warm muffin when the chocolate is still gooey. Enjoy!

Recipe FAQs
Why do I need to start the muffins at 425°F?
Starting at 425°F provides an immediate heat shock to the baking powder and soda. This rapid rise creates the signature high, bakery style domes before the structure sets during the lower temperature bake.
How to ensure my muffins have a velvety texture?
Fold the wet and dry ingredients just until combined, leaving a few streaks of flour visible. If you enjoyed mastering the delicate crumb structure here, see how the same principle of minimal agitation works in our scratch recipe for cinnamon rolls.
Is it true I should store these in the refrigerator to keep them fresh?
No, this is a common misconception. The refrigerator causes starch molecules to recrystallize rapidly, which actually makes your muffins go stale faster; keep them in an airtight container at room temperature instead.
How to prevent the chocolate chips from sinking to the bottom?
Toss the chocolate chips with a small pinch of flour before folding them into the batter. This coating helps the chips adhere to the batter, keeping them suspended evenly throughout the muffin rather than settling at the base.
How to tell if the muffins are fully baked?
Insert a toothpick into the center of the largest muffin. If it comes out clean or with just a few moist crumbs, your muffins are done; avoid opening the oven door before the final 13 15 minute phase to ensure the structure holds.
Is it necessary to use room temperature eggs?
Yes, using room temperature eggs is crucial for a smooth emulsion. Cold eggs can cause the melted butter to seize, resulting in a lumpy batter that won't rise as effectively in the oven.
Why did my muffins turn out dense?
Overmixing the batter is the most likely culprit. Aggressive stirring develops the gluten in the flour, turning a light, airy muffin into a heavy, rubbery one.
Bakery Style Chocolate Chip Muffins
Ingredients:
Instructions:
Nutrition Facts:
| Calories | 286 kcal |
|---|---|
| Protein | 5.5 g |
| Fat | 14.1 g |
| Carbs | 33.9 g |
| Fiber | 1.7 g |
| Sugar | 15.2 g |
| Sodium | 181 mg |
