Chicken Stuffing Casserole: Creamy and Crisp
- Time: Active 10 minutes, Passive 30 minutes, Total 40 minutes
- Flavor/Texture Hook: Velvety cream sauce meets a buttery, herb flecked crunch
- Perfect for: Busy weeknight recovery, cozy Sunday potlucks, or beginner cooks
- Master the Ultimate Golden Chicken Stuffing Casserole
- The Physics of the Crunch and Cream
- Ingredient Component Analysis
- Essential Numbers for a Successful Weeknight Bake
- Selecting the Best Components for Your Casserole
- Minimal Tools for a Low Stress Kitchen
- Building Layers of Flavor and Texture
- Solving Common Texture and Moisture Issues
- Creative Ways to Personalize Your Dinner
- Scaling the Recipe for Different Crowds
- Debunking Common Kitchen Myths
- Preserving That Freshly Baked Shatter and Silk
- Rounding Out Your One Pan Masterpiece
- HIGH in Sodium
- Recipe FAQs
- 📝 Recipe Card
Master the Ultimate Golden Chicken Stuffing Casserole
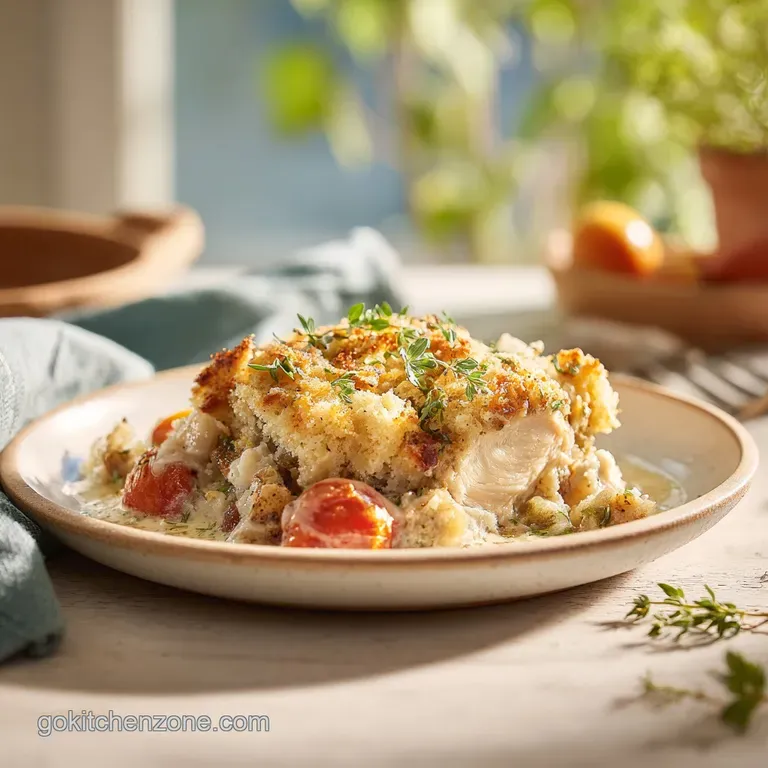
The sound of a spoon breaking through a perfectly browned stuffing crust is basically music to my ears. I remember the first time I tried making a version of this. I was rushing home from a long shift, the kind where your feet ache and your brain is absolute mush.
I didn't want a "project" meal, but I also couldn't face another bland sandwich. I threw what I had into a glass dish, and the aroma of sage and melted butter filling the kitchen was the exact hug I needed.
We've all been there where we want something that tastes like a holiday feast but only takes the effort of a boxed meal. This Chicken Stuffing Casserole is that exact middle ground.
It's the dish that made my friends stop asking "What's for dinner?" and start asking "Is there any of that stuffing stuff left?" Trust me, the way the juices from the chicken mingle with the cream of chicken soup to create a thick, savory gravy is nothing short of brilliant.
We aren't just tossing things in a pan and hoping for the best. Over the years, I've realized that the order of operations matters just as much as the ingredients themselves. If you've ever ended up with a soggy mess or dry chicken, don't worry. I've made those mistakes so you don't have to.
We are going to build layers of texture that stay distinct even after 30 minutes in the oven.
The Physics of the Crunch and Cream
The Hydration Gradient: By layering the dry stuffing mix on top of the wet sauce but only drizzling butter over it, we create a moisture barrier. This allows the bottom of the stuffing to soften into a dumpling like texture while the top undergoes a Maillard reaction for a distinct shatter.
| Chicken Thickness | Internal Temp | Rest Time | Visual Cue |
|---|---|---|---|
| 1 inch cubes | 165°F (74°C) | 5 minutes | Opaque and firm to touch |
| 1/2 inch dice | 165°F (74°C) | 3 minutes | Edges slightly golden |
| Shredded (cooked) | Warm through | 2 minutes | Sauce starts bubbling |
The key to a successful one pan meal is understanding how the heat moves through the dish. In this casserole, the chicken sits at the bottom where it's insulated by the sauce, preventing it from drying out while it reaches that safe internal temperature.
Meanwhile, the top layer is exposed to the dry heat of the oven, which is exactly what we need for that golden brown finish. It's a simple bit of kitchen physics that makes a world of difference.
Ingredient Component Analysis
| Ingredient | Science Role | Pro Secret |
|---|---|---|
| Sour Cream | Acidic Tenderizer | Use full fat for a richer, more stable emulsion that won't break |
| Stuffing Mix | Structural Topping | Don't pre hydrate it; let the butter and rising steam do the work |
| Chicken Broth | Viscosity Adjuster | Keeps the sauce from turning into a thick paste during the bake |
Using a mix of cream of chicken and cream of celery provides a wider flavor profile than using just one. The celery notes add an aromatic depth that mimics the traditional "mirepoix" (onions, carrots, celery) without you having to chop a single vegetable. If you find yourself wanting to experiment with other flavors, you might find inspiration in my Chicken Divan Recipe, which uses a similar creamy base but adds a punchy broccoli element.
Essential Numbers for a Successful Weeknight Bake
This recipe is designed to be efficient. We use 1.5 lbs of boneless, skinless chicken breasts, which is the sweet spot for a standard 9x13 inch baking dish. It provides enough protein for 6 servings without overcrowding the pan.
Overcrowding is the enemy of even cooking; if the chicken is piled too high, the middle pieces will steam rather than sear, leading to a rubbery texture.
Chef's Tip: For the most consistent results, freeze your butter for about 10 minutes before melting it. It sounds counterintuitive, but super cold butter that is then melted quickly seems to coat the stuffing crumbs more evenly, leading to a much better "shatter" factor.
When it comes to the seasonings, 1/2 tsp of kosher salt and 1/2 tsp of cracked black pepper might seem modest, but remember that the canned soups and the stuffing mix already carry a significant amount of sodium.
We are seasoning the chicken itself to ensure every bite is flavorful, but we aren't trying to overwhelm the palate. The 1 tsp of garlic powder is our secret weapon for that savory, "all day cooked" aroma that hits you the second you open the oven door.
Selecting the Best Components for Your Casserole
- 1.5 lbs chicken breasts: Cut into 1 inch cubes. Why this? Cubes cook evenly and ensure chicken in every single forkful.
- 1/2 tsp kosher salt: Standard seasoning. Why this? Enhances the natural savory notes of the poultry.
- 1/2 tsp cracked black pepper: For a tiny bit of bite.
- 1 tsp garlic powder: Provides a consistent savory base.
- 10.5 oz cream of chicken soup: The primary thickener.
- 10.5 oz cream of celery soup: Adds aromatic depth.
- 1/2 cup sour cream: Adds tang and silkiness.
- 1/4 cup low sodium chicken broth: Prevents the sauce from getting too thick.
- 6 oz boxed stuffing mix: The textural crown.
- 1/2 cup unsalted butter: Melted for the topping. Why this? Unsalted allows you to control the final sodium levels.
- 1 tbsp fresh parsley: For a burst of color and freshness at the end.
| Original Ingredient | Substitute | Why It Works |
|---|---|---|
| Sour Cream | Greek Yogurt (full fat) | Similar tang and fat content. Note: May be slightly more acidic |
| Cream of Celery | Cream of Mushroom | Adds an earthy, umami flavor instead of the bright celery notes |
| Chicken Breasts | Chicken Thighs | More fat means more flavor. Note: May require 5 extra minutes of bake time |
If you happen to have leftovers or want to swap the chicken for something else, the logic remains the same. You need a protein, a binder, and a crunchy top. For instance, you could adapt the creamy base logic from my Broccoli Rice Casserole recipe if you wanted to lean more into the vegetable side of things, though the stuffing topping is really what makes this specific dish shine.
Minimal Tools for a Low Stress Kitchen
You really don't need much to pull this together, which is why it's my go to for nights when the dishwasher is already full. A large mixing bowl is essential for combining the soups, sour cream, and broth into a velvety slurry.
I prefer using a whisk for this part to ensure there are no lumps of sour cream hiding in the corners.
A 9x13 inch baking dish is the standard "casserole" size and works perfectly here. If you use a smaller, deeper dish, you'll need to increase the baking time because the heat has to penetrate a thicker layer of ingredients. Stick to the wider pan if you want that high ratio of crunchy topping to creamy filling.
Finally, a small microwave safe bowl for melting the butter is all you need for the finishing touch. No fancy gadgets or specialized equipment required.
Building Layers of Flavor and Texture

- Preheat the oven. Set your oven to 350°F (180°C) and lightly grease your 9x13 baking dish with butter or non stick spray.
- Season the chicken. Place the 1.5 lbs of cubed chicken into the bottom of the dish. Sprinkle evenly with the 1/2 tsp salt, 1/2 tsp pepper, and 1 tsp garlic powder. Note: Seasoning the meat directly ensures the flavor is built from the bottom up.
- Mix the velvety binder. In your large bowl, whisk together the 10.5 oz cream of chicken soup, 10.5 oz cream of celery soup, 1/2 cup sour cream, and 1/4 cup chicken broth.
- Cover the protein. Pour the soup mixture over the chicken cubes. Use a spatula to spread it evenly so every piece of meat is submerged.
- Apply the crown. Sprinkle the 6 oz of dry stuffing mix over the top of the sauce in an even layer. until no large "bald spots" of sauce are visible.
- Add the liquid gold. Drizzle the 1/2 cup of melted butter as evenly as possible over the dry stuffing mix. Note: Don't worry if some spots look drier than others; the steam from the chicken will help hydrate them.
- Bake the casserole. Place in the center of the oven for 30 minutes. until the sauce is bubbling at the edges and the stuffing is golden brown.
- Final touch. Remove from the oven and let it sit for 5 minutes. Sprinkle with 1 tbsp fresh parsley before serving. until the fresh aroma of the herbs hits the air.
Solving Common Texture and Moisture Issues
One of the most frequent complaints about any stuffing based dish is that the bread can become "mushy." This usually happens for one of two reasons: either there was too much liquid in the sauce, or the dish was covered with foil for too long. If you want that distinct crunch, you have to leave the dish uncovered.
The dry air of the oven is what evaporates the moisture from the top layer of bread.
Another issue is the chicken releasing too much water, which can thin out your sauce. This is common if you are using "enhanced" chicken that has been injected with a salt solution. If you notice your sauce looks a bit thin halfway through, don't panic. The 5 minute resting period after baking is crucial.
As the temperature drops slightly, the starches in the soup and the stuffing will set, turning that liquid into a thick, glossy gravy.
| Problem | Root Cause | Solution |
|---|---|---|
| Dry Chicken | Overcooked or cut too small | Ensure 1 inch cubes and check temp at 25 mins |
| Soggy Stuffing Topping | Covered with foil while baking | Bake uncovered to allow moisture to evaporate |
| Thin, Watery Sauce | Chicken released excess water | Let it rest for 5-10 mins after baking to thicken |
Common Mistakes Checklist
- ✓ Pat the chicken cubes dry with a paper towel before seasoning to ensure the spices stick.
- ✓ Avoid using "fat free" soups or sour cream, as they often contain thickeners that can turn gummy when heated.
- ✓ Resist the urge to stir the stuffing into the sauce; it should sit on top like a lid.
- ✓ Use a clear glass baking dish if possible so you can see the sauce bubbling at the bottom.
- ✓ Don't skip the resting time; it's the difference between a puddle and a plate of comfort.
Creative Ways to Personalize Your Dinner
If you want to shake things up, there are plenty of ways to adapt this base. For a "Pioneer Woman" style richness, you can add a layer of shredded cheddar cheese between the sauce and the stuffing. This creates a gooey, salty barrier that adds another dimension of flavor.
Just be aware that adding cheese will increase the total fat and calorie count significantly.
For those who need to avoid gluten, there are several boxed gluten-free stuffing mixes available now that perform surprisingly well. They tend to be a bit more absorbent, so you might want to add an extra tablespoon of chicken broth to your soup mixture to compensate.
If you're looking for a low carb swap, you can replace the stuffing with a mix of crushed pork rinds and parmesan cheese, though the texture will be more "breaded" than "stuffing like."
If you want X, do Y
- If you want a deeper flavor: Brown the chicken cubes in a skillet for 2 minutes per side before adding them to the baking dish.
- If you want more vegetables: Mix 1 cup of frozen peas and carrots into the soup mixture before pouring it over the chicken.
- If you want a spicy kick: Add 1/2 tsp of red pepper flakes to the garlic powder seasoning.
Scaling the Recipe for Different Crowds
Downsizing (Serving 2-3): If you are cooking for a smaller household, you can easily halve this recipe. Use an 8x8 inch square pan instead. You'll use 0.75 lbs of chicken and roughly half of each soup can.
Since you can't really buy "half cans" of soup, I recommend mixing the full amount of sauce, using what you need, and freezing the rest of the sauce base for a quick meal later. Reduce the baking time to about 20-25 minutes.
Scaling Up (Serving 12): To double the recipe for a party, use two 9x13 inch pans rather than one giant deep dish. This ensures the stuffing to chicken ratio remains perfect.
When doubling, you don't actually need to double the spices exactly; 1.5x the salt and pepper is usually sufficient to avoid over salting. You may need to swap the pans halfway through the baking time (top rack to bottom rack) to ensure both get that golden brown crust.
Debunking Common Kitchen Myths
Myth: You must cook the stuffing separately first. This is entirely false for this specific casserole. The dry stuffing mix is designed to absorb moisture. By placing it on top of the wet sauce, it drinks up the steam and fat from the chicken and butter, resulting in a much more flavorful crust than if you had made it with plain water on the stove first.
Myth: Canned soups are "cheating." While I love a good homemade béchamel, canned soups offer a level of stability and consistent seasoning that is hard to beat for a 40 minute weeknight meal.
They contain emulsifiers that prevent the sauce from breaking under high heat, something that can easily happen with a homemade cream sauce if you aren't careful.
Preserving That Freshly Baked Shatter and Silk
Storage Guidelines: This casserole keeps beautifully in the fridge for up to 3 days. Store it in an airtight container to keep the chicken from drying out. Just be warned: the stuffing will lose its "shatter" and become soft after a night in the refrigerator.
It still tastes great, but the texture will be more like a savory bread pudding.
Freezing and Reheating: You can freeze the assembled (but unbaked) casserole for up to 3 months. Cover it tightly with a layer of plastic wrap followed by a layer of heavy duty foil.
To bake from frozen, remove the plastic, replace the foil, and bake at 350°F (180°C) for 1 hour, removing the foil for the last 15 minutes.
To reheat leftovers, use the oven at 325°F (160°C) for 15 minutes to try and crisp the topping back up; the microwave will just make the stuffing rubbery.
Zero Waste Tip: If you have leftover stuffing mix that didn't fit in the pan, don't throw it away. Keep it in a sealed bag and use it as "breading" for pork chops or as a binder for meatloaf later in the week. The herbs already inside the mix add way more flavor than plain breadcrumbs.
Rounding Out Your One Pan Masterpiece
Because this dish is quite rich and savory, it pairs best with something bright and acidic. A simple green salad with a sharp lemon vinaigrette is usually my go to. If you want something warm, roasted green beans or steamed broccoli florets provide a nice crunch and a pop of color that balances the golden hues of the casserole.
For a true comfort food feast, some people love serving this alongside mashed potatoes, but since the stuffing is already a starch, I find that a bit heavy. Instead, try a side of cranberry sauce even the canned kind to cut through the creaminess.
The tartness of the berries acts as a perfect foil to the savory garlic and celery notes in the Chicken Stuffing Casserole. It's like having a little bit of Thanksgiving on a random Tuesday night, and honestly, we all deserve that kind of easy win every now and then.

HIGH in Sodium
1095 mg mg of sodium per serving (48% of daily value)
The American Heart Association recommends limiting sodium intake to about 2,300mg per day for optimal health.
Sodium Reduction Tips for Chicken & Stuffing
-
Soup Swap-20%
Replace the cream of chicken and cream of celery soups with homemade versions or low-sodium alternatives. This can significantly reduce the sodium content since canned soups are a major source of sodium.
-
Salt Smartly-25%
Omit the added kosher salt (1/2 tsp). You likely won't notice a difference, especially with the other ingredients already contributing sodium. Taste and add a pinch only if needed.
-
Broth Boost-30%
Ensure you're using truly low-sodium chicken broth. Many brands labeled 'low-sodium' still contain significant amounts. Consider making your own or diluting store-bought low-sodium broth with water to further reduce sodium.
-
Stuffing Solution-15%
Prepare the stuffing mix from scratch using low-sodium bread and your own herbs and spices, or choose a low-sodium stuffing mix. Boxed stuffing mixes are often loaded with sodium.
-
Herb Power!
Boost flavor with fresh or dried herbs (like thyme, rosemary, or sage) and spices instead of relying on salt. Experiment with different flavor combinations to enhance the dish naturally.
Recipe FAQs
What kind of stuffing is best for casserole?
The boxed, dry variety is superior for casseroles. You want to use the dry mix straight from the box without pre-hydrating it. This allows the butter drizzle and the steam from the casserole base to create both a soft bottom layer and a crispy top crust.
What gives crack chicken casserole its flavor?
The combination of cream of celery soup and sour cream provides the signature savory depth. The celery soup adds aromatic complexity beyond simple cream of chicken, while the sour cream cuts the richness with a necessary tang.
What are some common chicken stuffing mistakes?
Stirring the dry stuffing into the sauce is the most common error that leads to mush. Keep the stuffing layered on top of the sauce and drizzle the butter over it; this technique builds the essential texture contrast.
What is a famous Texas casserole?
Jalapeño Popper Chicken is a famous, flavor packed casserole often associated with Texas style comfort food. This casserole uses a rich, creamy base similar to this one but incorporates cream cheese and spicy peppers for an extra kick. If you enjoy this creamy texture, you might like that similar flavor profile in our Jalapeno Popper Chicken recipe.
How do I ensure the chicken stays moist during the 30-minute bake?
Cut the chicken into uniform 1 inch cubes and place them directly into the sauce layer. The surrounding liquid insulates the meat from direct dry heat, allowing it to cook gently to 165°F while remaining tender.
Is it true I must use a 9x13 dish for this recipe?
No, this is a common misconception for scaling. While 9x13 is ideal for the listed ingredient amounts, you can halve the recipe for two people using an 8x8 inch pan, though you will need to slightly reduce the baking time.
How can I achieve a silky sauce if I use a homemade substitute for canned soup?
Master a stable roux base and incorporate the acid (sour cream) at the very end off the heat. Learning how to build a stable emulsion is key to avoiding grainy sauces, a skill you practice when making a classic sauce base for recipes like our Classic Chicken Tetrazzini recipe.
Chicken Stuffing Casserole

Ingredients:
Instructions:
Nutrition Facts:
| Calories | 484 kcal |
|---|---|
| Protein | 29.2 g |
| Fat | 27.1 g |
| Carbs | 28.4 g |
| Fiber | 1.8 g |
| Sugar | 3.9 g |
| Sodium | 1095 mg |
