Buttery Garlic Corn on the Cob: Snappy and Aromatic
- Time: Active 5 minutes, Passive 10 minutes, Total 15 minutes
- Flavor/Texture Hook: Snappy kernels with a velvety, aromatic garlic finish
- Perfect for: Quick weeknight sides or stress free summer hosting
- The Secret to Snappy Buttery Garlic Corn on the Cob
- Timing and Precision for the Perfect Side
- How Temperature and Emulsions Create Flavor
- Troubleshooting Common Issues
- Choosing the Best Ingredients for Flavor
- Simple Tools Required for This Recipe
- Step-by-Step Instructions for the Perfect Finish
- Troubleshooting Tips for Garlic Butter Success
- Scaling the Recipe for Any Crowd
- Creative Flavor Twists for Variety
- Debunking Common Corn Myths
- Storage and Zero Waste Guidelines
- What to Serve with Your Garlic Butter Corn
- Recipe FAQs
- 📝 Recipe Card
The Secret to Snappy Buttery Garlic Corn on the Cob
The biggest dinner struggle with corn is that most people treat it like a vegetable that needs to be "cooked through" in a pot of water. If you've ever bitten into a cob only to have lukewarm, flavorless water squirt out while the kernels feel like mushy peas, you know exactly what I mean.
Boiling corn on the cob is the quickest way to dilute its natural sweetness and ruin that satisfying snap we all crave. It happens to the best of us - we get distracted, the water boils too long, and the corn ends up rubbery and waterlogged.
I used to think that was just how corn was supposed to be until I realized that corn is basically a starch heavy grain that loves high, dry heat. This recipe fixes the soggy center problem by skipping the water bath entirely.
We’re using the oven or the air fryer to concentrate the sugars inside each kernel while we build a garlic butter that actually sticks to the cob instead of sliding right off into a yellow puddle on your plate.
This approach is about reliability. Whether it’s a chaotic Tuesday night or a weekend get together, you want a side dish that doesn't require constant monitoring. By the time you’ve set the table, this buttery garlic corn on the cob is ready to hit the plates.
We’re going to look at why dry heat changes the game and how a tiny bit of honey acts as the "glue" for your garlic coating.
Timing and Precision for the Perfect Side
Before you start husking, you need a plan. This recipe moves fast once the heat is on. Because we are working with high temperatures, a few minutes can be the difference between snappy kernels and scorched ones.
I always suggest prepping the butter while the heat source is preheating so that as soon as the corn is hot, the flavor can be locked in.
| Method | Temperature | Time | Best Result |
|---|---|---|---|
| Oven Baked | 425°F (220°C) | 10-12 minutes | Soft, steamed interior with deep flavor |
| Air Fryer | 400°F (200°C) | 8-10 minutes | Slightly charred kernels and extra snap |
| Stovetop Sear | Medium High | 6-8 minutes | Intense browning but requires constant turning |
The choice between the oven and the air fryer usually comes down to how much corn you are making. If you're doing a big batch for the whole family, the oven is your best friend. If it's just a quick side for two, the air fryer saves time on the preheat.
Both methods produce a far superior result to boiling because they preserve the integrity of the cell walls within the corn kernels.
Chef's Tip: If you want a deeper flavor, let your minced garlic sit in the olive oil for 5 minutes before mixing it into the butter. This helps the fat soluble flavor compounds in the garlic distribute more evenly.
How Temperature and Emulsions Create Flavor
Heat Conduction: Rubbing the corn with olive oil before roasting creates a thin layer of fat that transfers heat more efficiently than air alone, ensuring the kernels cook through without drying out.
Starch Gelatinization: High heat quickly transforms the starches inside the corn into a soft, sweet gel, which provides that classic "pop" when you bite into it.
Emulsion Stability: By whipping the honey into the softened butter, you create a sticky matrix that prevents the butter from breaking into a greasy liquid when it hits the hot cob.
Residual Infusion: Applying the garlic mixture to the corn immediately after it leaves the heat uses the cob's thermal energy to "bloom" the garlic aromatics without burning them.
Troubleshooting Common Issues
| Issue | Solution |
|---|---|
| Why do fat soluble aromatics matter | The flavor of garlic is carried primarily through fats. If you just toss raw garlic onto corn, it tastes sharp and disconnected. When we whip it into high fat butter, the fat surrounds the garlic part |
| How does the honey link prevent runoff | One of the most annoying things about buttered corn is seeing all that expensive butter end up at the bottom of the bowl. Honey is a natural invert sugar that is quite viscous. When blended with butte |
| Why avoid the big boil | When you submerge corn in boiling water, you create an environment where osmosis occurs. The sugars inside the corn actually leach out into the water, and the water enters the corn. This is why boiled |
Choosing the Best Ingredients for Flavor
The quality of your corn is the foundation here. If you can find corn that was picked the same day, you’ll notice a massive difference in sugar content. As soon as corn is harvested, its sugars begin converting into starches.
This is why "super sweet" varieties are popular; they stay sweet longer after being pulled from the stalk.
| Ingredient | Science Role | Pro Secret |
|---|---|---|
| Fresh Sweet Corn | Structural Starch | Look for green, damp husks; it means the corn is still hydrated. |
| High Fat Butter | Flavor Carrier | Use European style butter (like Kerrygold) for a silkier mouthfeel and less water content. |
| Fresh Garlic | Aromatic Punch | Hand mince your garlic rather than using a press to keep the oils inside the pieces. |
When it comes to the butter, don't reach for the tub of spreadable margarine. You need the stability of real, unsalted butter. Since we add sea salt separately, using unsalted butter allows you to control the seasoning precisely. If you're looking for a great pairing for this meal, I often serve this alongside my Au Gratin Potatoes for a full comfort food spread.
Ingredient List and Substitutions
- 4 ears fresh sweet corn: If you can't find fresh, frozen "corn on the cob" works, but thaw it completely and pat it very dry first.
- 1 tbsp extra virgin olive oil: You can use avocado oil or any high smoke point oil. Why this? It prevents the corn from sticking to the foil and aids heat transfer.
- 0.5 tsp sea salt: Kosher salt is a great alternative.
- 4 tbsp unsalted high fat butter: If using salted butter, omit the extra sea salt. Why this? Fat carries the garlic flavor and creates a velvety texture.
- 3 cloves garlic: In a pinch, 1 tsp of garlic powder works, but the flavor won't be as vibrant.
- 1 tsp honey: Maple syrup or agave nectar can work as a sticky binder.
- 0.25 tsp smoked paprika: Regular paprika or a pinch of cayenne for heat.
- 1 tbsp fresh parsley: Chives or cilantro provide a similar fresh finish.
Simple Tools Required for This Recipe
You don't need a professional kitchen to make world class buttery garlic corn on the cob. The most important tool here is actually something you probably have in your pantry: heavy duty aluminum foil.
The foil acts as a mini pressure cooker for each cob, trapping just enough steam to soften the kernels while the high heat of the oven roasts the exterior.
You'll also need a small mixing bowl and a fork. While some people use a hand mixer for the butter, I find a fork is better for creating that "pomade" consistency without over aerating it. A pastry brush is the final essential piece.
It allows you to get the garlic butter into the gaps between the kernels, which is something a knife just can't do efficiently.
Chef's Tip: If you don't have a pastry brush, you can put the corn in a large bowl with the butter and toss it using tongs. It's messier, but it gets the job done!
step-by-step Instructions for the Perfect Finish
- Heat the source. Preheat your oven to 425°F (220°C) or set your air fryer to 400°F (200°C). Note: Starting with a hot environment ensures the corn begins cooking immediately.
- Prep the corn. Remove all husks and every strand of silk from the 4 ears of corn.
- Dry the kernels. Pat each cob completely dry with a paper towel. This is vital for the oil to stick and prevent steaming.
- Apply the base. Rub each ear with 1 tbsp olive oil and 0.5 tsp sea salt.
- Create the foil pouch. Wrap each cob tightly in foil to lock in the natural moisture.
- Whip the butter. Combine 4 tbsp softened butter, 3 minced garlic cloves, 1 tsp honey, and 0.25 tsp smoked paprika. Whip until the mixture is pale and creamy.
- Cook the corn. Roast in the oven for 10-12 minutes or air fry for 8-10 minutes.
- Check for doneness. Carefully open one foil pack; the corn should be vibrant yellow and slightly translucent.
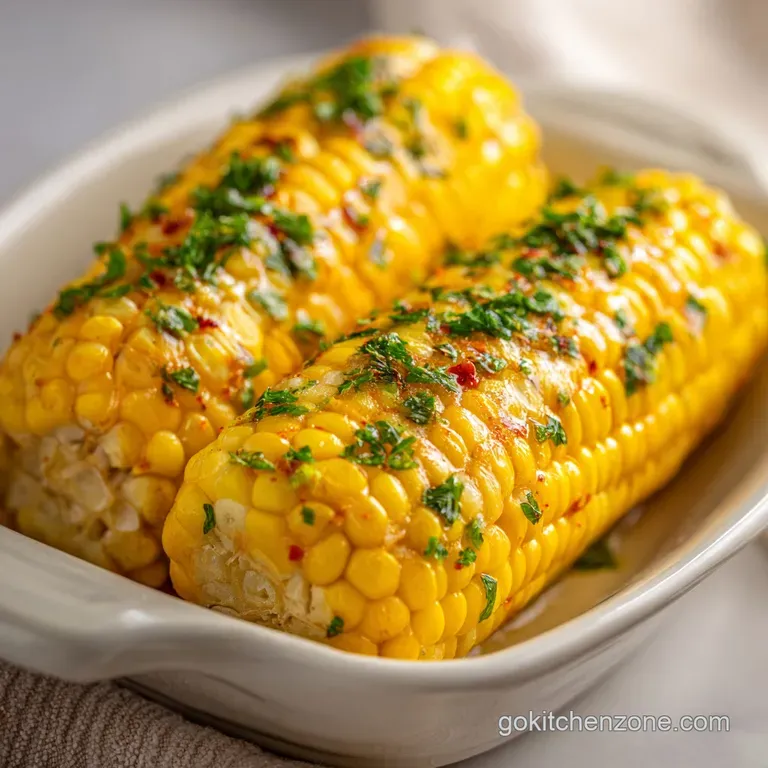
- Butter the cob. Immediately brush the garlic butter over the hot corn using a pastry brush.
- Final garnish. Sprinkle 1 tbsp fresh parsley over the cobs and serve while the butter is still bubbling.
Troubleshooting Tips for Garlic Butter Success
The most common issue with this recipe is the garlic turning bitter. This usually happens if the garlic is chopped too far in advance or if it's exposed to direct high heat for too long. By mixing it into the butter and applying it after the corn is cooked, we protect those delicate garlic oils.
Why Your Garlic Might Taste Off
If your garlic has a metallic or overly sharp taste, it might be due to the "germ" (the little green sprout in the middle). Always remove that before mincing. Also, ensure you are using fresh garlic. Pre minced garlic in a jar has a preservative acid that completely clashes with the sweetness of the corn.
| Problem | Root Cause | Solution |
|---|---|---|
| Butter slides off | Corn was too wet or butter wasn't whipped | Pat corn dry and ensure honey is fully incorporated into the butter. |
| Rubbery kernels | Overcooked or old corn | Reduce cook time by 2 minutes and check for freshness at the store. |
| Bitter flavor | Burnt garlic or green germ | Apply garlic butter after cooking; remove green sprouts from garlic cloves. |
For another great vegetable side that avoids the "mushy" trap, you might want to try my Broccoli Casserole recipe, which uses a similar over high heat approach to keep the veggies snappy.
Common Mistakes Checklist
- ✓ Don't skip drying the corn; moisture on the surface prevents the oil from adhering.
- ✓ Ensure the butter is truly softened at room temperature, not melted in the microwave.
- ✓ Use fresh parsley at the very end to maintain its bright color and peppery flavor.
- ✓ Avoid over wrapping the foil; one tight layer is better than a thick bundle for heat penetration.
- ✓ Check your garlic cloves for soft spots before mincing.
Scaling the Recipe for Any Crowd
When you're scaling this recipe up for a BBQ, you have to be careful about crowding. If you put 12 ears of corn in a single oven, the temperature will drop significantly. You may need to add 3-5 minutes to the total cook time.
For the butter, you can double or triple the recipe easily, but I recommend keeping the garlic to 2.5 times the amount rather than a full triple to avoid it becoming overpowering.
If you're scaling down for one person, the air fryer is your best bet. Use just one ear of corn and half the butter mixture. Since the air fryer is a smaller space, the cook time usually remains the same regardless of whether you have one cob or four.
Creative Flavor Twists for Variety
Once you've mastered the basic buttery garlic corn on the cob, you can start experimenting with different flavor profiles. The base method remains the same, but the compound butter can be adapted to almost any cuisine.
For a Spicy Chipotle Twist
Add 1 tsp of chipotle in adobo sauce to your butter mixture instead of the smoked paprika. This gives the corn a smoky, lingering heat that pairs perfectly with grilled chicken or tacos. You can also add a squeeze of fresh lime juice right before serving to cut through the richness of the butter.
How do I make this Vegan?
Substituting the butter for a high-quality plant based butter (like Miyoko's) works perfectly. Most vegan butters have a similar fat to water ratio to dairy butter, so they will still create a nice emulsion with the honey. Use agave instead of honey to keep it strictly vegan.
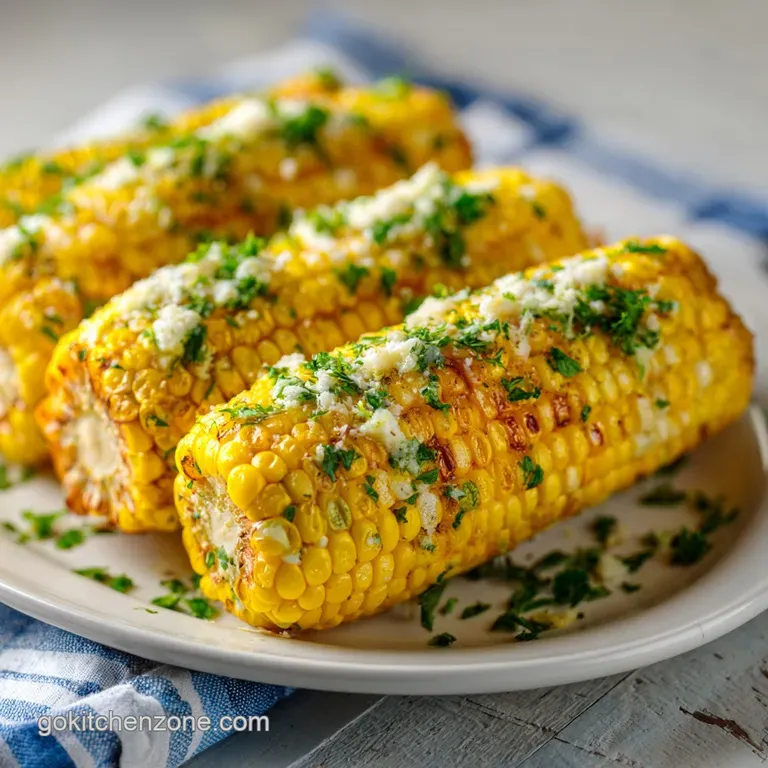
What about a "Parmesan Crust" twist?
After brushing on the garlic butter, roll the corn in freshly grated Parmesan cheese and a pinch of black pepper. The residual heat from the corn will melt the cheese just enough to create a savory, salty crust that clings to the butter.
Debunking Common Corn Myths
One myth that needs to disappear is that you must soak corn in water before roasting. If you are roasting in the husk on a grill, soaking can prevent the husk from catching fire, but for oven roasting in foil, it’s completely unnecessary.
It actually introduces extra moisture that can lead to that soggy texture we're trying to avoid.
Another misconception is that adding salt to the cooking water makes corn tough. While we aren't boiling our corn, it’s worth noting that toughness is usually a result of overcooking, which causes the starch to become dense and chewy, rather than a reaction to salt.
In our recipe, the salt on the surface actually helps draw out a tiny bit of moisture, concentrating the sugars for a better flavor.
Storage and Zero Waste Guidelines
Storage: Leftover buttery garlic corn on the cob can be stored in the fridge for up to 3 days. I recommend wrapping the cobs in plastic wrap or placing them in an airtight container to keep the garlic aroma from taking over your fridge.
To reheat, wrap them back in foil and pop them in a 350°F (180°C) oven for 10 minutes.
Freezing: You can freeze the cooked corn, but it's best to cut the kernels off the cob first. Put the kernels in a freezer bag, and they will stay fresh for up to 3 months. When you're ready to use them, just sauté them in a pan with a little extra butter.
Zero Waste: Don't throw away those corn cobs! Even after you've eaten the kernels, the cobs hold a lot of flavor. You can simmer them with some onion, celery, and water to make a "corn stock" which is an incredible base for chowders or risotto.
Even the corn silk can be dried and steeped into a mild, earthy tea that is a traditional staple in many cultures.
What to Serve with Your Garlic Butter Corn
This dish is a powerhouse side that fits into almost any menu. Because of the garlic and butter profile, it naturally complements grilled proteins. Think about serving it with a steak or a piece of blackened salmon. The sweetness of the corn balances out the savory, charred notes of grilled meat perfectly.
If you're looking for a vegetarian spread, this corn is the star of the show alongside a hearty salad or a pasta dish. The smoked paprika in the butter gives it enough depth to feel like a "main event" vegetable.
No matter how you serve it, the goal is that snappy, flavorful bite that proves you don't need a pot of boiling water to make great corn.

Recipe FAQs
How to cook buttery corn on the cob?
Preheat your oven to 425°F (220°C) or your air fryer to 400°F (200°C). Pat husked corn dry, rub with olive oil and salt, then roast in foil for 10-12 minutes or air fry for 8-10 minutes before brushing with your prepared garlic butter emulsion.
How to make garlic butter sweet corn?
Whip softened butter, minced garlic, honey, and smoked paprika with a fork until the mixture reaches a pale, velvety pomade consistency. Apply this mixture to the hot corn immediately after cooking to ensure the flavors meld into the kernels.
What is the best way to butter corn on the cob?
Use a pastry brush to apply a garlic butter emulsion to the hot corn kernels immediately after it leaves the heat. This method ensures even coverage and prevents the butter from simply sliding off into the bottom of your serving dish.
Is it better to cook garlic in oil or butter?
Use high fat butter for the finishing emulsion. Garlic flavor is fat-soluble, and incorporating minced garlic into softened butter prevents the sharp, raw bite you get when simply tossing it onto hot corn; if you enjoy this method of creating a smooth finish, see how the same silky texture principle works in our mashed potatoes recipe.
Is it true I should boil the corn first for extra moisture?
No, this is a common misconception. Boiling corn introduces excessive surface water that prevents the kernels from charring properly and dilutes the natural sweetness of the corn.
How to keep the garlic butter from running off the corn?
Incorporate honey into the butter mixture before applying. Honey acts as a viscous binder that helps the fat-based emulsion cling to the kernels rather than sliding directly onto the plate.
How to store leftover buttery garlic corn?
Wrap the cobs in plastic or seal them in an airtight container and keep them in the refrigerator for up to 3 days. To reheat, wrap the cobs in foil and warm them in a 350°F (180°C) oven for 10 minutes.
Buttery Garlic Corn

Ingredients:
Instructions:
Nutrition Facts:
| Calories | 228 calories |
|---|---|
| Protein | 3.3 g |
| Fat | 16.2 g |
| Carbs | 21.8 g |
| Fiber | 2.7 g |
| Sugar | 8.2 g |
| Sodium | 296 mg |
