Peanut Butter Chicken: Silky & Crispy
- Time: Active 15 minutes, Passive 15 minutes, Total 30 minutes
- Flavor/Texture Hook: Shattering crispy exterior meets a velvety, nutty glaze
- Perfect for: Busy weeknight dinner struggles or beginner meal prep
- Mastering The Best Ever Peanut Butter Chicken
- The Physics Of A Glossy Sauce
- Component Analysis For Balanced Flavor
- Simple Ingredients And Smart Subs
- Basic Tools For Better Browning
- Essential Steps For Golden Chicken
- Professional Fixes For Sauce Errors
- Creative Ways To Adapt Flavors
- Adjusting Portions Without Losing Bold Flavor
- Debunking Myths About Nut Based Sauces
- Storage Guidelines And Scrappy Tips
- Simple Finishing Touches For Contrast
- Recipe FAQs
- 📝 Recipe Card
Mastering The Best Ever Peanut Butter Chicken
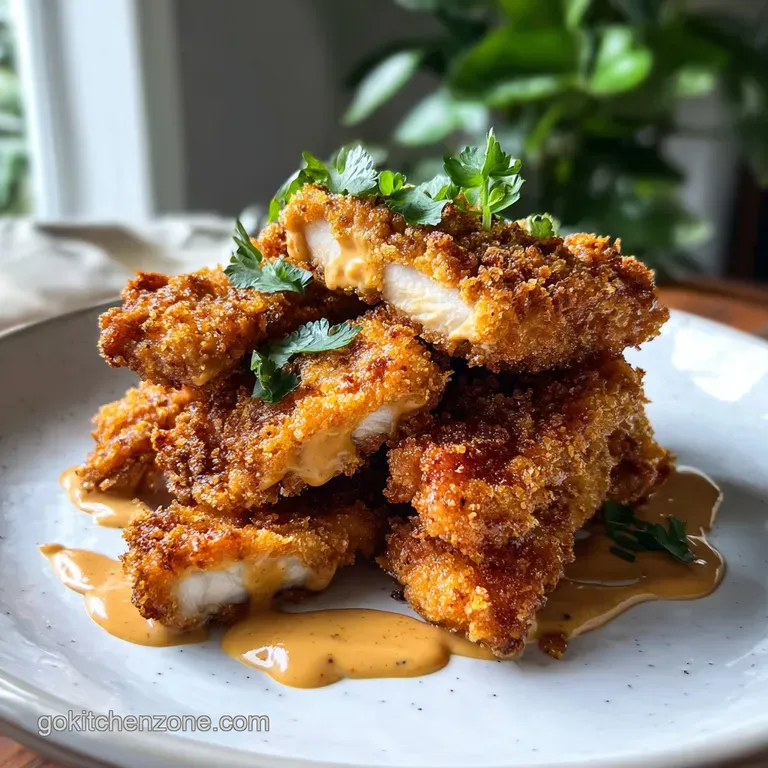
The kitchen currently smells like a dream, and honestly, if you could catch a whiff of this ginger and garlic hitting the hot oil, you'd already have your apron on. There is something about the way natural peanut butter transforms from a thick spread into a glossy, pourable glaze that feels like a magic trick every single time I make it.
We’ve all had those evenings where the "dinner struggle" is real, the fridge looks bare, and the temptation to order in is hovering at an all time high.
That is exactly how this recipe became a staple in my house. I remember the first time I tried to make a nut based sauce; I ended up with a clumpy, oily mess because I didn't understand how to properly emulsify the fats with the broth.
I almost gave up on the idea entirely until I realized that the secret isn't a fancy technique, but rather the order in which you introduce the liquids. Once you nail that rhythm, you get a sauce that clings to the chicken like a silk blanket rather than sliding off into a puddle at the bottom of the bowl.
We are going for a specific texture here: chicken that manages to stay "crispy" even under a blanket of sauce. It’s a balance of acidity from the rice vinegar and that slow burning heat from the sriracha.
If you are looking for a meal that feels expensive but costs less than a fancy coffee per serving, you have found it. Trust me, the way the honey cuts through the saltiness of the soy sauce is going to make your taste buds do a literal happy dance.
The Physics Of A Glossy Sauce
Fat Emulsification: The natural oils in peanut butter are bonded to the chicken bone broth through the agitation of whisking, creating a stable, velvety emulsion. This prevents the sauce from breaking or looking greasy when it hits the hot pan.
| Method | Time | Texture | Best For |
|---|---|---|---|
| Stovetop (This Recipe) | 30 minutes | Crispy and saucy | Maximum flavor and speed |
| Slow Cooker | 4 hours | Shredded and tender | Hands off meal prep |
| Air Fryer | 20 minutes | Extra crunchy | Lower oil consumption |
Choosing the right cooking method depends entirely on your schedule. While the slow cooker is great for a set it and forget it vibe, it won't give you that shattering crust on the chicken that the stovetop method provides.
If you've got the 30 minutes, the pan-fried version is the clear winner for texture.
Component Analysis For Balanced Flavor
When we look at what makes this Peanut Butter Chicken stand out, it isn't just about the protein. It is about how the cornstarch interacts with the surface moisture of the meat. By creating a dry barrier, we allow the Maillard reaction to happen faster, giving us those deep brown, savory bits that hold onto the sauce.
| Ingredient | Science Role | Pro Secret |
|---|---|---|
| Cornstarch | Moisture Barrier | Pat chicken dry first to ensure the starch sticks rather than clumps |
| Rice Vinegar | Protein Denaturant | The acidity cuts through the heavy fat of the peanut butter |
| Natural PB | Primary Emulsifier | Use "stir" style with no sugar to control the final sweetness |
The interaction between the honey and the soy sauce is also vital. The sugars in the honey help the sauce thicken and caramelize as it simmers, while the soy provides the fermented depth that makes it feel like a professional "Asian Peanut Butter Chicken" dish.
If you are ever out of rice vinegar, a squeeze of lime works as a bright, citrusy alternative that still provides the necessary acid.
Simple Ingredients And Smart Subs
Finding the right balance between cost and quality is the heart of a good home cooked meal. I always reach for chicken thighs because they are more forgiving and remain juicy even if the heat gets a little high.
If you are looking for another reliable poultry dish, you might enjoy the technique in my pan-fried Chicken recipe, which also focuses on getting that perfect crust.
- 1.5 lbs chicken thighs: Cut into 1 inch pieces. Why this? Thighs have more fat, staying "velvety" after searing.
- 1/4 cup cornstarch: For the coating. Why this? Creates a thinner, crispier crust than standard flour.
- 1/2 cup natural creamy peanut butter: No sugar or salt added. Why this? Gives you total control over the seasoning profile.
- 1/2 cup chicken bone broth: Low sodium is best. Why this? Adds collagen and depth without excess salt.
- 2 tbsp soy sauce: Low sodium preferred. Why this? Provides the "umami" base for the entire sauce.
- 1 tbsp rice vinegar: For a subtle tang. Why this? Brightens the heavy nut flavors immediately.
- 1 tbsp fresh ginger: Finely grated. Why this? Provides a spicy, aromatic back note that dried ginger lacks.
- 2 cloves garlic: Minced. Why this? The foundation of any savory stovetop stir fry.
- 1 tbsp honey: For a touch of sweetness. Why this? Helps the sauce glaze and stick to the meat.
| Original Ingredient | Substitute | Why It Works |
|---|---|---|
| Avocado Oil | Vegetable or Grapeseed Oil | Both have high smoke points for searing chicken safely |
| Rice Vinegar | Apple Cider Vinegar | Similar acidity levels, though slightly fruitier |
| Honey | Maple Syrup | Provides sweetness and helps with caramelization. Note: Adds a slight earthy flavor |
Using a substitute like almond butter can also work if someone has a peanut allergy, though the flavor profile will shift toward a more toasted, nutty finish. If you find yourself with extra peanut butter after this, it’s the perfect excuse to bake a batch of my Peanut Butter Blossom Cookies recipe.
Basic Tools For Better Browning
You don't need a kitchen full of gadgets, but a heavy bottomed skillet is your best friend here. A cast iron pan or a stainless steel skillet (like a tri ply All Clad) distributes heat more evenly than thin aluminum. This prevents "hot spots" where the garlic might burn while the chicken is still pale.
A microplane or fine grater is also a total game changer for the ginger and garlic. When you grate them instead of chopping, they release more essential oils, and they melt into the sauce so you don't get any harsh, crunchy bites of raw garlic.
Finally, a sturdy whisk is essential for combining the peanut butter and broth into a smooth liquid before it hits the pan.
Essential Steps For Golden Chicken

- Dry the meat. Use paper towels to pat the 1.5 lbs of chicken pieces until bone dry. Note: Surface moisture creates steam, which prevents browning.
- Coat thoroughly. Toss the chicken with 1/4 cup cornstarch, 1/2 tsp sea salt, and 1/4 tsp pepper until every piece is ghostly white.
- Heat the oil. Add 2 tbsp avocado oil to your skillet over medium high heat until the oil shimmers and dances.
- Sear the chicken. Place chicken in the pan and cook for 4 minutes per side until a golden, shattering crust forms.
- Whisk the sauce. In a small bowl, combine peanut butter, broth, soy sauce, rice vinegar, ginger, garlic, sriracha, and honey until the mixture is completely smooth.
- Aromatize. Push the chicken to the edges and pour the sauce into the center until it begins to bubble and sizzle.
- Emulsify. Stir the chicken back into the sauce, coating every piece until the liquid thickens into a glossy glaze.
- Simmer briefly. Let it cook for another 2 minutes until the internal temperature hits exactly 165°F.
Chef's Tip: If the sauce looks too thick, add one tablespoon of broth at a time. The cornstarch on the chicken will naturally thicken the liquid, so don't be afraid to thin it out slightly to get that "velvety" pour.
Professional Fixes For Sauce Errors
The most common issue I see with any "Homemade Peanut Butter Chicken Sauce" is the sauce breaking or seizing. This usually happens if the pan is too hot when the sauce is added, causing the fat to separate from the liquids. If you see oil pooling at the edges, don't panic.
You can usually save it by adding a splash of warm water and whisking vigorously.
My Chicken Is Rubbery
This usually happens from overcrowding the pan. If you put too much meat in at once, the temperature drops and the chicken boils in its own juices instead of searing.
| Problem | Root Cause | Solution |
|---|---|---|
| Seized Sauce | Heat too high or not enough liquid | Remove from heat and whisk in 1 tbsp of warm water |
| Bland Flavor | Not enough salt or acid | Add an extra teaspoon of soy sauce or rice vinegar |
| Soggy Coating | Chicken wasn't dry before starching | Pat dry and use higher heat for the initial sear |
Common Mistakes Checklist
- ✓ Never skip drying the chicken; it's the difference between "crispy" and "soggy."
- ✓ Don't use "natural" peanut butter that has added sugar, or the sauce will be cloying.
- ✓ Avoid adding the garlic too early in the searing process or it will turn bitter.
- ✓ Ensure your ginger is fresh; the jars of pre minced ginger often have a metallic aftertaste.
- ✓ Let the chicken rest for 2 minutes after cooking to allow the juices to redistribute.
Creative Ways To Adapt Flavors
If you want to turn this into a "Peanut Butter Chicken Curry", simply add a tablespoon of red curry paste to the sauce mixture. The heat from the curry paste pairs beautifully with the creamy nut base.
You can also throw in a handful of snap peas or bell peppers during the last 3 minutes of cooking for a "one pan" meal that includes your veggies.
For those watching their carbs, you can swap the honey for a keto friendly sweetener like monk fruit and serve the chicken over a bed of cauliflower rice. The sauce is so rich that you won't even miss the traditional grains.
Adjusting Portions Without Losing Bold Flavor
Scaling a recipe like this requires a bit of math to keep the ratios intact. If you are cutting the recipe in half for a solo dinner, use a smaller 8 inch skillet. This ensures the sauce doesn't evaporate too quickly in a large, empty pan.
When doubling the recipe for a crowd, work in batches for the chicken. Trying to fry 3 lbs of chicken at once will result in a steamed mess. For the sauce, you only need to increase the spices by about 1.5 times, but keep the liquids and peanut butter strictly at 2x to maintain that "velvety" texture.
Debunking Myths About Nut Based Sauces
Many people think that you have to use expensive, high end peanut butter for a good sauce. In reality, the budget friendly "store brand" natural peanut butter often works better because it has a consistent oil to solids ratio. As long as the only ingredients are peanuts and maybe a little salt, you are good to go.
Another common myth is that peanut butter will make the dish taste like a dessert. Because we are balancing it with soy sauce, ginger, and garlic, the peanut butter acts more like a rich, savory cream base than a sweet spread. It provides body and "mouthfeel" rather than just sugar.
Storage Guidelines And Scrappy Tips
This "Easy Peanut Butter Chicken" keeps remarkably well in the fridge for up to 4 days. The sauce actually thickens as it sits, so when you go to reheat it, you might need to add a teaspoon of water to loosen things up again.
I recommend reheating in a skillet over low heat rather than the microwave to preserve some of that texture.
- Fridge: Store in an airtight container for 4 days.
- Freezer: You can freeze the cooked chicken and sauce for up to 3 months.
- Zero Waste: Don't throw away those ginger peels! Toss them into a bag in your freezer to use later when making a homemade broth.
- Leftover Sauce: If you have extra sauce, it makes an incredible cold noodle dressing the next day.
Simple Finishing Touches For Contrast
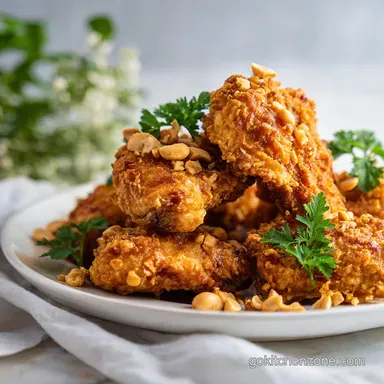
Presentation is all about contrast. Since the sauce is a deep, warm tan, you want to brighten things up with vibrant greens and reds. A heavy sprinkle of sliced green onions and some toasted sesame seeds adds a "shatter" of texture and a pop of color.
If you really want to go the extra mile, a few fresh cilantro leaves and a wedge of lime on the side make the dish look like it came straight from a restaurant. The acidity from a final squeeze of lime juice right before eating wakes up all those savory notes and makes the "Homemade Peanut Butter Chicken Sauce" truly sing.
Enjoy your meal!
 : PIN FOR LATER")
Recipe FAQs
Do peanut butter and chicken go together?
Yes, absolutely. Peanut butter acts as a rich, nutty emulsifier in savory sauces, providing body and depth similar to cream or ground nuts in other cuisines.
What does peanut butter chicken taste like?
Savory, slightly sweet, and deeply umami. The flavor profile balances the richness of the peanut butter with salty soy sauce and bright acidity from rice vinegar, finishing with aromatic ginger and garlic.
What is peanut butter chicken Chinese?
It is an Americanized adaptation of East Asian dipping sauces. Authentic regional Chinese cooking uses peanuts frequently, but this specific glazed chicken preparation is often found in American Chinese takeout menus, resembling dishes like Sesame Chicken in texture.
What do you eat with peanut butter chicken?
Steamed white rice or plain noodles are ideal sides. The rice perfectly soaks up the excess glossy sauce left on the plate, and you can mix in simple steamed vegetables like broccoli or carrots for balance.
Is it true that the sauce will break if I don't use full fat peanut butter?
No, this is a common misconception. While full fat provides more stable oils, the primary emulsification happens when the fats bond with the hot chicken broth; using a high-quality natural peanut butter without added sugar gives you better flavor control.
How do I ensure the chicken stays crispy under the sauce?
Use a cornstarch coating and high heat for the initial sear. The cornstarch creates a hard, dry barrier that resists moisture absorption until the very last minute of simmering; mastering this dry barrier technique is crucial for texture.
How long should I simmer the sauce to reach the thickest glaze?
Simmer for 2 to 3 minutes after adding the sauce to the pan. Stir continuously until the liquid visibly clings to the chicken pieces and you can briefly draw a line through the sauce that holds its shape before flowing back together.
Peanut Butter Chicken Recipe
Ingredients:
Instructions:
Nutrition Facts:
| Calories | 512 kcal |
|---|---|
| Protein | 41.2 g |
| Fat | 29.8 g |
| Carbs | 19.6 g |
| Fiber | 2.1 g |
| Sugar | 6.4 g |
| Sodium | 785 mg |
