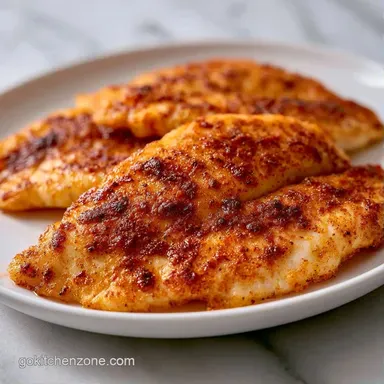
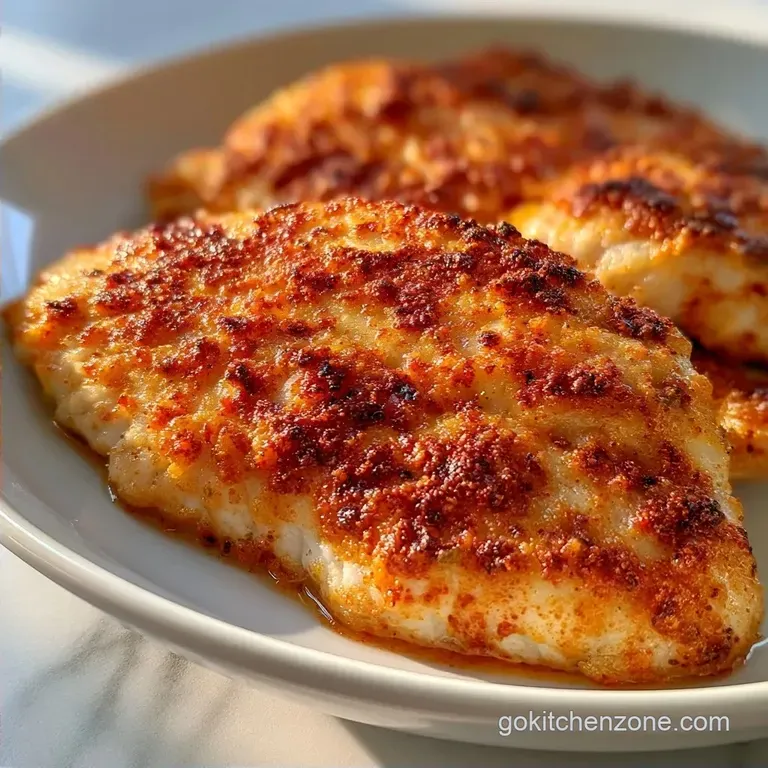
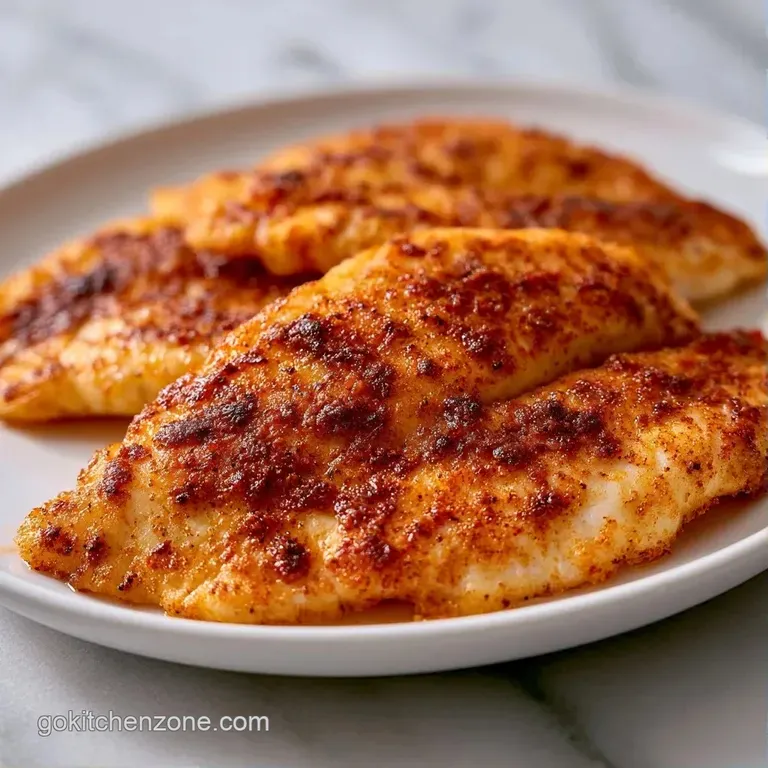
Ultra-Crispy Pan Fried Tilapia
- Time: 5 min active + 8 min cooking
- Flavor/Texture Hook: Mahogany crust with flaky, moist centers
- Perfect for: 15 minute dinner struggle or beginner cooks
The sound of butter foaming in a hot pan is my favorite part of any Tuesday. There is something about that sizzle that tells you dinner is actually happening. I used to struggle with fish sticking to the pan, which usually ended in a fragmented mess of tilapia and a lot of frustration.
I found that the trick is all in the moisture. If you leave even a bit of water on the fillet, the flour turns into a gummy paste. That paste acts like glue, bonding the fish to the skillet. Now, I treat my paper towels like gold, patting every inch of the fish until it is bone dry.
This go to pan fried Tilapia method is built for reliability. You don't need to be a pro to get a golden brown crust. Just follow the timing, don't touch the fish too early, and you'll have a meal that tastes like it took way more effort than 14 minutes.
Quick pan fried Tilapia Guide
- Dry Surface
- Removing moisture lets the oil sear the fish immediately instead of steaming it.
- Fat Blend
- Butter provides the rich flavor, while olive oil raises the smoke point so the butter doesn't burn.
- Flour Dusting
- A thin coating creates a barrier that helps pan fried Tilapia stay flaky and develop a crisp crust.
| Method | Time | Texture | Best For |
|---|---|---|---|
| Stovetop | 8 min | Crispy/Browned | Quick weeknights |
| Oven | 15 min | Tender/Uniform | Cooking for 4+ people |
Ingredient Deep Dive
The goal here is to enhance the mild flavor of the fish without masking it. For pan fried Tilapia fillets, you want a seasoning blend that adds depth and a bit of color.
| Ingredient | What It Does | Best Swap |
|---|---|---|
| Tilapia | Lean protein base | Cod or Flounder |
| Butter | Adds richness and browning | Ghee |
| Flour | Creates the golden crust | Cornstarch |
| Paprika | Adds color and earthiness | Smoked Paprika |
The Right Tools
You don't need a professional kitchen for this, but a few specific tools make the process smoother. A non stick skillet is great for beginners, but a stainless steel or cast iron pan gives you a better crust if you manage the heat right.
Use a wide, shallow dish for the flour. This prevents you from having to "fold" the fish, which can tear the delicate fillets. A fish spatula is also a lifesaver. Its thin edge slides under the crust without breaking it, making the flip a breeze.
Finally, grab a digital meat thermometer. It is the only way to be 100% sure you aren't overcooking the fish. Tilapia goes from moist to rubbery in about 60 seconds.
Cooking step by step
Follow these steps to ensure the fish doesn't stick and the crust stays intact.
- Pat the tilapia fillets with paper towels until the surface is bone dry. Season both sides evenly with salt and pepper.
- Whisk together the flour, garlic powder, paprika, and onion powder in a shallow dish.
- Press each fillet firmly into the flour mixture, coating both sides entirely, then shake off any excess flour. Note: Excess flour burns in the pan and tastes bitter.
- Heat the olive oil and butter in a skillet over medium heat until the butter foams and begins to sizzle.
- Carefully lay the fillets in the pan. Cook undisturbed for 3-4 minutes until a mahogany colored crust forms.
- Flip carefully using a fish spatula. Cook for another 3 minutes.
- Remove the fish from the pan once the internal temperature reaches 145°F (63°C) or the flesh is opaque.
- Transfer to a wire rack or paper towel lined plate for 1 minute to set the crust. Note: This prevents the bottom from getting soggy.
Precision Checkpoints:
- Searing time: 3-4 minutes on the first side.
- Target Temp: 145°F internal.
- Resting time: 1 minute on a rack.
Tips for Better Results
If you want more crunch, you can double dip the fish in the flour or add a tablespoon of cornstarch to the mix. If you prefer something in the oven instead, my baked tilapia recipe is a great alternative for larger crowds.
One thing I learned the hard way is to avoid overcrowding the pan. If the fillets are touching, they release steam. That steam prevents the crust from forming and makes the fish soggy. Give them at least an inch of space.
Decision Shortcut:
- Want more crunch? Use a panko flour blend.
- Want it spicy? Add a pinch of cayenne to the flour.
- Want it lean? Use olive oil only, skipping the butter.
Fixing Common Issues
When your pan fried Tilapia sticks, it is almost always a heat issue. If the pan isn't hot enough, the proteins bond to the metal. You should hear a loud sizzle the moment the fish hits the oil.
If the crust is dark brown but the middle is still raw, your heat is too high. Lower the flame to medium and let it cook more slowly. Rubbery fish usually happens because the internal temperature climbed past 150°F.
| Problem | Root Cause | Solution |
|---|---|---|
| Fish sticks | Pan not hot enough | Wait for butter to foam |
| Burnt crust | Heat too high | Lower to medium |
| Rubbery texture | Overcooked | Pull at 145°F |
Scaling for Guests
Scaling pan fried Tilapia for guests requires a shift in strategy. Do not try to cook six fillets in one pan. You will drop the pan temperature, and you'll end up with poached fish instead of fried fish.
Work in batches of two. Set the finished fillets on a wire rack in a warm oven (around 200°F) while you finish the rest. For the seasonings, don't just double the salt. Increase spices to 1.5x first, then taste a small bit of the coating to see if it needs more.
Common Fish Myths
Some people say you need to bring fish to room temperature before cooking. For thin fillets like tilapia, this isn't necessary and can actually be a food safety risk. Cold fish sears just fine.
Another common belief is that searing "seals in the juices." This is simply not true. Searing adds a layer of flavor and texture through browning, but moisture loss happens regardless. The goal is the crust, not a "seal."
Storage and Reheating
Leftover pan fried Tilapia stays good in the fridge for 2-3 days. Store it in an airtight container with a piece of paper towel at the bottom to absorb excess moisture.
To reheat, avoid the microwave. Microwaving makes the fish rubbery and the crust soggy. Instead, use a toaster oven or a dry skillet over medium heat for 2 minutes per side. This brings back the crispness.
For zero waste, if you have leftover seasoned flour, don't throw it away. You can use it to thicken a sauce or use it as a rub for shrimp. If you have fish scraps, they can be frozen for a homemade fish stock.
Flavor Variations
You can easily change the profile of this recipe by swapping the spices. For a lemon pepper twist, replace the paprika with 1 tsp of lemon pepper seasoning and squeeze a fresh lemon over the fish right before serving.
If you like a spicy Cajun kick, use a pre made Cajun seasoning in place of the garlic and onion powder. For a gluten-free swap, use almond flour or a 1:1 gluten-free flour blend. Note that almond flour is grainier and won't brown as deeply as all purpose flour.
| Original Ingredient | Substitute | Why It Works |
|---|---|---|
| All Purpose Flour | Cornstarch | Lighter crust. Note: Less browning |
| Butter | Ghee | Higher smoke point. Note: Nuttier flavor |
| Paprika | Chili Powder | Adds heat. Note: Changes flavor profile |
Best Side Dish Ideas
Since the fish is mild and buttery, you need sides that provide acidity or freshness. A simple arugula salad with a lemon vinaigrette cuts through the richness beautifully.
For a heartier meal, pair this with a creamy ravioli sauce and some steamed asparagus. The tomato acidity in the sauce balances the fried notes of the fish. If you're keeping it light, steamed broccoli or a quick quinoa pilaf works well.
I hope you give this a try tonight. It really takes the stress out of dinner when you know you can get a great result in under 15 minutes. Enjoy your pan fried Tilapia!
Recipe FAQs
How to cook tilapia fillets in a pan?
Pat fillets dry, season, and coat in flour. Heat olive oil and butter over medium heat until sizzling, then cook undisturbed for 3-4 minutes per side until the internal temperature reaches 145°F.
Is tilapia considered a "garbage fish"?
No, this is a common misconception. Tilapia is a widely farmed, sustainable fish valued for its mild flavor and versatility in the kitchen.
How to reheat leftover pan fried tilapia?
Use a toaster oven or dry skillet. Heat over medium for 2 minutes per side to restore crispness, as microwaving makes the fish rubbery and soggy.
Why is my pan fried tilapia soggy?
You likely overcrowded the pan. When fillets touch, they release steam rather than searing, which prevents the mahogany crust from forming.
What are the quickest ways to cook tilapia?
Pan frying is one of the fastest methods. This technique takes only 14 minutes from prep to plate, making it an ideal weeknight option.
How to cook tilapia fillets in the oven?
Follow a baked tilapia recipe if you are cooking for a larger crowd. Baking is a great alternative that avoids the need for constant flipping in a skillet.
What sides or sauces pair well with this fish?
Creamy or vegetable based sides balance the mild fish. This dish pairs perfectly with a side of broccoli rice for a complete meal.
pan fried Tilapia Fillets 2