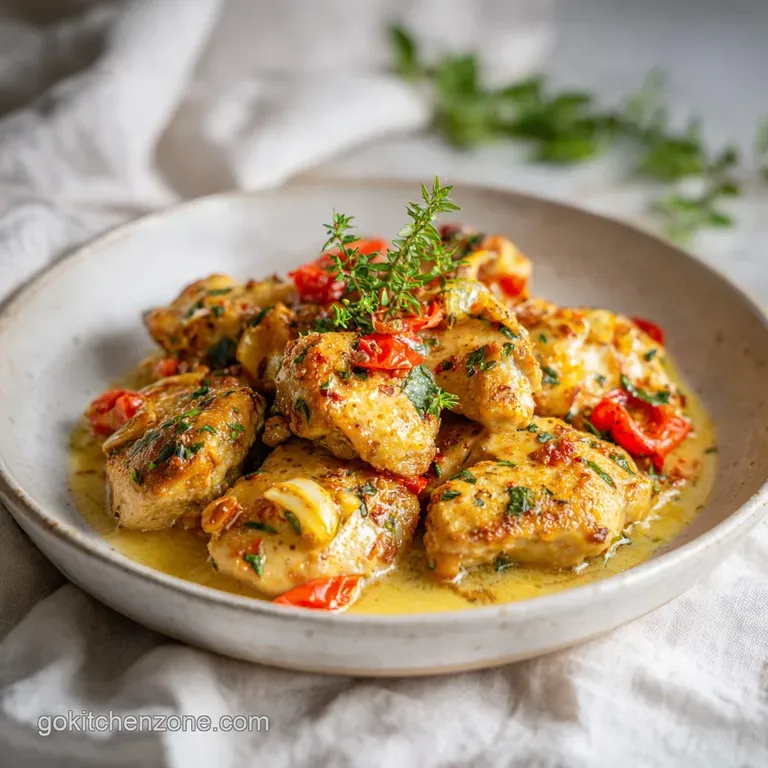
Creamy Garlic Chicken: Crispy and Velvety
- Time: Active 10 minutes, Passive 20 minutes, Total 30 minutes
- Flavor/Texture Hook: Velvety cream sauce with a golden, crispy edged crust
- Perfect for: Busy weeknights when you need a high protein, comforting win
- Master This Easy Stovetop Creamy Garlic Chicken for Weeknights
- Why This One Pan Technique Works Every Time
- Component Analysis for Better Flavor
- The Essential Elements and Smart Substitutes
- Reliable Tools for a One Pan Meal
- How to Make It
- How to Fix Common Problems
- Adjusting for Different Needs
- How to Store and Keep Fresh
- Presentation Tips for the Home Cook
- Recipe FAQs
- 📝 Recipe Card
Master This Easy Stovetop Creamy Garlic Chicken for Weeknights
There is a specific sound that happens when you drop a cold, flour dusted chicken cutlet into a shimmering pool of hot avocado oil. It is a sharp, rhythmic sizzle that tells you the crust is forming instantly. That sound is usually the best part of my Tuesday nights.
I remember the first time I tried making this Creamy Garlic Chicken without a plan. I just threw some garlic and cream in a pan and hoped for the best. The result was a thin, greasy mess that tasted more like warm milk than a proper sauce.
I realized then that the secret isn't just more garlic; it's how you treat that garlic.
This dish is about the specific choice of using garlic in two different ways. We are going with smashed whole cloves to infuse the fat with a mellow, nutty sweetness, followed by minced garlic for that sharp, punchy kick we all crave. It is a layering of flavor that most quick recipes skip.
When that garlic aroma hits the heavy cream and starts bubbling, your entire kitchen smells like a high end bistro, but you’re likely still in your sweatpants.
You can expect a sauce that actually clings to the meat rather than puddling at the bottom of the plate. It is rich, yes, but the hit of fresh lemon juice at the very end acts like a bright light in a dark room. It cuts through the fat of the Parmesan and heavy cream, making every bite feel balanced.
We're going to use one pan, a few reliable steps, and about 30 minutes to make the dinner struggle vanish.
Why This One Pan Technique Works Every Time
- Surface Protection: The all purpose flour dredge acts as a sacrificial layer that browns beautifully while keeping the chicken breast meat tender and juicy inside.
- Starch Thickening: Residual flour from the chicken stays in the pan fat, acting as a mini roux that naturally stabilizes the heavy cream and prevents it from breaking.
- Layered Aromatics: Starting with smashed garlic cloves infuses the oil with flavor without the risk of burning, while the minced garlic added later provides the immediate aromatic hit.
- Emulsion Stability: Adding chilled butter at the very end (a technique known as mounting) creates a glossy, thick finish that doesn't feel heavy or greasy on the palate.
| Method | Cook Time | Final Texture | Best For |
|---|---|---|---|
| Stovetop Skillet | 20 minutes | Crispy crust, silky sauce | Maximum flavor and speed |
| Oven Baked | 35 minutes | Softer texture, uniform heat | Hands off meal prep |
| Slow Cooker | 4 hours | Fall apart tender, thin sauce | Extremely busy mornings |
This comparison highlights why the skillet method is my go to for this specific dish. While the oven is great for batches, you lose that "shatter" of the golden crust that makes the stovetop version so addictive. If you are looking for a way to use up extra garlic in a different format, you might also like these Garlic Parmesan Turkey Meatballs which use a similar flavor profile but in a baked form.
Component Analysis for Better Flavor
| Ingredient | Science Role | Pro Secret |
|---|---|---|
| Chicken Bone Broth | Provides a rich protein base and liquid for deglazing | Use bone broth over standard stock for a "stickier" mouthfeel from the collagen. |
| Heavy Cream | Acts as the primary fat based emulsifier for the sauce | Ensure it's at room temperature before adding to prevent the sauce from "shocking" and curdling. |
| Parmesan Cheese | Adds salt, umami, and helps thicken the liquid | Always grate it fresh from a block; pre shredded cheese has starch coatings that make sauces grainy. |
Selecting the right chicken is the first step toward success here. I always suggest chicken breasts cut into thin cutlets. If you buy the thick, jumbo breasts, they take too long to cook through, and by the time the middle is done, the outside is as tough as a work boot.
Pounding them to a uniform half inch thickness ensures every piece finishes at the exact same moment.
The Essential Elements and Smart Substitutes
- 1.5 lbs chicken breast: Cut these into thin cutlets. Why this? They cook fast and provide more surface area for the sauce to cling to.
- Substitute: Chicken thighs (boneless/skinless) for a juicier, fattier result.
- 0.5 cup all purpose flour: Used for the light dredging. Why this? It creates the crust and thickens the sauce later.
- Substitute: Cornstarch or almond flour for a gluten-free alternative.
- 1 tsp sea salt: Essential for seasoning the flour.
- 0.5 tsp cracked black pepper: Provides a subtle heat.
- 1 tsp smoked paprika: This adds a deep, mahogany color to the crust.
- Substitute: Sweet paprika if you don't want the smoky notes.
- 2 tbsp avocado oil: A high smoke point oil. Why this? It won't burn during the over high heat searing process.
- Substitute: Grapeseed oil or refined olive oil.
- 2 cloves garlic, smashed whole: Used for the first layer of flavor.
- 4 cloves garlic, minced: The main flavor driver.
- 1 cup chicken bone broth: The liquid base.
- Substitute: Dry white wine (like Sauvignon Blanc) for a more acidic, sophisticated sauce.
- 1 cup heavy cream: Provides the "creamy" in Creamy Garlic Chicken.
- Substitute: Full fat coconut milk (note: will add a tropical flavor).
- 0.5 cup freshly grated Parmesan cheese: For salt and thickness.
- 1 tbsp fresh lemon juice: To brighten the heavy fats.
- 2 tbsp unsalted butter: Must be chilled and cubed. Why this? Cold butter emulsifies; warm butter just melts into oil.
| Original Ingredient | Substitute | Why It Works |
|---|---|---|
| Heavy Cream (1 cup) | Full fat Coconut Milk (1 cup) | Similar fat content. Note: Adds a distinct coconut flavor and slight sweetness. |
| All Purpose Flour | Almond Flour | Provides a nutty crust. Note: Does not thicken the sauce as effectively as wheat flour. |
| Avocado Oil | Ghee (Clarified Butter) | High smoke point with a rich, buttery flavor. |
Reliable Tools for a One Pan Meal

You don't need a kitchen full of gadgets for this. A 12 inch heavy bottomed skillet is your best friend here. I prefer stainless steel or cast iron because they hold heat better than thin aluminum pans.
When you drop the chicken in, a heavy pan won't lose its temperature, which is how you get that beautiful sear instead of just steaming the meat.
You'll also want a sturdy whisk and a meat mallet. If you don't have a mallet, a heavy rolling pin or even the bottom of a small saucepan works to pound the chicken flat. The goal is evenness, not aggression. Also, have a plate ready nearby to hold the chicken once it's seared.
This keeps the workflow smooth and prevents the garlic from burning while you're hunting for a dish.
How to Make It
- Prep the protein. Place the chicken between two sheets of plastic wrap and pound to a uniform 1/2 inch thickness using a meat mallet. Note: This ensures the chicken cooks at the same rate and stays tender.
- Season and dredge. In a shallow bowl, whisk together the flour, sea salt, black pepper, and smoked paprika. Dredge each chicken piece in the mixture, shaking off any excess. Note: A light coating is better than a thick paste.
- Heat the pan. Heat the avocado oil in a 12 inch heavy bottomed skillet over medium high heat until shimmering and slightly hazy.
- Sear the chicken. Sear the chicken for 4–5 minutes per side until a mahogany colored crust forms and the internal temperature reaches 165°F. Work in batches to avoid crowding the pan. Remove the chicken and set it aside on a plate.
- Soft garlic infusion. Reduce heat to medium. Add the two smashed garlic cloves to the residual fat to mellow. Note: This colors the fat with a sweet garlic flavor.
- Add minced garlic. Add the 4 minced garlic cloves and cook for 30 seconds until aromatic but not turning brown.
- Deglaze the skillet. Pour in the chicken bone broth to deglaze the pan, scraping up all the browned bits (fond) with a wooden spoon or whisk.
- Simmer the cream. Stir in the heavy cream and simmer until the sauce reduces slightly and begins to coat the back of a spoon.
- Melt the cheese. Whisk in the grated Parmesan cheese and lemon juice until the cheese is completely melted and the sauce is velvety.
- The glossy finish. Finish the sauce by whisking in the chilled cubed butter until emulsified and glossy. Return the chicken to the pan to coat thoroughly before serving.
How to Fix Common Problems
If things go sideways in the kitchen, don't panic. Most sauce issues are just a matter of temperature or ratios. One thing I've learned is that "broken" sauces where the oil separates from the cream usually happen because the heat was too high or the cheese was added too fast.
Why Your Sauce Separated
A "broken" sauce looks curdled or oily. This usually happens if the cream boils too violently or if you used pre shredded cheese with cellulose fillers. To fix this, remove the pan from the heat immediately and whisk in a splash of cold heavy cream or a teaspoon of water.
This helps bring the temperature down and re binds the fats.
Why the Chicken is Dry
If your chicken feels like cardboard, it was likely either too thick to begin with or left in the pan too long. The 1/2 inch thickness is a hard rule for a reason. If you find the outside is burning before the inside is done, your heat is too high. Aim for a medium high sizzle, not a smoky inferno.
| Problem | Root Cause | Solution |
|---|---|---|
| Thin Sauce | Not enough reduction or dredging flour | Simmer for 2 more minutes or whisk in an extra tablespoon of Parmesan. |
| Bitter Taste | Garlic was burnt | If the minced garlic turns dark brown/black, wipe the pan and start the sauce over. |
| Grainy Texture | Pre shredded cheese used | Whisk vigorously over low heat; next time, grate the Parmesan fresh from a block. |
Common Mistakes Checklist
- ✓ Pat chicken completely dry before dredging (prevents the flour from becoming a gummy paste).
- ✓ Ensure the oil is shimmering before adding chicken (prevents the meat from sticking and soaking up oil).
- ✓ Don't overcrowd the skillet (steam will trap between the pieces and ruin the crispy crust).
- ✓ Use room temperature cream (prevents the sauce from breaking when hitting the hot pan).
- ✓ Use chilled butter for the final whisk (creates the emulsion that gives the sauce its shine).
Adjusting for Different Needs
Scaling this recipe is fairly straightforward because it is a one pan meal. If you are cooking for a crowd and need to double it, do not try to squeeze all the chicken into the pan at once. You must sear in batches.
If you overcrowd the pan, the temperature drops, the chicken releases its juices, and you end up "boiling" the meat in its own liquid instead of searing it.
When doubling the sauce, be careful with the salt. The Parmesan and bone broth already bring a lot of sodium to the table. I usually suggest doubling the cream and broth but only increasing the salt and spices by about 50% at first. You can always add more salt at the end, but you can't take it out once it's in there.
If you are looking for a side dish that plays well with these flavors, this Creamy Parmesan Orzo is a fantastic companion. The orzo soaks up the extra garlic sauce beautifully, making it a very cohesive meal.
Decision Shortcut
- If you want a thicker sauce, let the cream simmer for an extra 3 minutes before adding the cheese.
- If you want a lighter meal, swap half the heavy cream for more bone broth and add an extra squeeze of lemon.
- If you want more "crunch", increase the flour dredge to a double dip (flour, then a quick dip in broth, then flour again).
How to Store and Keep Fresh
Storage: This Creamy Garlic Chicken will stay fresh in the fridge for up to 3 days. Keep it in an airtight glass container to prevent the garlic aroma from taking over your entire refrigerator. When you store it, the sauce will thicken significantly as the fats and proteins cool down.
Freezing: I generally don't recommend freezing cream based sauces. The emulsion tends to break when thawed, leaving you with a grainy, separated mess. If you must freeze it, do so for no more than 1 month, and be prepared to whisk it vigorously during reheating to bring the sauce back together.
Reheating: Avoid the microwave if possible. It turns the chicken rubbery. Instead, place the chicken and sauce in a small skillet over low heat. Add a tablespoon of milk or broth to loosen the sauce. Cover the pan for 2-3 minutes until the chicken is warmed through.
Zero Waste Tip: Don't toss those smashed garlic cloves after cooking. They become soft and buttery. I like to mash them into the sauce or spread them onto a piece of crusty bread. Also, if you have leftover sauce but no chicken, it makes a killer base for a quick pasta dish the next day.
Culinary Myths Debunked
- Myth: You must use olive oil for everything. Truth: Olive oil has a low smoke point. For searing chicken at high heat, avocado oil is much better because it won't burn or turn bitter.
- Myth: Searing "seals in" the juices. Truth: Searing is actually for flavor (the Maillard reaction). The "juice" is kept inside by not overcooking the meat and letting it rest for a minute before slicing.
- Myth: Fresh garlic is always better than jarred. Truth: Okay, this one is mostly true. Jarred garlic often has an acidic preservative that ruins the mellow sweetness of this specific sauce. Stick to the fresh bulbs for this one.
Presentation Tips for the Home Cook
We eat with our eyes first, and a pan of beige chicken and white sauce can look a bit dull without a little help. The easiest way to make this look like a 25 dollar entree is through contrast. The mahogany crust we created during the sear is your best friend here.
Don't drown the chicken entirely in the sauce; leave some of that golden brown crust peeking through.
Fresh herbs are non negotiable for the finish. A sprinkle of chopped flat leaf parsley or even some fresh thyme adds a pop of green that signals freshness. If you want to get fancy, a few very thin slices of lemon tucked between the chicken pieces look great and remind people of that citrus hit inside the sauce.
For serving, I like to use wide, shallow bowls rather than flat plates. It keeps the sauce contained so you can swipe every bit of it up with a piece of bread or some mashed potatoes. If you're looking for more ways to use garlic in your cooking, I've found that this Garlic Butter Sauce is a great basic recipe to keep in your back pocket for seafood nights. It follows many of the same principles of heat control and aromatic layering that we used today.

Recipe FAQs
How to ensure the chicken breast cooks evenly without drying out?
Place the chicken between two sheets of plastic wrap and pound to a uniform 1/2 inch thickness. This consistent thickness allows the meat to reach 165°F internally at the same rate, preventing the thinner edges from overcooking.
How to get a deep, mahogany colored crust on the chicken?
Heat the avocado oil in a 12 inch heavy bottomed skillet until it is shimmering before adding the meat. Patting the chicken completely dry before dredging in the flour mixture is also essential to prevent the coating from turning into a gummy paste.
How to avoid overcrowding the pan during searing?
Work in small batches to ensure there is space between each cutlet. Crowding the skillet traps steam, which ruins the crispy crust and prevents the mahogany color from forming correctly.
How to keep the cream sauce from breaking or curdling?
Use room temperature heavy cream to minimize the temperature shock when it hits the hot pan. If you enjoyed mastering this stable sauce technique, you can apply the same emulsification logic when preparing other velvety dairy based dishes.
Is it necessary to use a specific type of butter for the final sauce?
Yes, the butter must be chilled and cubed. Whisking cold butter into the sauce at the end, a technique known as monter au beurre, is what creates that signature glossy, emulsified finish.
How to build maximum flavor in the sauce base?
Deglaze the skillet with chicken bone broth after cooking the garlic. Scraping up the browned bits, or fond, from the bottom of the pan is the secret to unlocking the deep savory flavor in the final cream sauce.
How to properly manage the garlic so it doesn't turn bitter?
Add smashed garlic cloves to the residual fat first to mellow the flavor, then stir in the minced garlic for only 30 seconds. Cooking the minced garlic briefly ensures it becomes aromatic without burning or turning bitter in the hot oil.
Creamy Garlic Chicken Skillet
Ingredients:
Instructions:
Nutrition Facts:
| Calories | 721 kcal |
|---|---|
| Protein | 59g |
| Fat | 44g |
| Carbs | 15g |
| Fiber | 1g |
| Sugar | 2g |
| Sodium | 785mg |
