Southern Style Banana Pudding: Silky Custard and Meringue
- Time: Active 15 minutes, Passive 15 minutes, Total 30 minutes
- Flavor/Texture Hook: Silky vanilla custard with shatter crisp toasted meringue
- Perfect for: Family reunions, Sunday dinners, or a feel good weekend treat
- The One Step That Makes Your Custard Silky
- Component Deep Dive for Better Results
- The Technical Details for a Flawless Result
- Sourcing the Best Ingredients for Rich Flavor
- The Tools You Need for Silky Custard
- The Step by Step Guide to Perfect Layers
- Solving Common Texture and Meringue Problems
- Scaling the Dish for Large Gatherings
- Variations for Every Mood and Occasion
- Debunking Common Custard Misconceptions
- How to Store and Save Your Leftovers
- Finding the Best Pairings for Your Dessert
- Recipe FAQs
- 📝 Recipe Card
Close your eyes and imagine the kitchen on a humid Sunday afternoon. There is a specific, heady scent that fills the air when vanilla custard begins to bubble on the stove - it is warm, floral, and deeply nostalgic.
I remember the first time I stood by the counter, watching the whisk move in rhythmic circles, waiting for those first thick "bloops" of steam to signal the pudding was ready. It is a dish that feels like a hug in a bowl, a staple at every backyard gathering where the sun stays out late and the laughter is loud.
This isn't just about mixing things together; it is about the moment the warm custard hits the crisp wafers and you know, just know, that they are going to soften into that perfect, cake like texture overnight.
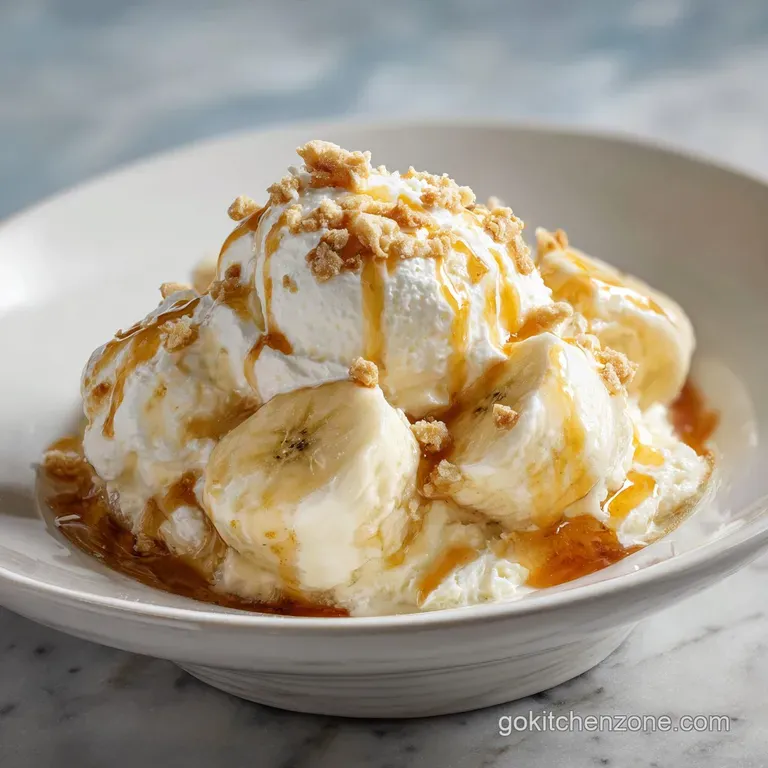
We are going for a southern style classic here, but with the vibrance and crave worthy creaminess that only comes from scratch made elements. You are going to love how the bright yellow bananas pop against the ivory custard, especially when topped with those golden brown peaks of meringue that look like tiny toasted mountains.
We've all had those puddings that are either too thin or, worse, taste like nothing but sugar. This version is different. It balances the sweetness of 200g of granulated sugar with the richness of four large egg yolks and a punch of pure vanilla extract.
It is colorful, it is bold, and it is exactly what you want to bring to the table when you want people to ask for seconds before they’ve even finished their first serving.
The One Step That Makes Your Custard Silky
Building a great dessert is about understanding how the ingredients talk to each other. When we talk about a custard based pudding, we are really talking about a delicate dance of thickening agents and proteins that need to stay in harmony so the final result is velvety rather than lumpy.
- Starch Swelling: The 40g of cornstarch acts like tiny sponges; as they heat up in the milk, they absorb liquid and expand, which gives the pudding its structure and prevents it from being a runny mess.
- Egg Tempering: By slowly adding a cup of the hot milk mixture into the 4 egg yolks, we gently raise their temperature so they don't "scramble" or clump when they hit the main pot.
- Fat Stabilization: Adding 30g of cubed butter at the very end doesn't just add flavor; it creates a glossy finish and a smoother mouthfeel by coatng the starch molecules.
- Acid Interaction: The 1g of cream of tartar in the meringue serves to stabilize the egg white proteins, ensuring those stiff peaks don't collapse while they are browning in the oven.
| Method | Total Time | Texture | Best For |
|---|---|---|---|
| Traditional Stovetop | 30 minutes | Velvety, rich, complex | Special occasions, authentic flavor |
| Instant Shortcut | 10 minutes | Light, airy, one dimensional | Quick weeknight cravings |
| No Bake/Whipped | 20 minutes | Mousse like, very soft | High volume parties, summer heat |
Choosing the stovetop method might take a few extra minutes of whisking, but the depth of flavor you get from cooking the sugar and milk together is incomparable. The heat transforms the raw starch taste into something toasted and sweet, providing a sturdy base that won't turn into a watery soup once the bananas start releasing their natural juices.
Component Deep Dive for Better Results
To get that crave worthy result every single time, we need to look at what's actually happening inside the saucepan. Not all ingredients are created equal, and in a simple dish like this, quality shines through.
| Ingredient | Science Role | Pro Secret |
|---|---|---|
| Full fat Milk | Provides the liquid base and essential fats for creaminess. | Never use skim; the lack of fat will cause the starch to clump and the flavor to fall flat. |
| Cornstarch | The primary thickener that holds the "set" of the pudding. | Whisk it into the sugar while cold to separate the granules and prevent lumps later. |
| Egg Yolks | Adds emulsifiers and a rich, golden color to the custard. | Use room temperature yolks for a more seamless tempering process. |
Using whole milk is non negotiable here if you want that feel good richness. If you try to cut corners with lower fat versions, the pudding loses its ability to coat the back of a spoon, and you'll miss out on that luxurious, velvety texture that defines a true homemade classic.
The Technical Details for a Flawless Result
Accuracy is your best friend when you are working with custards. While cooking can often be about "vibes" and "handfuls," a good pudding relies on specific ratios to ensure it sets up properly in the fridge without becoming a brick.
- Oven Temperature: 175°C (350°F). This is the "Goldilocks" zone hot enough to brown the meringue quickly before the pudding underneath gets too hot and begins to thin out.
- Final Custard Cook: 2 minutes. Once the tempered yolks are back in the pan, you need exactly this much time to cook off the raw flour taste of the starch without over tightening the eggs.
- Wafer Weight: 315g. This amount ensures you have enough cookies to create three distinct layers in a 9x9 inch dish, providing the necessary structural integrity for clean slices.
Precision isn't about being fussy; it's about consistency. If you pull the custard off the heat too early, it might look thick while hot but will turn into a pourable sauce as it cools. On the other hand, overcooking it will make it heavy and dull.
Stick to these checkpoints, and you’ll have a dessert that looks like it came from a professional bakery.
Sourcing the Best Ingredients for Rich Flavor
When you are gathering your essentials, think about the colors and textures. We want bright yellow bananas look for the ones with just a few brown speckles, as these are the sweetest but still firm enough to slice neatly.
- 200g Granulated Sugar: The backbone of the sweetness.
- 40g Cornstarch: Why this? Essential for a thick, sliceable set without using flour.
- 2g Fine Sea Salt: To balance the sugar and make the vanilla pop.
- 720ml Full fat Whole Milk: Use the freshest milk you can find.
- 4 Large Egg Yolks: Why this? Provides the yellow hue and rich mouthfeel.
- 30g Unsalted Butter: Cubed and cold.
- 10ml Pure Vanilla Extract: Avoid the imitation stuff; you'll taste the difference.
- 315g Vanilla Wafers: The classic choice for that cake like texture.
- 5 Large Ripe Bananas: Sliced into uniform rounds.
- 4 Large Egg Whites: Saved from your yolks, kept at room temperature.
- 100g Granulated Sugar: Specifically for the meringue topping.
- 1g Cream of Tartar: Why this? Keeps the meringue peaks from collapsing.
| Original Ingredient | Substitute | Why It Works |
|---|---|---|
| Whole Milk | Coconut Milk (Full Fat) | Similar fat content. Note: Adds a tropical fusion twist. |
| Vanilla Wafers | Biscoff Cookies | Adds a deep cinnamon, caramelized flavor. |
| Granulated Sugar | Light Brown Sugar | Adds a molasses like depth to the custard. |
If you decide to swap the wafers for Biscoff or even graham crackers, just remember that the moisture absorption will be different. Vanilla wafers are engineered to soak up the custard and become soft, whereas a hard biscuit might stay a bit crunchier.
Both are delicious, but the classic "soggy wafer" (in the best way possible!) is the hallmark of the southern style.
The Tools You Need for Silky Custard
You don't need a kitchen full of gadgets, but a few specific items will make your life much easier. A heavy bottomed saucepan is probably the most important tool here; it distributes heat evenly, which is vital when you are working with milk and sugar that love to scorch on thin metal.
A balloon whisk is also essential for getting into the corners of the pan. You want to keep that mixture moving constantly. If you leave it for even thirty seconds, the cornstarch can settle at the bottom and create a thick, burnt layer. I also highly recommend a 9x9 inch glass or ceramic baking dish.
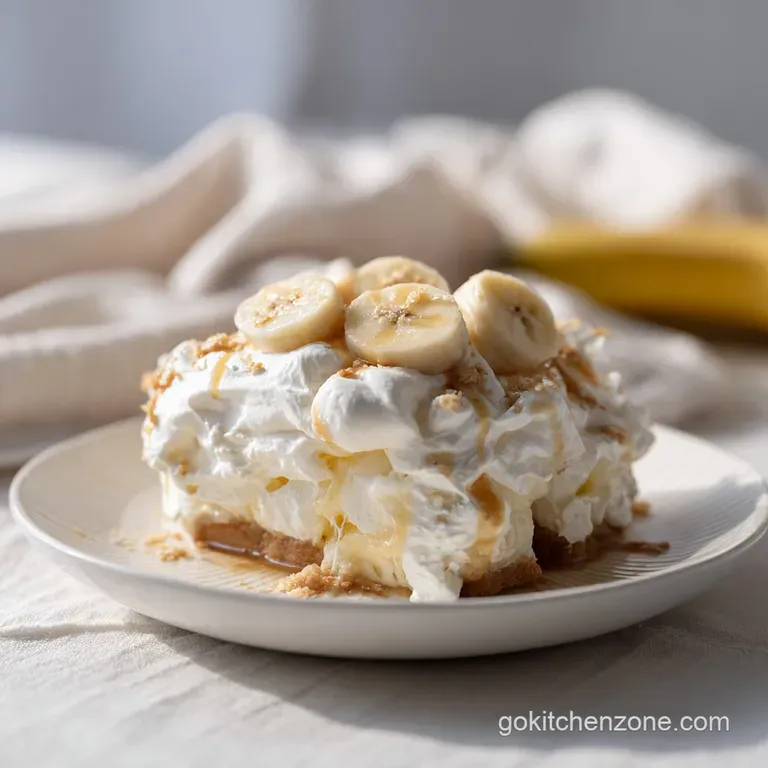
Glass is great because you can see those beautiful layers of cookies and bananas from the side, making for a much more colorful presentation.
Finally, make sure your mixing bowl for the egg whites is spotlessly clean. Even a tiny drop of fat or yolk will prevent those whites from whipping into the stiff, glossy peaks we need for the meringue. I usually wipe my bowl down with a little lemon juice or white vinegar first just to be safe.
The step-by-step Guide to Perfect Layers
Now for the fun part. Put on some music, get your whisk ready, and let's make some magic. The smell of the vanilla hitting the warm milk is honestly my favorite part of the whole process.
- Whisk the dry base. In a heavy bottomed saucepan, whisk together 200g sugar, 40g cornstarch, and 2g salt while they are cold. Note: This prevents the starch from forming lumps once the liquid is added.
- Add the milk. Slowly whisk in the 720ml of whole milk. Place the pan over medium heat and stir continuously with a spatula or whisk. Cook until the mixture begins to thicken and bubble.
- Temper the yolks. Whisk your 4 egg yolks in a separate bowl. Slowly pour one cup of the hot milk mixture into the yolks while whisking constantly.
- Finish the custard. Pour the tempered yolk mixture back into the saucepan. Continue cooking for 2 minutes until thick and glossy.
- Enrich the flavor. Remove the pan from the heat. Stir in the 30g of cubed butter and 10ml of vanilla extract until the butter has melted completely.
- Build the layers. In your 9x9 inch dish, create a layer of vanilla wafers, then a layer of sliced bananas, then the warm custard. Repeat until you have used all 315g of wafers and 5 bananas.
- Whip the meringue. In a clean bowl, beat the 4 egg whites with 1g cream of tartar until soft peaks form. Gradually add 100g sugar, beating until stiff, glossy peaks form.
- Seal and bake. Spread the meringue over the warm pudding, making sure to seal it all the way to the edges of the dish. Bake at 175°C for 10-15 minutes until golden brown.
The aroma when the meringue starts to toast is absolutely incredible it’s like a giant toasted marshmallow. You want to look for a beautiful, even tan color on the peaks. Don't walk away from the oven during those last few minutes; meringue can go from perfect to burnt very quickly!
Solving Common Texture and Meringue Problems
Even the best cooks run into trouble sometimes. The two biggest enemies of a perfect banana pudding are a runny base and a "weeping" meringue (where a layer of liquid forms between the pudding and the topping).
Why Your Pudding is Runny
If your pudding doesn't set, it usually means the cornstarch wasn't cooked long enough to fully "activate." It needs to reach a gentle boil to achieve its full thickening power. Another culprit could be the bananas; if they are overripe, they release more moisture, which can thin out the custard over time.
Why the Meringue Shrinks
When the meringue pulls away from the sides, it's usually because it wasn't "anchored" to the edges of the dish. When you spread it, make sure the egg whites actually touch the rim of the baking dish. This creates a seal that holds the meringue in place as it bakes and cools.
| Problem | Root Cause | Solution |
|---|---|---|
| Lumpy Custard | Starch added to hot liquid | Always whisk cornstarch into cold sugar and milk first. |
| Gritty Meringue | Sugar added too fast | Add sugar one tablespoon at a time while beating whites. |
| Thin/Watery Base | Under cooked starch | Ensure the mixture bubbles for a full 2 minutes after tempering. |
Common Mistakes Checklist
- ✓ Never stop stirring the custard; it can scorch in seconds.
- ✓ Use a heavy bottomed pan to ensure even heat distribution.
- ✓ Ensure egg whites are at room temperature for maximum volume.
- ✓ Slice bananas just before layering to prevent unappetizing browning.
- ✓ Don't skip the cream of tartar; it’s the "glue" that holds your meringue together.
- ✓ Let the pudding cool slightly before refrigerating to prevent condensation.
Scaling the Dish for Large Gatherings
If you are feeding a crowd maybe a big summer BBQ or a holiday party you’ll likely want to double this. Scaling a custard isn't as simple as just doubling everything and keeping the same pot.
When doubling the recipe, use a much larger, wider pot. The increased surface area helps the milk heat more evenly and prevents the bottom from scorching while you wait for the top to catch up. You should also be prepared for the thickening process to take a few extra minutes since there is more mass to heat.
For the meringue, I recommend sticking to a maximum of 8 egg whites in a standard stand mixer bowl; any more than that and you won't get the same air incorporation.
If you are scaling down for a small dinner for two, you can easily halve the ingredients. Use a smaller saucepan and a small loaf pan or individual ramekins for the layers. The cook time for the custard will be faster, so keep a close eye on it!
| Servings | Dish Size | Wafer Count | Cook Time Adjustment |
|---|---|---|---|
| 5 People | 9x5 Loaf Pan | ~150g | Reduce by 5 mins |
| 10 People | 9x9 Square | 315g | Standard 15 mins |
| 20 People | 9x13 Rect. | 630g | Increase by 10 mins |
Variations for Every Mood and Occasion
One of the best things about this recipe is how much you can play with it. While the classic is feel good and nostalgic, sometimes you want something a bit more fusion forward or modern.
For a Salted Caramel Twist, try drizzling a little homemade caramel sauce between the layers and swapping the sea salt for a flakey Maldon salt on top of the meringue. It adds a sophisticated edge to the sweetness.
If you have guests who are gluten sensitive, there are some fantastic gluten-free vanilla wafers on the market now that hold up surprisingly well in the custard.
If you love these warm, comforting fruit flavors, you might also enjoy a Banana Bread Cobbler for your next brunch. It uses that same wonderful banana aroma but in a cake like format. For a different kind of stovetop comfort, my Creamy Rice Pudding uses a similar tempering technique to achieve a velvety texture that is perfect for chilly evenings.
For a Modern Salted Caramel Twist
Add 50ml of caramel sauce to the custard after removing from heat. This creates a "dulce de leche" style base that is incredibly rich and pairs perfectly with the fresh bananas.
To Make it gluten-free
Swap the 315g of wafers for a gluten-free alternative. Because GF cookies can sometimes be harder, let the pudding sit in the fridge for at least 4 hours before serving to ensure they soften properly.
Debunking Common Custard Misconceptions
There are a lot of "old wives' tales" in the kitchen, especially when it comes to eggs and milk. Let's clear a few things up so you can cook with confidence.
Myth: You must boil the custard for a long time to make it thick. Actually, once the cornstarch reaches its gelatinization point (usually around 80-90°C), it thickens almost instantly.
Boiling it for too long after that can actually break down the starch bonds and make the pudding thin again. Two minutes of bubbling is the sweet spot.
Myth: Adding more eggs always makes it creamier. While yolks add richness, adding too many can make the pudding taste "eggy" or heavy. The balance of 4 yolks to 720ml of milk is designed to give you that velvety feel without over powering the delicate vanilla and banana flavors.
Myth: Aluminum pans are fine for custard. Avoid them! Aluminum can react with the egg yolks and turn your beautiful yellow custard a weird, unappetizing grey color. Always stick to stainless steel, enamel, or non stick heavy bottomed pans.
How to Store and Save Your Leftovers
This is one of those rare dishes that actually tastes better after a few hours in the fridge because the wafers have time to absorb the moisture from the custard. However, it does have a shelf life.
Storage: Keep the pudding in the fridge, covered loosely with plastic wrap. It will stay fresh and delicious for about 3 days. After that, the bananas will start to soften too much and release liquid, which can make the base a bit watery.
Zero Waste Tip: If you find yourself with extra bananas that are getting too ripe for the pudding, don't toss them! Peel them and pop them in a freezer bag for smoothies, or mash them up to use in a Moist Banana Cake. Even the leftover egg shells can be crushed and added to your garden soil for a calcium boost!
I don't recommend freezing this specific pudding. The custard will "split" when it thaws, resulting in a grainy texture, and the meringue will turn into a sticky, weepy mess. This is a dessert meant to be enjoyed fresh and shared with friends.
Finding the Best Pairings for Your Dessert
Since this is a rich, creamy, and fairly sweet dessert, you want to serve it with something that offers a bit of contrast. A strong, dark roast coffee is the classic pairing the bitterness of the coffee cuts right through the sugar and fat of the custard.
If you are serving this at a party, consider a side of fresh berries, like raspberries or blackberries. The tartness of the fruit provides a beautiful counterpoint to the mellow vanilla. For a real "southern porch" vibe, a glass of cold, unsweetened iced tea with a wedge of lemon is perfection.
No matter how you serve it, this banana pudding is going to be the star of the show. It’s colorful, it’s comforting, and it’s a total crowd pleaser. Just be prepared to share the recipe everyone is going to want to know how you got that custard so perfectly silky!

Recipe FAQs
Can you make pudding from scratch?
Yes, homemade custard is superior in flavor and texture. By whisking 200g sugar, 40g cornstarch, and salt into whole milk over medium heat, you create a rich, glossy base that surpasses any boxed mix.
What do you put on bananas to keep them from turning brown in banana pudding?
Do not add anything to the bananas; simply slice them immediately before assembly. The best defense against oxidation is timing the prep so the bananas are sealed between the warm custard layers as quickly as possible.
Is it better to use cornstarch or flour for banana pudding?
Use cornstarch for the cleanest flavor and glossiest finish. Flour often leaves a pasty, opaque consistency, whereas cornstarch provides the stable, smooth thickening required for a classic custard. If you enjoy mastering these thickening agents, the same fat and starch ratio logic applies to creating consistent bakes in other desserts.
What can I use to thicken my banana pudding?
Stick to cornstarch as the primary thickener. Ensure you whisk it thoroughly with the sugar and salt while cold before adding the milk to prevent clumps, then cook continuously for two minutes after tempering in your egg yolks to reach the ideal glossy consistency.
How to keep the meringue from weeping?
Spread the meringue while it is still warm and seal the edges completely against the dish. Using cream of tartar is non-negotiable here, as it stabilizes the egg whites and creates the structural integrity needed to prevent liquid from pooling.
How to prevent the custard from scorching?
Use a heavy bottomed saucepan and never stop stirring. Constant motion with a spatula ensures even heat distribution, preventing hot spots that cause the eggs and milk to burn on the bottom of the pan.
How to tell when the custard is finished cooking?
Look for the mixture to bubble and thicken to a glossy, coat the-spoon consistency. After tempering the yolks and returning the mixture to the heat, cook for exactly two minutes to ensure the cornstarch is fully activated without overcooking the eggs.
Southern Style Banana Pudding
Ingredients:
Instructions:
Nutrition Facts:
| Calories | 443 kcal |
|---|---|
| Protein | 7.2 g |
| Fat | 12.5 g |
| Carbs | 71.6 g |
| Fiber | 2.1 g |
| Sugar | 52.4 g |
| Sodium | 222 mg |
