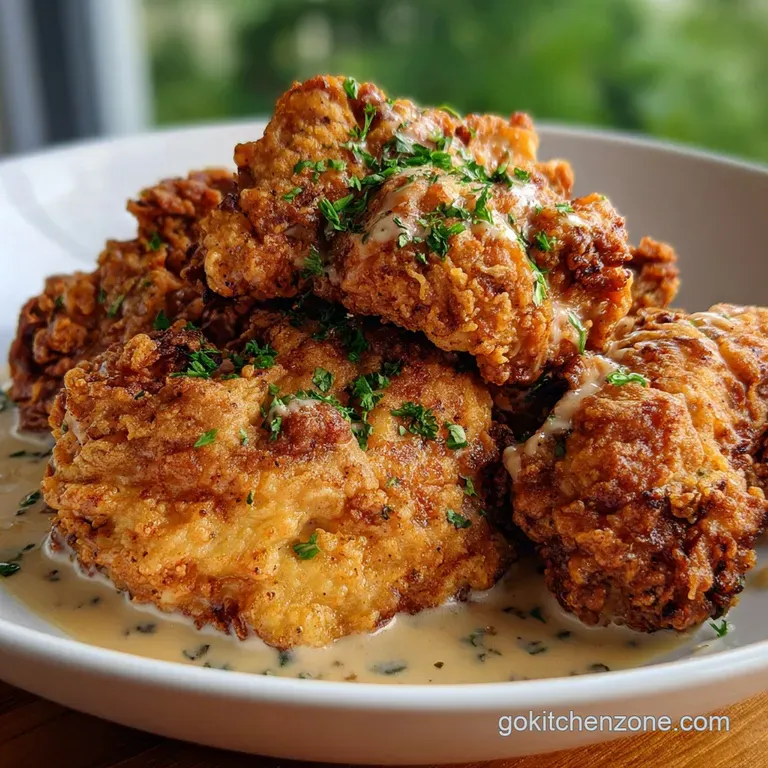
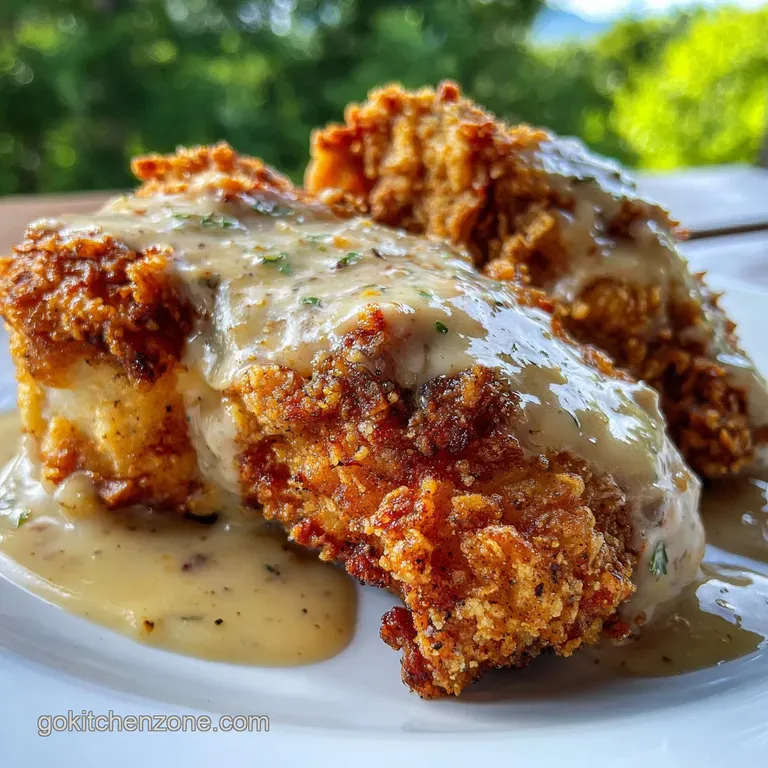
Country Fried Chicken: Crispy with Gravy
- Time: Active 20 minutes, Passive 15 minutes, Total 35 mins
- Flavor/Texture Hook: Shattering crust with a velvety pepper gravy
- Perfect for: A cozy weeknight dinner or a crowd-pleasing weekend treat
- Mastering the Science of the Golden Crunch
- Essential Components for Recipe Success
- Essential Tools for Home Cooks
- Systematic Cooking Flow for Success
- Solving Common Frying Problems
- Adjusting for Different Groups
- Debunking Kitchen Myths
- Keeping It Fresh and Zero Waste
- Final Serving Suggestions
- High in Sodium
- Country Fried Chicken FAQs
- 📝 Recipe Card
Listen, we have all been there. It is 6:00 PM on a Tuesday, the kids are asking what is for dinner, and you are staring at a pack of chicken breasts wondering how to make them interesting again. I remember the first time I tried making this. I thought I could just toss some flour on the meat and call it a day.
The result? A soggy, sad mess that peeled off like wet wallpaper. I was devastated, but it taught me the most important lesson in home cooking: the "how" matters just as much as the "what."
Now, when I drop those breaded pieces into the hot oil, the sizzle is music to my ears. The aroma of smoked paprika and cracked black pepper fills the kitchen, and I know exactly what is coming. My kids actually stay in the kitchen just to wait for that first piece to come out of the pan.
We are talking about a crust that actually stays put and a gravy that is thick enough to coat a spoon without being gloopy. This is the version that finally worked for me, and I promise, it is going to happen for you too.
The trick to getting that mahogany glow is all about patience and a few weird things I learned by failing. We are not just making dinner here, we are creating that specific kind of comfort that makes the whole day feel better. It is direct, it is honest, and it is exactly what you need when the week gets heavy.
Forget about anything fancy, let's just focus on getting that perfect crunch every single time.
Mastering the Science of the Golden Crunch
The Cornstarch Matrix: Adding 0.5 cup cornstarch to the flour creates a brittle protein structure that does not develop gluten as easily, resulting in a shatter style crunch rather than a chewy one.
Buttermilk Tenderization: The mild lactic acid in 1.5 cups full fat buttermilk gently breaks down the lean protein fibers in the 1.5 lbs boneless skinless chicken breasts, ensuring they stay juicy during the over high heat fry.
The Hydration Bond: Letting the breaded chicken sit for a few minutes before frying allows the buttermilk and flour to form a "glue" that prevents the crust from separating from the meat in the pan.
Carryover Thermodynamics: The 1.5 lbs of chicken continues to cook for about 2-3 minutes after leaving the pan, so pulling it out just as it hits that golden brown shade is crucial to prevent drying out.
| Cooking Method | Cook Time | Texture Outcome | Best For |
|---|---|---|---|
| Cast Iron Fry | 15 minutes | Thick, craggy, deeply browned crust | Maximum flavor and traditional feel |
| Air Fryer | 18 minutes | Lighter, drier crunch with less oil | A healthier weeknight alternative |
| Deep Fryer | 8 minutes | Uniformly golden and very airy crust | Consistency when cooking for a crowd |
When you are looking for a complete meal, this chicken pairs beautifully with something fresh. I often serve it alongside my Mediterranean Chicken Wraps recipe if I’m doing a big family spread where people want different options. The contrast between the heavy gravy and the zesty wraps is always a hit at my house.
Essential Components for Recipe Success
| Ingredient | Science Role | Pro Secret |
|---|---|---|
| Full fat Buttermilk | Chemical tenderizer | Use cold buttermilk to keep the fat stable during the dredging process |
| Cornstarch | Moisture absorber | It prevents the flour from becoming a doughy mess when it hits the oil |
| Cracked Black Pepper | Flavor aromatics | Toast the pepper in a dry pan for 30 seconds to wake up the oils |
| Neutral Oil | Heat conductor | Choose an oil with a high smoke point like canola or grapeseed |
To make this happen, you need a few specific things from your pantry. Don't skip the hot sauce in the brine; it doesn't make it spicy, it just adds a necessary hit of vinegar that brightens the whole dish.
- 1.5 lbs boneless skinless chicken breasts: Pounded to 1/2 inch thickness. Why this? Ensures even cooking so the edges don't burn before the center is safe.
- 1.5 cups full fat buttermilk: Substitute with 1.5 cups whole milk + 1 tbsp lemon juice. Why this? The acidity is vital for breaking down tough protein strands.
- 1 tsp hot sauce: Such as Frank's RedHot.
- 1 tsp kosher salt: Use half the amount if using fine table salt.
- 0.5 tsp coarsely ground black pepper: For the brine.
- 2 cups all purpose flour: The base of our breading.
- 0.5 cup cornstarch: Substitute with potato starch for similar results. Why this? It lowers the protein content of the flour for a crispier finish.
- 2 tsp garlic powder: Essential for that savory, "country" profile.
- 2 tsp onion powder: Adds sweetness and depth to the flour mix.
- 1 tsp smoked paprika: Substitute with regular paprika for less smokiness.
- 1 tbsp cracked black pepper: The star of the gravy and crust.
- 1 cup neutral oil for frying: Canola, vegetable, or peanut oil.
- 0.25 cup all purpose flour: For the gravy roux.
- 2 cups whole milk, warmed: Using warm milk prevents lumps in your gravy.
- Salt and heavy black pepper: To taste for the finishing gravy.
Essential Tools for Home Cooks
For this recipe, I highly recommend a large cast iron skillet, like a 12 inch Lodge. The heavy metal holds heat much better than stainless steel, which means when you drop that cold chicken in, the oil temperature doesn't plummet. If you don't have cast iron, a heavy bottomed Dutch oven is your next best friend.
You'll also need a meat mallet for pounding the chicken. If you don't have one, a heavy rolling pin or even the bottom of a small saucepan works in a pinch. Just make sure you cover the chicken with plastic wrap first to avoid a mess. Finally,, a wire cooling rack set over a baking sheet is non negotiable.
If you put the finished chicken directly onto a plate or paper towels, the steam will trapped underneath and turn that beautiful crust into mush in seconds.
Systematic Cooking Flow for Success
1. Prepare and Tenderize
Place the 1.5 lbs boneless skinless chicken breasts between two sheets of plastic wrap. Use a mallet to pound them to a uniform 1/2 inch thickness. Note: This ensures the chicken cooks at the same rate throughout.
2. The Brine Phase
In a shallow bowl, whisk together 1.5 cups full fat buttermilk, 1 tsp hot sauce, 1 tsp kosher salt, and 0.5 tsp black pepper. Submerge the chicken in this mixture and let it sit for at least 15 minutes.
3. Mix the Dry Dredge
In a separate wide dish, combine 2 cups all purpose flour, 0.5 cup cornstarch, 2 tsp garlic powder, 2 tsp onion powder, 1 tsp smoked paprika, and 1 tbsp cracked black pepper. Whisk thoroughly until the spices are evenly distributed.
4. The Double Dredge Process
Remove a piece of chicken from the buttermilk, letting the excess drip off. Press it firmly into the flour mixture, then dip it back into the buttermilk, and finally back into the flour. Note: This "double dip" creates those extra crunchy bits we love.
5. Heat the Oil
Pour 1 cup neutral oil into your skillet and heat over medium high until a pinch of flour sizzles immediately. The oil should be shimmering but not smoking.
6. The Frying Stage
Carefully place two pieces of chicken into the pan. Fry for 4-5 minutes per side until the crust is a deep mahogany brown.
7. The Rest Period
Transfer the fried chicken to a wire rack. Let it rest while you make the gravy. Note: Resting allows the juices to redistribute inside the meat.
8. Start the Gravy Roux
Drain all but 0.25 cup of the frying oil from the pan, keeping the browned bits (the fond). Whisk in 0.25 cup all purpose flour and cook for 2 minutes until it smells slightly nutty.
9. Incorporate the Milk
Slowly whisk in 2 cups of warmed whole milk. Continue whisking over medium heat until the sauce thickens and bubbles.
10. Final Seasoning
Stir in plenty of extra black pepper and salt. Pour the velvety gravy over the crispy chicken and serve immediately.
Solving Common Frying Problems
Sometimes things don't go as planned in the kitchen, and that is okay. The most common heartbreak with this dish is the breading falling off. Usually, this happens because the chicken was too wet when it hit the flour, or you flipped it too early. Let the crust set before you even think about touching it with tongs.
Why Your Crust Is Peeling
If your breading is sliding off like a loose coat, it's often due to "steam pockets." This happens if the chicken wasn't pounded evenly or if there was too much moisture trapped under the flour.
To fix this, always pat the chicken dry before the initial buttermilk dip, and make sure to press the flour into the meat firmly with the palm of your hand.
| Problem | Root Cause | Solution |
|---|---|---|
| Soggy Crust | Oil temperature too low | Use a thermometer; ensure oil is at 350°F before adding chicken |
| Burnt Breading | Heat too high or sugar in brine | Lower heat to medium and avoid honey or sugar in your buttermilk mix |
| Raw Middle | Chicken too thick | Always pound to 1/2 inch; use a meat thermometer to hit 165°F |
Common Mistakes Checklist
- ✓ Never crowd the pan - only fry two pieces at a time to keep oil temp high.
- ✓ Don't skip the cornstarch - flour alone will never get that specific shatter.
- ✓ Let the breaded chicken rest for 5 minutes before frying to set the coating.
- ✓ Use a wire rack for cooling - paper towels are the enemy of crunch.
- ✓ Keep the milk warm for the gravy to prevent a lumpy, broken sauce.
If you're in a rush and need a faster version of this flavor profile, you might want to try my Grilled Chicken Sweet recipe. It hits some of those same savory notes but skip the frying entirely, which is great for a busy Monday.
Adjusting for Different Groups
When scaling this recipe down for just two people, it is pretty straightforward. You can easily halve the chicken and the gravy ingredients. However, I still recommend making the full amount of the flour dredge. Having a large volume of flour makes the dredging process much cleaner and more efficient.
For a single egg or smaller amounts of buttermilk, just use what you need and save the rest for pancakes the next morning.
If you are scaling up for a big Sunday dinner of 8 or 12 people, you'll need to work in batches. Keep the finished chicken on a wire rack in a 200°F oven to keep it warm while you finish the rest.
When doubling the spices, be careful with the salt; I usually go with 1.5x the salt even if I'm 2x the chicken, as it's easier to add more later than to fix a salt bomb. For the gravy, you'll want to use a larger pot if you're going beyond 4 cups of milk to ensure you have enough room to whisk vigorously without splashing.
| Goal | If you want... | Then do this... |
|---|---|---|
| Extra Crunch | Maximum cragginess | Add 2 tablespoons of buttermilk directly into the dry flour mix and stir to create little clumps before dredging. |
| Lighter Feel | Less oil | Pan fry for 2 minutes per side to set the crust, then finish in a 400°F oven for 10 minutes. |
| Spicy Kick | More heat | Add 1 tablespoon of cayenne pepper to the flour dredge and use a spicier hot sauce in the buttermilk. |
Debunking Kitchen Myths
One big myth is that you need a deep fryer for "real" fried chicken. Honestly, a shallow fry in a cast iron skillet creates a better crust for this specific dish because the contact with the bottom of the pan creates those beautiful dark brown spots that hold so much flavor.
You don't need gallons of oil to get a professional result.
Another one is that you have to soak the chicken in buttermilk overnight. While it doesn't hurt, 15 to 30 minutes is actually plenty for the thin, pounded breasts we are using here. Over soaking can sometimes make the meat too soft, almost mushy.
If you are in a hurry, don't feel guilty about a short soak; the double dredge will still give you that iconic texture.
Keeping It Fresh and Zero Waste
Storage Guidelines
You can keep leftovers in the fridge for up to 3 days. Store the chicken and the gravy in separate airtight containers. If you store them together, the chicken will absorb all the moisture from the gravy and become a sponge.
To reheat, I suggest putting the chicken in an air fryer at 350°F for about 5 minutes or in a toaster oven. Avoid the microwave unless you don't mind a soft crust.
Freezing and Zero Waste
You can freeze the fried chicken (without gravy) for up to 2 months. To use it from frozen, bake it at 375°F until heated through. For zero waste, don't throw away those little bits of seasoned flour or the leftover buttermilk. If you have extra, you can combine them to make "hushpuppy" style drops to fry up as a snack. Also, the leftover gravy is incredible the next morning over a toasted Chicken Club Sandwich recipe or some simple biscuits.
Final Serving Suggestions
This dish is heavy, so I like to serve it with something that cuts through the fat. A simple side of steamed green beans or a crisp garden salad with a vinegar based dressing works wonders. If you want to go full comfort mode, mashed potatoes are the traditional choice, but don't overlook a side of Boursin Orzo with Chicken recipe if you want a different take on the creamy starch component.
When you plate this, put the gravy under the chicken if you want to preserve every bit of that crunch, or go for the classic "drowned" look if you're eating it immediately. Add a final crack of black pepper over the top right before it hits the table.
It looks great, but more importantly, it gives you that fresh hit of spice that makes the white gravy pop. Trust me, once you master this flow, you'll never look at a plain chicken breast the same way again. It’s a total weeknight win.

High in Sodium
965 mg mg of sodium per serving (42% of daily value)
The American Heart Association recommends limiting sodium intake to no more than 2,300mg per day for most adults.
Tips to Reduce Sodium in Your Fried Chicken Recipe
-
Reduce Added Salt-25%
The recipe calls for salt in both the chicken marinade and the gravy. Reduce the 1 tsp kosher salt in the chicken marinade by half, to 1/2 tsp. Also, eliminate adding any salt to the gravy and rely on other seasonings.
-
Low Sodium Buttermilk-10%
While buttermilk doesn't contain high sodium, it can vary. Look for low-sodium buttermilk, if available, or make your own by adding vinegar or lemon juice to regular milk. Let it sit for 5-10 minutes until slightly thickened. This controls the sodium content more effectively.
-
Control the Heat-5%
Since the recipe calls for hot sauce, use it sparingly, or consider making your own low-sodium version. Many commercial hot sauces contain high amounts of sodium; even eliminating 1/2 tsp can help.
-
Flavor Boost
Enhance the flavor with sodium free herbs and spices. Consider adding a pinch of cayenne pepper or freshly ground black pepper to the flour mixture for an extra kick without added sodium.
Country Fried Chicken FAQs
What is Country Fried chicken made of?
It's a breaded and pan-fried chicken dish. Typically, chicken pieces are coated in a seasoned flour and cornstarch mixture, then fried until golden brown and crispy. It's often served with a peppery milk based gravy.
What's the difference between chicken fried chicken and Country Fried chicken?
Often, they are the same dish with a different name. "Chicken Fried Chicken" usually refers to a boneless chicken breast that's breaded and fried like chicken fried steak, then topped with gravy. "Country Fried Chicken" can be made with bone-in or boneless pieces and is also pan-fried with gravy.
What are the 5 ingredients in fried chicken?
The core ingredients are chicken, flour, salt, pepper, and oil. While many recipes add other spices and a tenderizing liquid like buttermilk, these five are fundamental to achieving classic fried chicken texture and flavor.
How to make southern fried chicken at home?
Start by brining chicken pieces in buttermilk for at least 15 minutes. Then, dredge them in a seasoned flour and cornstarch mixture, ensuring a thick coating. Fry in hot oil (around 350°F) until deeply golden brown and cooked through, then drain on a wire rack.
Can I use chicken thighs for Country Fried Chicken?
Yes, chicken thighs are an excellent choice. Their higher fat content makes them incredibly juicy and flavorful when fried. You can use the same brining and dredging techniques as with breasts, but they might take a few minutes longer to cook through.
What makes the crust extra crispy?
A combination of cornstarch and proper frying technique. Adding cornstarch to your flour dredge creates a lighter, more brittle crust that stays crisp longer. Also, ensure your oil is hot enough and don't overcrowd the pan, which lowers the oil temperature and leads to greasy, soggy chicken. If you enjoyed mastering the texture control here, see how the same crisping principles apply to our Crispy Chicken Wonton Tacos: Oven Baked Shells in 25 Minutes.
How do I make the gravy for Country Fried Chicken?
Create a roux from the pan drippings and flour, then whisk in milk. After frying the chicken, leave about a quarter cup of oil in the pan, whisk in equal parts flour to make a roux, cook for a minute, then slowly whisk in warmed milk until thickened. Season generously with salt and pepper.
Country Fried Chicken

Ingredients:
Instructions:
Nutrition Facts:
| Calories | 645 kcal |
|---|---|
| Protein | 43.8 g |
| Fat | 38.2 g |
| Carbs | 32.4 g |
| Fiber | 1.4 g |
| Sugar | 6.2 g |
| Sodium | 965 mg |
