No Knead Gluten Free Bread: Crusty and Velvety
- Time: Active 15 minutes, Passive 165 minutes, Total 3 hours
- Flavor/Texture Hook: Crusty exterior with a light, airy, and velvety center
- Perfect for: Weeknight dinner sides or impressive weekend brunch toasts
- Achieving a Shattering Crust with No Knead Gluten Free Bread
- Why This Works
- Essential Recipe Specs for a Perfect Golden Loaf
- Selecting the Right Building Blocks for Structure
- Minimal Equipment Needed for Artisan Results
- Step by Step Guide to Baking Your Loaf
- Fix Common Baking Flaws and Save the Batch
- Swaps and Creative Twists for Custom Flavors
- The Best Way to Store and Reheat Leftovers
- Flavorful Pairing Ideas for Fresh Warm Slices
- Myths About Gluten-free Yeast Breads
- Recipe FAQs
- 📝 Recipe Card
Achieving a Shattering Crust with No Knead gluten-free Bread
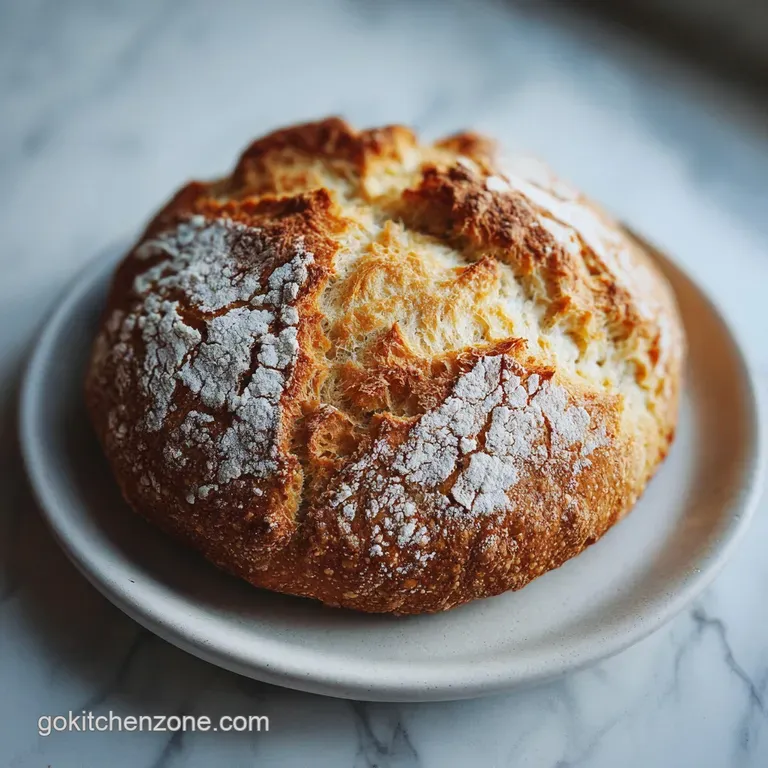
The first thing you notice isn't the smell, though that yeasty, warm aroma is definitely there. It's the sound. When you pull this loaf out of a 450°F oven and set it on the cooling rack, it actually "sings." As the cool air hits that mahogany crust, you'll hear tiny little cracks and pops.
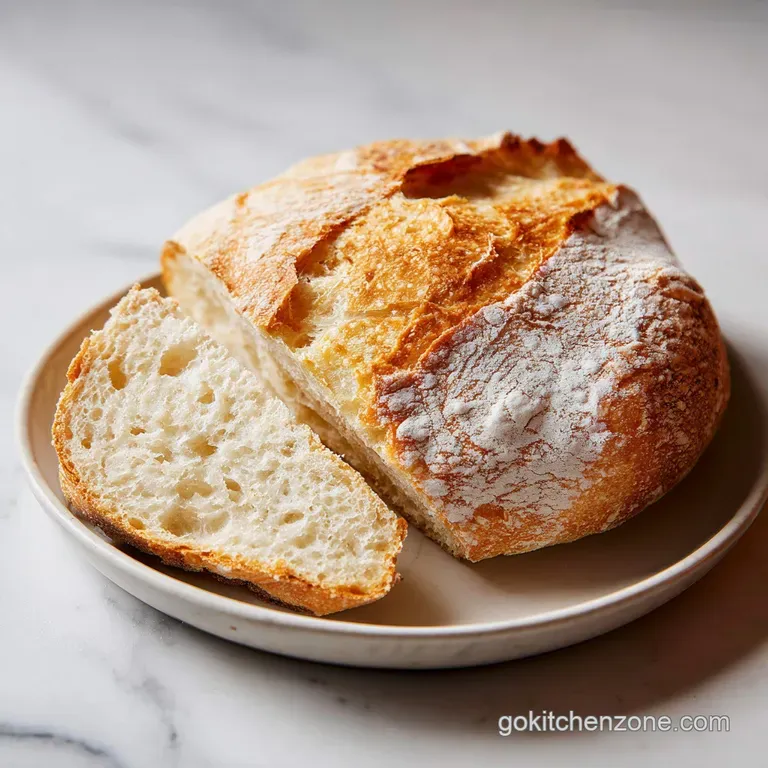
It’s the sound of a crust so crisp it’s basically glass, and for anyone who has suffered through the dense, brick like texture of many store-bought options, that sound is everything.
I remember the first time I pulled this specific version out of my Dutch oven. I was convinced I’d messed it up because the dough looked more like a thick cake batter than the bouncy, elastic balls of dough I saw in standard bread videos. I almost threw it out.
But I decided to trust the process, dropped that shaggy mess into the scorching hot pot, and hoped for the best. When I lifted the lid 30 minutes later, I wasn't looking at a pancake; I was looking at a high rising, golden masterpiece.
We've all been there with the dinner struggle trying to find a decent side that everyone can eat without it tasting like cardboard. This loaf is the answer. It’s reliable, it doesn’t require a stand mixer, and you won't spend twenty minutes scrubbing sticky dough off your hands.
It’s the kind of bread that makes you want to skip the main course and just dive into the loaf with a stick of salted butter.
Why This Works
- Hydration Replacement: High water content (425ml) allows the starches in the gluten-free flour to swell and link together without the need for mechanical kneading.
- Steam Injection: Baking inside a closed 450°F Dutch oven traps the moisture escaping from the dough, keeping the surface supple long enough for the bread to rise before the crust sets.
- Honey Activation: The 15ml of honey provides immediate fuel for the 7g of instant yeast, ensuring a vigorous fermentation even in a shorter two hour window.
- Oil Lubrication: Extra virgin olive oil coats the starch granules, preventing them from becoming too rigid and ensuring the crumb stays velvety rather than crumbly.
How the Crust Stays Crispy
The secret is the transition from a closed environment to an open one. During the first 30 minutes, the trapped steam gelatinizes the starches on the surface. When you remove the lid for the final 15 minutes, that moisture evaporates rapidly, leaving behind a thin, dehydrated layer of starch that browns deeply and shatters when sliced.
| Method | Total Time | Texture | Best For |
|---|---|---|---|
| No Knead Dutch Oven | 3 hours | Shattering crust, airy | Artisan dinner loaves |
| Classic Kneaded (GF) | 4 hours | Denser, uniform | Sandwich bread slices |
| Bread Machine | 3 hours 30 mins | Soft, thick crust | Hands off daily use |
Standard gluten-free loaves often fail because the outside dries out before the inside is cooked. Using the Dutch oven method essentially creates a mini steam oven inside your kitchen, which is the exact setup professional bakeries use.
It’s the most reliable way to get that "artisan" look without owning a five thousand dollar oven.
Essential Recipe Specs for a Perfect Golden Loaf
When we talk about successful baking, the "science" is really just about how the ingredients interact with heat and moisture. In this no knead gluten-free bread, we aren't relying on a gluten network to trap air. Instead, we’re creating a structural web of starches and gums.
| Ingredient | Science Role | Pro Secret |
|---|---|---|
| GF Flour (450g) | Provides starch base | Always use a blend with Xanthan gum for "stretch" |
| Instant Yeast (7g) | Produces CO2 gas | Whisk into dry flour to prevent clumping |
| Warm Water (425ml) | Hydrates starches | Keep it at 105°F to wake yeast without killing it |
| Olive Oil (30ml) | Softens the crumb | Adds a subtle peppery note and prevents staling |
Understanding the hydration level is vital. Most people see a "wet" dough and think they need more flour. Don't do it! That extra moisture is what prevents your bread from turning into a dry, gritty mess the next day. The water is what creates the steam that pushes the dough upward during the "oven spring" phase.
Speaking of moisture, if you ever find yourself craving something a bit different but still within the bread family, you might enjoy the texture of a Moist Zucchini Bread Recipe. It uses a similar principle of high moisture to ensure a soft result, though it's much sweeter than our artisan loaf here.
Selecting the Right Building Blocks for Structure
- 450g high-quality gluten-free All Purpose Flour Blend: Look for a blend that lists rice flour, potato starch, and tapioca starch. It must include Xanthan Gum. Why this? The gum mimics gluten, holding the air bubbles in place as the bread rises.
- 10g Fine Sea Salt: Don't use coarse salt; it won't dissolve properly in the shaggy dough. Why this? Salt regulates yeast growth and brings out the nutty flavor of the grains.
- 7g Instant Yeast: Ensure it is fresh by checking the expiration date. Why this? Instant yeast doesn't need proofing in water first, making this a true one bowl recipe.
- 425ml Warm Water (105°F / 40°C): Use a thermometer if you're unsure. Why this? Precise temperature ensures the yeast works efficiently during the 2 hour rise.
- 15ml Honey: Any liquid sweetener works, but honey adds a nice depth. Why this? It provides sugar for the yeast to eat and helps with the browning of the crust.
- 30ml Extra Virgin Olive Oil: Use a brand you like the taste of. Why this? It provides fat for a tender crumb and helps the bread stay fresh longer.
For the Dry Mix
Start by weighing your flour. If you don't have a scale, fluff the flour with a spoon before leveling it off in the measuring cup. Whisk the 450g of flour, 10g of salt, and 7g of yeast in a large bowl. You want these distributed perfectly before any liquid hits the bowl.
For the Wet Mix
In a separate jug, combine your 425ml of warm water, 15ml of honey, and 30ml of olive oil. Whisk it until the honey is fully dissolved. If the water is too hot, it will kill the yeast; if it's too cold, your two hour rise will turn into a five hour wait.
105°F should feel like a comfortably warm bath.
Minimal Equipment Needed for Artisan Results
You don't need a fancy kitchen to make a great loaf, but a few specific items make the "no knead" process much easier. First, a heavy bottomed 6 quart Dutch oven is non negotiable for that specific crust. If you don't have one, any heavy oven safe pot with a very tight fitting lid will work in a pinch.
The goal is to trap steam.
Second, get a dough whisk or a very sturdy wooden spoon. Since we aren't using a mixer, you'll be doing a few minutes of vigorous stirring. A dough whisk is brilliant because it has less surface area than a spoon, meaning the sticky GF batter won't cling to it as much.
Chef's Tip: Put your Dutch oven in the oven while it preheats. You want that cast iron to be screaming hot when the dough hits the bottom. This creates an immediate "thermal shock" that helps the bread rise rapidly before the structure sets.
Finally, parchment paper is your best friend. gluten-free dough is notoriously sticky. Trying to drop it directly into a hot pot is a recipe for a burnt mess. Shaping the dough on parchment and then lifting the whole thing into the pot is the secret to a clean, perfectly shaped loaf every time.
step-by-step Guide to Baking Your Loaf
- In a large mixing bowl, whisk together the 450g gluten-free flour, 10g fine sea salt, and 7g instant yeast until perfectly blended and light. Note: This prevents salty pockets in your finished bread.
- In a separate measuring jug, whisk the 425ml warm water, 15ml honey, and 30ml olive oil until the honey is fully incorporated.
- Pour the wet ingredients into the dry ingredients. Use a sturdy wooden spoon or dough whisk to stir until no dry flour streaks remain.
- Continue stirring for about 2 minutes. The dough will have the consistency of a thick, shaggy cake batter rather than a traditional ball. Note: Stirring helps develop the structure from the Xanthan gum.
- Cover the bowl with plastic wrap or a damp cloth and let it rise at room temperature for 135 minutes (2 hours 15 minutes).
- Preheat your oven and the 6 quart Dutch oven to 450°F (230°C). Allow the pot to heat for at least 30 minutes inside the oven.
- Once preheated, carefully transfer the shaggy dough onto a piece of parchment paper. Use a wet spatula to smooth the top into a rough dome.
- Lower the dough (and the paper) into the hot Dutch oven. Cover with the lid immediately to trap the steam.
- Bake for 30 minutes until the structure is set and the bread has risen.
- Remove the lid and bake for an additional 15 minutes until the crust is mahogany and sounds hollow when tapped.
- Transfer to a wire rack and cool completely (at least 1 hour) before slicing. Note: Slicing too early makes the bread gummy inside.
Fix Common Baking Flaws and Save the Batch
One of the biggest frustrations with gluten-free baking is the "gummy" center. If you cut into your bread and it looks a bit translucent or feels wet, it’s usually because of one of two things: either the oven wasn't hot enough, or you didn't let it cool long enough.
gluten-free bread continues to "bake" with its own internal steam even after it leaves the oven.
| Problem | Root Cause | Solution |
|---|---|---|
| Gummy Texture | Sliced while too hot | Wait at least 60 mins before cutting |
| No Rise | Water was too hot | Use a thermometer for 105°F water |
| Pale Crust | Not enough sugar/honey | Add a teaspoon more honey next time |
If your bread didn't rise as much as you'd like, check your yeast. Instant yeast can lose its potency quickly if not stored in the fridge. Also, make sure you aren't using a "low carb" flour blend; those often lack the starches needed to hold the air bubbles created by the yeast.
Common Mistakes Checklist
- ✓ Don't skip the preheat: The Dutch oven must be 450°F before the dough goes in.
- ✓ Use a scale: 450g of flour is much more accurate than "3 cups."
- ✓ Check your Xanthan: If your blend doesn't have it, add 1.5 teaspoons manually.
- ✓ Wet your hands: When handling the dough, wet fingers prevent sticking.
- ✓ Trust the batter: Don't add more flour just because it isn't a "ball."
Swaps and Creative Twists for Custom Flavors
This base recipe is a blank canvas. If you're looking for something more savory, you can easily fold in 1 tablespoon of dried rosemary and 2 cloves of minced garlic during step 3. The olive oil already provides a great base for these Mediterranean flavors.
For a seed crusted version, spray the top of the dough with a little water right before you put the lid on, and sprinkle heavily with sesame seeds, poppy seeds, or "everything" bagel seasoning. The steam will help the seeds stick to the crust as it expands.
| Original Ingredient | Substitute | Why It Works |
|---|---|---|
| Honey (15ml) | Maple Syrup (15ml) | Same sugar content. Note: Adds a slight autumnal flavor |
| Extra Virgin Olive Oil | Melted Coconut Oil | Similar fat profile. Note: Bread will have a very slight coconut scent |
| Warm Water (425ml) | GF Beer (room temp) | Adds carbonation. Note: Result is a deeper, fermented "sourdough" taste |
If you are looking for a flatter, faster bread to go with a Mediterranean spread, you might want to try an Easy Skillet Naan Bread. It uses a similar hydration principle but cooks in minutes on the stovetop instead of the Dutch oven.
Scaling the Recipe
If you want to make a giant loaf, you can double the ingredients, but be careful. A 900g flour loaf is too big for a standard 6 quart Dutch oven and will likely result in a raw center. Instead, bake two separate loaves.
If you need to halve the recipe, use a smaller 3 quart pot and reduce the initial covered bake time to 25 minutes.
The Best Way to Store and Reheat Leftovers
gluten-free bread is notorious for turning into a rock within 24 hours. This is due to a process called starch retrogradation, where the water leaves the starch granules and migrates to the crust.
To prevent this, never store your bread in the fridge; the cold temperature actually speeds up the staling process.
- Fridge
- 0 days (Avoid! It ruins the texture).
- Room Temp
- 2 days in a sealed paper bag or bread box.
- Freezer
- 3 months. Slice the bread before freezing so you can grab a single piece at a time.
Zero Waste Tips: If your loaf does get a bit hard, don't toss it. Stale gluten-free bread makes the absolute best croutons. Just cube it up, toss with olive oil and garlic salt, and bake at 375°F for 10 minutes.
Alternatively, pulse it in a blender for high-quality gluten-free breadcrumbs.
Flavorful Pairing Ideas for Fresh Warm Slices
The beauty of this artisan loaf is its versatility. Because it has a neutral but rich flavor, it works just as well with sweet toppings as it does with savory ones. For a simple breakfast, try a thick slice toasted with salted butter and a drizzle of honey to echo the ingredients inside the dough.
The Ultimate Avocado Toast
Take a thick slice of this no knead gluten-free bread, toast it until the edges are dark golden, and rub a raw garlic clove over the surface. Top with smashed avocado, a squeeze of lemon, and red pepper flakes. The sturdy crust can handle the weight of the toppings without folding.
The Classic "Better Than Dining Out" Starter
Serve warm slices alongside a small bowl of high-quality balsamic vinegar and extra virgin olive oil. Because this bread is so porous, it soaks up the oil perfectly. It’s the easiest way to make a weeknight dinner feel like a three course meal without much extra effort.
Myths About gluten-free Yeast Breads
You must knead bread to develop structure. Actually, in gluten-free baking, kneading can sometimes do more harm than good by knocking out the delicate air bubbles. Since there is no gluten to "develop," we rely on starch hydration and Xanthan gum. Stirring is enough; kneading is unnecessary.
Yeast doesn't work well without gluten. Yeast doesn't care about gluten; it cares about sugar and warmth. As long as your flour blend has enough starch (like potato or tapioca) to trap the gas the yeast produces, you will get a beautiful rise.
The "glue" (gluten) is replaced by the gums in your flour blend.
gluten-free bread is always dry. This is only true if the hydration is too low. Many recipes try to make the dough look like "regular" dough, leading to a dry finished product.
By keeping the dough shaggy and wet (like this recipe), you ensure a moist, bouncy crumb that lasts longer than a single afternoon.
You can't get a good crust without a professional oven. The Dutch oven debunked this years ago. By trapping the bread's own moisture, you are essentially creating a professional steam injection environment.
The steam keeps the exterior soft so the bread can expand fully, then the final lid off bake crisps it to perfection. Right then, let's get that oven preheated and start baking!

Recipe FAQs
Why is my dough so wet and sticky?
This is completely normal for gluten-free bread. Unlike wheat dough, this mixture should look like a thick, shaggy cake batter rather than a solid ball; resist the urge to add more flour or you will end up with a dense, dry loaf.
How to ensure a crispy, golden crust?
Bake the loaf inside a preheated 6-quart Dutch oven at 450°F. The heavy lid traps steam for the first 30 minutes, which is essential for proper rise, while the final 15 minutes without the lid allows the crust to develop its signature shattering texture.
How to handle the dough without it sticking to my fingers?
Wet your hands thoroughly with water before shaping or transferring the dough. Since this dough is high hydration, the moisture acts as a barrier that prevents the batter from clinging to your skin, a technique similar to how you would handle the dough in our easy soft pretzel recipe.
Is it true that I should knead the dough to get a better rise?
No, this is a common misconception. gluten-free flour blends lack the proteins necessary to form a gluten network, so kneading provides no benefit and may actually disrupt the aeration needed for a light crumb.
How to tell if the bread is fully baked?
Listen for a hollow sound when you tap the bottom of the loaf. If it sounds dense or thud like, return the bread to the oven for a few more minutes, as the crust should feel firm and the interior moisture should be evaporated.
What should I do if my flour blend does not contain xanthan gum?
Manually whisk in 1.5 teaspoons of xanthan gum to your dry ingredients. Without this binding agent, the bread will lack the structure needed to hold its shape during the 2-hour fermentation and the high heat bake.
Can I proof the dough for less than 2 hours?
No, the 2-hour rise time is non-negotiable. This period is critical for the instant yeast to ferment and for the gluten-free flours to fully hydrate, ensuring you achieve the correct texture after the 45-minute bake.
No Knead gluten-free Bread

Ingredients:
Instructions:
Nutrition Facts:
| Calories | 162 kcal |
|---|---|
| Protein | 1.8 g |
| Fat | 2.8 g |
| Carbs | 31.6 g |
| Fiber | 1.5 g |
| Sugar | 1.5 g |
| Sodium | 325 mg |
