
To connect a washer, first, make sure to place it near a water supply and a drain. Then, connect the water hoses to the corresponding hot and cold water taps as well as the drain hose to a suitable drain point.
Connecting a washer is a simple process, but it’s important to ensure it’s done correctly to avoid any issues. The first step is to position the washer near a water supply and a drain. Next, connect the water hoses to the hot and cold water taps, and then connect the drain hose to a suitable drain point.
By following these steps, you can easily connect your washer and ensure it operates efficiently.
Essential Tools And Supplies
When connecting a washer, it’s crucial to have the essential tools and supplies to ensure a smooth and hassle-free installation process. These tools will not only help you connect the washer securely but also ensure that it functions efficiently. Here are the essential tools and supplies you will need:
Adjustable Wrench
An adjustable wrench is a versatile tool that will be essential for tightening and securing the water supply hoses to the washer. Using an adjustable wrench allows you to get a secure and tight connection without damaging the fittings.
Leveler
Having a leveler is important to ensure that the washer is placed on a flat and even surface. This will help prevent the washer from vibrating excessively during operation and ensure that it functions smoothly.
Measuring Tape
Using a measuring tape is crucial to ensure that the washer is placed in the right position and has enough space for ventilation and operation. It will also help in measuring the correct distance for the water supply and drainage connections.
Pipe Tape
Pipe tape, also known as Teflon tape, is essential for sealing the threaded connections of the water supply hoses and preventing any potential leaks. Applying pipe tape ensures a secure and watertight connection for the water supply hoses.
Shutting Off Water Supply
Before connecting a washer, it’s important to shut off the water supply to prevent any leaks or flooding. Follow the steps below to safely shut off the water supply for your washer.
Locate the Main Water Valve
To begin, you need to locate the main water valve in your home. This valve is usually located near the water meter or where the main water line enters the house. It may be in the basement, garage, or utility room. Once you’ve located the main water valve, take note of its position for future reference.
Turning The Valve To Closed Position
Using a wrench or your hands, turn the valve handle clockwise to close the valve. Make sure to turn it completely to shut off the water supply. Check the valve for any leaks or drips to ensure it is fully closed. Once you close the valve, turn off the water supply to the washer and proceed safely with the connection process.
Unpacking And Positioning Your Washer
Properly unpacking and positioning your washer is crucial for ensuring its efficient functioning and longevity. In this section, we will guide you through the essential steps from removing transit bolts to placing the washer in your desired location and ensuring it is level.
Removing Transit Bolts
Upon unboxing your washer, it is essential to check for and remove transit bolts. These bolts are used to secure the drum during transportation and must be taken out before operating the washer. Failing to do so can lead to serious internal damage or malfunction. Refer to the user manual for the specific location and removal procedure of these transit bolts.
Placing Washer In Desired Location
Once the transit bolts are removed, carefully position the washer in the desired location. Ensure there is ample space around the washer for ventilation and easy access for maintenance. Additionally, it is important to place the washer on a stable and level surface to prevent excessive vibration during the spin cycle.
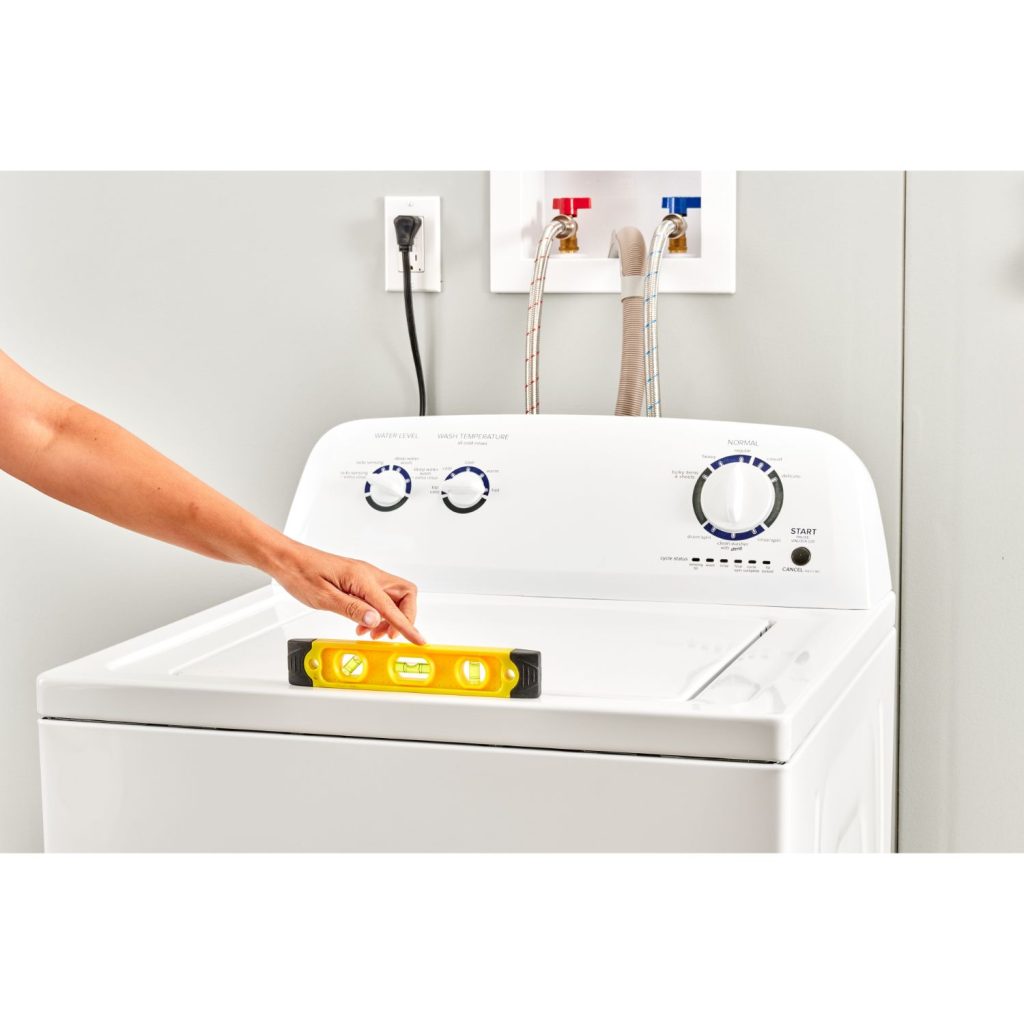
Ensuring The Washer Is Level
Using a spirit level, check and adjust the washer’s feet to ensure it is perfectly level. A washer that is not level can cause excessive noise, vibration, and uneven washing. leveling the washer will not only improve its performance but also prolong its lifespan.
Attaching Water Supply Hoses
Attaching water supply hoses is an essential step when connecting a washer. It ensures the proper flow of water to the machine, allowing it to function efficiently. In this guide, we will discuss how to identify hot and cold water hoses, connect them to the corresponding valves, and secure the hose connections with a wrench.
Identifying Hot And Cold Water Hoses
When setting up your washer, it’s crucial to identify the hot and cold water hoses correctly to ensure the proper functioning of the machine. Typically, the hot water hose is labeled with a red stripe or the word “hot,” while the cold water hose is labeled with a blue stripe or the word “cold.” Ensure that you correctly identify these hoses before proceeding with the connection.
Connecting Hoses To The Corresponding Valves
After identifying the hot and cold water hoses, the next step is to connect them to the corresponding valves. Locate the hot and cold water inlet valves at the back of the washer and attach the hot water hose to the hot water inlet valve and the cold water hose to the cold water inlet valve. Make sure to tighten the connections securely to prevent any leaks during operation.
Securing Hose Connections With A Wrench
Once the hoses are connected to the correct valves, use a wrench to secure the hose connections further. Tighten the connections by turning the wrench in a clockwise direction to ensure a snug fit. Be careful not to overtighten, as it may damage the hoses or the valve fittings. Properly secured hose connections will prevent leaks and ensure a steady water supply to the washer during operation.
Setting Up The Drain Hose
Properly setting up the drain hose for your washer is crucial for efficient and effective drainage during laundry cycles. It involves attaching the drain hose to the washer and ensuring the proper height and formation of the drain loop.
Attaching Drain Hose To Washer
When attaching the drain hose to the washer, follow the manufacturer’s instructions provided in the user manual. Typically, you will need to locate the drain outlet on the back of the washer and securely connect the hose to it. Ensure that the connection is tight to prevent any leaks during operation. Moreover, check for any kinks or bends in the hose that may obstruct the flow of water during drainage. Straighten the hose if necessary to ensure a smooth and unobstructed path for the water to exit the washer.
Proper Height And Formation Of Drain Loop
It is essential to maintain the proper height and formation of the drain loop to prevent backflow and ensure proper drainage. The drain hose should be elevated at least 39 inches above the floor to form a loop before it connects to the standpipe or laundry tub. This prevents water from flowing back into the washer and helps maintain optimal drainage.
Additionally, securing the hose with a cable tie or hook to keep it in place and prevent it from falling or shifting during operation is crucial. This will help maintain the integrity of the drain loop and prevent any potential drainage issues. Remember to refer to the manufacturer’s guidelines for specific instructions for your washer model, as the setup process may vary slightly depending on the brand and type of washer you have.
Checking And Testing Connections
When it comes to connecting a washer, it is crucial to ensure that the connections are secure and properly functioning. Checking and testing connections is an essential step to guarantee that the washer runs efficiently and effectively. It involves inspecting hose connections for leaks and running an initial wash cycle to test the installation.
Inspecting Hose Connections For Leaks
Inspecting hose connections for leaks is a critical step in ensuring the proper installation of the washer. Carefully examine each connection point, including where the hoses attach to the washer and to the water source. Look for any signs of moisture or water leakage. Tighten any loose connections to prevent potential leaks.
Running Initial Wash Cycle To Test Installation
After inspecting the hose connections for leaks, it’s important to run an initial wash cycle to test the installation. Follow the manufacturer’s instructions for selecting a suitable cycle and load the washer with a small load of laundry. Ensure that the machine fills, agitates, drains, and spins properly without any leaks or unusual noises. Observe the entire cycle to confirm that the washer is operating as intended.
Frequently Asked Questions On How To Connect A Washer
How Do I Connect A Washer To The Water Supply?
To connect a washer to the water supply, start by turning off the water valves, then connect the hoses to the corresponding hot and cold water inlets on the washer. Finally, turn on the water valves and check for any leaks.
What Type Of Detergent Should I Use For My Washer?
Use a high-quality detergent specifically formulated for washing machines to ensure optimal performance and cleanliness. Be sure to follow the manufacturer’s recommendations for the appropriate detergent amount based on load size and soil level.
Why Is It Important To Level My Washer?
Leveling your washer helps prevent excessive vibration and noise during the spin cycle, prolongs the lifespan of the appliance, and ensures proper water drainage. Use a bubble level to adjust the washer’s feet until it is evenly balanced on the floor.
How do I connect the water supply hoses to my washing machine?
Follow our step-by-step guide to securely connect the water supply hoses, ensuring a leak-free operation.
Can I use an extension cord for my washing machine’s power supply?
It’s recommended to refer to the washer manual and avoid using extension cords to maintain optimal machine performance.
What should I do if my washing machine is vibrating excessively during operation?
Explore our tips on leveling the washer and using shims to minimize vibrations and noise.
Is it necessary to check the power requirements before connecting the power cord?
Yes, it’s crucial to refer to the washer manual to ensure the power source meets the specific requirements for safe and efficient operation.
Can I install a washing machine on any type of flooring?
While it’s possible, a level surface is recommended to prevent vibrations. Learn more about choosing the optimal location in our installation guide.
How often should I run a test cycle after connecting my washer?
Running a test cycle before your first load and periodically thereafter helps identify any issues early on. Follow our guide for a seamless setup.
Are there specific maintenance tips for keeping the washer in top condition?
Explore our maintenance guide for valuable tips on keeping your washer in optimal condition, ensuring longevity and efficiency.
What tools do I need to connect my washing machine?
Ensure you have pliers, the washer manual, water supply hoses, and the power cord on hand for a successful installation. Learn more about the essentials in our guide.
Can I connect my washing machine to any water source?
It’s recommended to follow the manufacturer’s guidelines for connecting the machine to the appropriate hot and cold water sources. Learn more in our water supply hose section.
How do I troubleshoot common issues with washer installation?
Check out our troubleshooting section for quick solutions to common problems, ensuring a smooth installation process.
Conclusion
Connecting a washer becomes a simple process that you can easily accomplish with the right tools and knowledge. By following these steps, you can ensure a smooth setup and operation of your washing machine. Remember to consider safety measures and consult the manufacturer’s manual for specific guidance.
With these tips, you can confidently connect your washer and enjoy its benefits hassle-free.


