

Installing a bathroom sink drain, first, attach the drain flange to the sink. Next, connect the P-trap to the drainpipe.
Installing a bathroom sink drain may seem daunting, but it can be straightforward with the right guidance. Proper installation ensures a leak-free and efficiently draining sink, which is crucial for maintaining a clean and functional bathroom. This process involves a few essential steps, including securing the drain flange, connecting the P-trap, and ensuring all connections are tight and secure.
Having the right tools and materials on hand will make the task easier and more efficient. Whether you’re a seasoned DIY enthusiast or a beginner, following these steps will help you successfully install your bathroom sink drain.
Introduction To Diy Sink Drain Installation
Installing a bathroom sink drain yourself can be a fun and rewarding project. It saves money and gives a sense of accomplishment. Let’s dive into the basics of DIY sink drain installation.
The Appeal Of Diy In Home Improvement
DIY projects are very popular these days. They allow you to personalize your home. You can also save a lot of money. Many people enjoy the process of learning new skills.
Installing your own sink drain can be a great starting point. It’s a manageable task and doesn’t require many tools. You can complete it in a few hours.
What To Expect From This Guide
In this guide, you will learn all the steps to install a bathroom sink drain. We will cover everything from gathering materials to final testing. Each step is explained in simple terms.
Here are the main steps we will cover:
- Gathering the necessary tools and materials
- Removing the old drain
- Installing the new drain
- Testing for leaks
By the end of this guide, you will be ready to install a sink drain with confidence.
Tools And Materials Needed
Installing a bathroom sink drain can be a rewarding DIY project. To make the process smooth, having the right tools and materials is crucial. This guide will help you gather everything you need for a successful installation.
List Of Essential Tools
- Adjustable Wrench: Useful for tightening and loosening nuts and bolts.
- Plumber’s Putty: Creates a watertight seal around the drain.
- Pliers: Handy for gripping and turning parts.
- Pipe Tape: Ensures a leak-free connection.
- Bucket: Catches water during installation.
- Screwdriver: Essential for securing various components.
Choosing The Right Materials
Choosing the right materials is equally important. The materials you select will affect the durability and functionality of your sink drain.
| Material | Purpose |
|---|---|
| Drain Assembly | This is the main component that allows water to exit the sink. |
| Tailpiece | Connect the drain to the P-trap. |
| P-Trap | Prevents sewer gases from entering your home. |
| Gaskets | Provide a tight seal to prevent leaks. |
| Extension Tubes | Used if the drain and P-trap don’t align perfectly. |
Make sure all materials are compatible with your sink. Read the instructions carefully to ensure a proper fit.
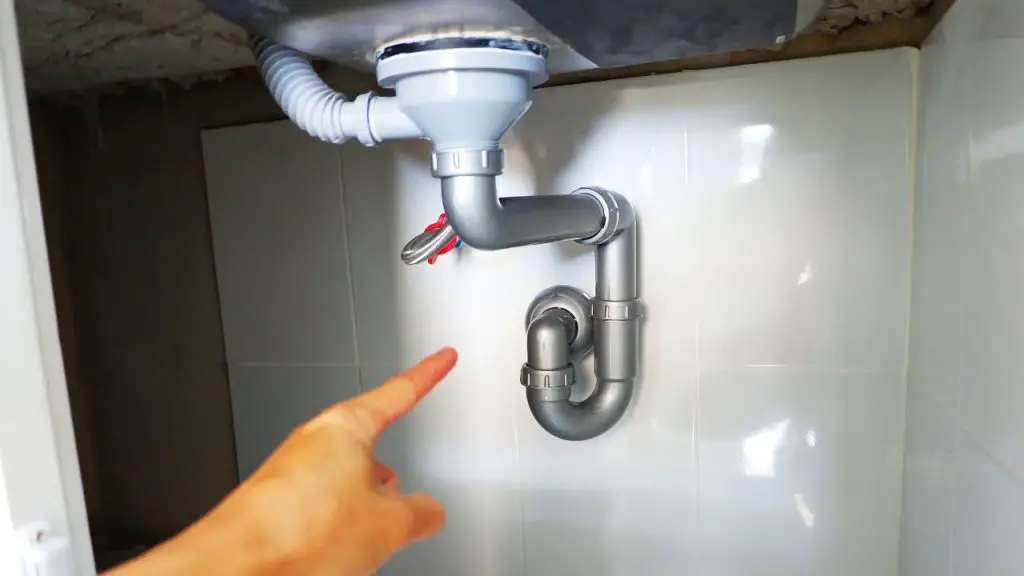
Understanding Sink Drain Components
Installing a bathroom sink drain can seem tricky. Knowing the parts helps. Let’s break down the key components.
Anatomy Of A Sink Drain
The sink drain has several parts. Each part has a specific role.
- Drain Flange: This is the visible part. It sits in the sink basin.
- Tailpiece: This connects the drain flange to the plumbing.
- P-Trap: This curved pipe holds water. It prevents sewer gases from entering your home.
- Pop-Up Stopper: This allows you to block the drain. You can fill the sink with water.
| Component | Function |
|---|---|
| Drain Flange | Sits in the sink basin |
| Tailpiece | Connects flange to plumbing |
| P-Trap | Holds water, blocks sewer gases |
| Pop-Up Stopper | Blocks drain, fills sink with water |
Types Of Sink Drains
There are different types of sink drains. Choosing the right one is important.
- Pop-Up Drain: This is common. It has a lever to open and close the drain.
- Grid Drain: This type has small holes. It allows water to drain but blocks debris.
- Push Button Drain: This type uses a push mechanism. Press to open or close the drain.
Understanding these components helps in installation. Choose the right type for your needs.
Preparation Steps
Installing a bathroom sink drain can be a manageable task. Proper preparation is crucial to success. Follow these steps to ensure a smooth installation process.
Safety First: Turning Off The Water
Before starting, always prioritize safety. Turn off the water supply to your sink. This prevents any unexpected water flow.
Locate the valves under your sink. Turn them clockwise until they are fully closed. If you can’t find the valves, turn off the main water supply to your home.
Once the water is off, open the faucet to release any remaining water in the pipes. This step ensures no water spills during the installation.
Clearing The Workspace
A clutter-free workspace is essential. Remove any items under the sink. This includes cleaning supplies, towels, and other personal items.
Place a bucket or pan under the sink to catch any residual water. This keeps your workspace dry and clean.
Gather all the tools you will need. These include a wrench, pliers, plumber’s putty, and the new drain assembly. Having everything ready saves time and reduces interruptions.
| Tools Needed | Purpose |
|---|---|
| Wrench | Loosen and tighten nuts |
| Pliers | Grip and turn parts |
| Plumber’s Putty | Seal gaps and prevent leaks |
| New Drain Assembly | Replace old drain |
With your workspace cleared and tools at hand, you’re ready to start installing your bathroom sink drain. Preparation is key to a successful and efficient installation.
Removing The Old Sink Drain
Removing the old sink drain is a crucial step before installing a new one. This task might seem daunting, but with the right tools and instructions, you can do it easily. Follow this guide to ensure a smooth and hassle-free removal process.
Step-by-step Removal Process
- Turn Off the Water Supply: Locate the water valves under the sink and turn them off. This prevents any water from leaking while you work.
- Disconnect the P-Trap: Place a bucket under the P-Trap to catch any water. Loosen the slip nuts using a wrench and carefully remove the P-trap.
- Remove the Drain Flange: Use a drain wrench or pliers to unscrew the drain flange. Be careful to avoid damaging the sink.
- Clean the Sink Area: Once the old drain is removed, clean the sink area to prepare it for the new installation.
Troubleshooting Common Challenges
Sometimes, you may face challenges while removing the old sink drain. Here are some common issues and solutions:
| Challenge | Solution |
|---|---|
| Stuck Slip Nuts | Apply penetrating oil and wait a few minutes. Use pliers for extra grip. |
| Corroded Drain Flange | Use a hacksaw to carefully cut through the flange. Avoid damaging the sink. |
| Leaking Water | Ensure the water supply is completely turned off. Use towels to soak any excess water. |
By following these steps and solutions, you can easily remove the old sink drain. Remember to take your time and be patient.
Fitting The New Sink Drain
Installing a new sink drain can seem daunting, but it doesn’t have to be. With the right tools and steps, you can achieve a professional finish. This guide will walk you through the process of fitting your new sink drain perfectly.
Sealing And Connecting Components
Start by placing the new drain into the sinkhole. Make sure it’s centered. Apply a generous bead of plumber’s putty around the drain’s underside. This will ensure a watertight seal. Press the drain firmly into the sinkhole. Wipe away any excess putty.
Next, fit the rubber gasket and washer onto the drain tailpiece underneath the sink. Secure them in place with the locking nut. Tighten the nut by hand first, then use a wrench for a secure fit. Avoid over-tightening to prevent damage.
Ensuring A Leak-free Installation
Connect the P-trap to the drain tailpiece. Ensure the trap arm fits snugly into the wall drain. Hand-tighten the slip nuts. Then use pliers for a secure fit. Check the alignment to ensure proper drainage.
Turn on the water supply and run water into the sink. Look for any leaks around the drain and P-trap. If you see water, tighten the connections further. Check the drain seal by filling the sink with water. Then unplug it and observe the drain area closely.
If there are no leaks, your new sink drain installation is complete. Enjoy your leak-free, professionally installed bathroom sink!
Testing The Installation
After installing your bathroom sink drain, the next step is ensuring it works properly. Testing the installation involves checking for leaks and ensuring smooth water flow. Proper testing helps prevent future issues and ensures a hassle-free experience.
Water Flow And Leak Testing
Start by turning on the faucet. Allow water to flow down the drain. Observe the water flow closely. Ensure it drains quickly and smoothly.
Next, check for leaks. Inspect the areas around the drain and pipes. Look under the sink for any signs of water. Even small drips can cause problems over time.
Use a dry cloth to wipe around the connections. This helps you detect any moisture. Pay special attention to the joints and seals. If the cloth gets wet, there may be a leak.
Adjustments And Fixes
If you find any issues during testing, adjustments may be needed. Tighten any loose connections using a wrench. Make sure not to overtighten, as this can damage the pipes.
Replace faulty seals or gaskets if necessary. These components ensure a watertight connection. Over time, they can wear out and need replacement.
In some cases, you may need to adjust the position of the drain. Ensure it aligns properly with the sink. A misaligned drain can cause leaks and poor water flow.
Follow these steps carefully to fix any issues:
- Identify the problem area.
- Loosen the necessary connections.
- Realign or replace parts as needed.
- Tighten the connections securely.
- Test the installation again to ensure all issues are resolved.
By addressing these issues promptly, you can ensure a reliable and efficient bathroom sink drain
Finishing Touches And Cleanup
After installing your new bathroom sink drain, the final step is to add finishing touches and clean up. This step ensures your bathroom looks pristine and functions perfectly. These small efforts make a significant difference.
Final Aesthetic Enhancements
Enhancing the look of your sink area can be simple:
- Polish the Sink: Use a gentle cleaner to make your sink shine.
- Seal the Edges: Apply silicone sealant around the drain edges for a neat finish.
- Check for Leaks: Ensure there are no leaks by running water through the drain.
These steps will make your sink area look professional and clean.
Proper Disposal Of Old Materials
Disposing of old materials correctly is essential:
- Separate Materials: Sort metal, plastic, and rubber parts.
- Recycle: Take recyclable materials to a recycling center.
- Dispose of Waste: Throw away non-recyclable items in the trash.
Proper disposal keeps your home and environment clean.
| Material | Disposal Method |
|---|---|
| Metal | Recycle |
| Plastic | Recycle |
| Rubber | Trash |
Remember to always wear gloves during cleanup to protect your hands. A clean and well-maintained bathroom boosts its overall appeal and functionality.
Maintenance Tips For Your New Sink Drain
Installing a new bathroom sink drain is a great way to improve your bathroom. Proper maintenance ensures it stays in good condition. Here are some helpful tips for keeping your sink drain clean and clog-free.
Regular Cleaning Practices
Regular cleaning keeps your sink drain functioning well. Follow these steps:
- Weekly cleaning: Use a mild soap and warm water.
- Monthly deep clean: Pour a mixture of baking soda and vinegar down the drain.
- Rinse thoroughly: Always rinse with hot water after cleaning.
Regular cleaning prevents buildup and keeps your drain clear.
Avoiding Common Clogging Issues
Clogging is a common problem in sink drains. Follow these tips to avoid it:
- Use a drain cover: This catches hair and debris.
- Avoid pouring grease: Grease can solidify and block the drain.
- Dispose of waste properly: Do not throw food or large particles down the drain.
Following these steps helps keep your drain clog-free and flowing smoothly.
Frequently Asked Questions
Do I Need Plumbers Putty For A Bathroom Sink Drain?
Yes, plumbers’ putty is commonly used for bathroom sink drains. It creates a watertight seal.
Which Way Does The Rubber Gasket Go On A Sink Drain?
Place the rubber gasket under the sink drain flange. Ensure it sits between the flange and the sink surface.
How To Install A Bathroom Sink Drain Stopper?
To install a bathroom sink drain stopper, remove the old stopper, insert the new one, and secure it with the pivot rod. Adjust the stopper height, then test for proper drainage. Tighten connections if needed.
How Do You Install A Bathroom Sink Drain Vessel?
To install a bathroom sink drain vessel, first, position the drain assembly. Apply the plumber’s putty around the drain hole. Insert the drain and tighten the locknut underneath. Attach the P-trap to the drain tailpiece. Finally, connect the P-trap to the wall drain and test for leaks.
How Do I Remove The Old Sink Drain?
First, disconnect the P-trap. Then, unscrew the drain flange from the sink.
What Tools Do I Need?
You will need a wrench, pliers, a plumber’s putty, and a screwdriver.
How Do I Install A New Drain?
Apply the plumber’s putty to the flange. Insert the drain body and tighten the locknut underneath.
Do I Need To Use Plumber’s Putty?
Yes, a plumber’s putty creates a watertight seal to prevent leaks.
How Do I Ensure No Leaks?
Tighten all connections securely. Check for leaks by running water through the drain.
What Is A P-trap?
A P-trap is a U-shaped pipe that traps debris and prevents sewer gases from entering your home.
Conclusion
Mastering the installation of a bathroom sink drain can save you money and time. Follow these steps for a hassle-free experience. Proper installation ensures a leak-free and functional sink. Enjoy the satisfaction of a job well done and a smoothly running bathroom sink.


