How to Descale a Keurig Coffee Maker: Simple Steps

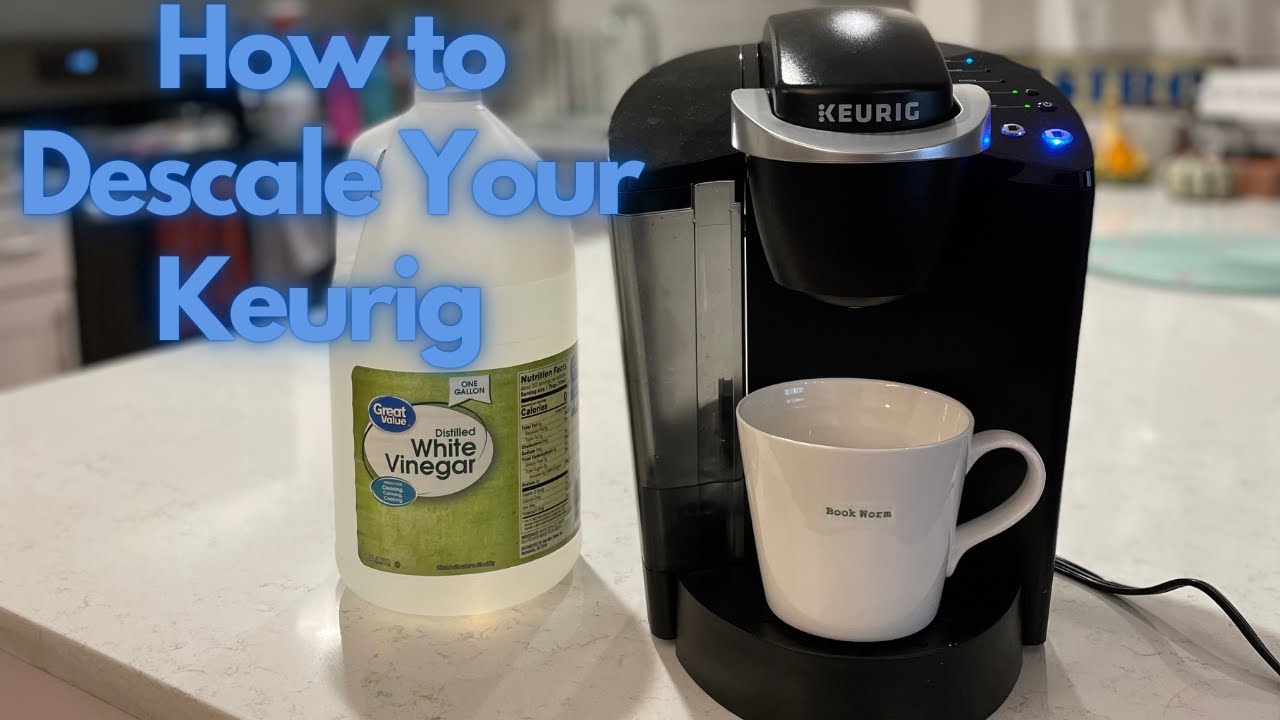
To descale a Keurig coffee maker, fill the reservoir with equal water and white vinegar. Run multiple brewing cycles until the reservoir is empty.
Descaling a Keurig coffee maker is essential for maintaining its performance and longevity. Mineral buildup from water can clog the machine, leading to poor coffee quality and slower brewing times. Regular descaling removes these deposits, ensuring your coffee maker functions efficiently.
This simple maintenance task also helps in preventing potential malfunctions. Using common household items like white vinegar makes the process easy and cost-effective. Describe your Keurig every three to six months for best results, depending on usage. Consistent descaling ensures delicious coffee and extends the lifespan of your machine.
Gathering Supplies
Descaling your Keurig coffee maker is essential for keeping it in top shape. Before starting, gather all necessary supplies. This will make the process smoother and quicker.
Necessary Tools
- Keurig coffee maker
- Large ceramic mug
- Water
- Cleaning cloth
You need a large ceramic mug. This will catch the descaling solution. A cleaning cloth is also important. It will help you wipe down the machine.
Choosing A Descaling Solution
Picking the right descaling solution is crucial. You have two main options:
| Option | Description |
|---|---|
| Vinegar | Cheap and effective. Use a mix of vinegar and water. |
| Commercial Descaler | Specifically designed for coffee makers. Follow the instructions on the package. |
Vinegar is easy to find and inexpensive. A commercial descaler is more specialized. Both will work well.
Preparing The Machine
Before descaling your Keurig coffee maker, prepare the machine properly. Proper preparation ensures a smooth descaling process. Follow these steps for the best results.
Emptying The Water Reservoir
First, empty the water reservoir. Remove the reservoir from the coffee maker. Pour out any remaining water.
- Remove the water reservoir.
- Pour out all water.
- Rinse the reservoir with clean water.
This step is crucial. Any leftover water can dilute the descaling solution.
Turning Off The Auto-brew
Next, turn off the auto-brew feature. This prevents the machine from starting automatically during descaling.
- Locate the auto-brew button on your Keurig.
- Press the button to turn it off.
- Ensure the light is off, indicating auto-brew is disabled.
Turning off auto-brew is important. It avoids interruptions during the descaling process.
Descaling Process
Descaling your Keurig coffee maker is essential for maintaining its performance. Minerals build up inside the machine over time. This can affect the taste of your coffee. Regular descaling ensures your coffee maker brews the best coffee.
Adding The Descaling Solution
First, you need a descaling solution. You can buy a Keurig-approved solution or make your own. To make your own, mix equal parts water and white vinegar. Pour the solution into the water reservoir of your Keurig.
Make sure the reservoir is at least halfway full. This ensures the solution can clean all parts of the machine. Place an empty mug on the drip tray.
Running The Brew Cycle
Next, start the brew cycle without a K-cup. This allows the solution to flow through the machine. Run the brew cycle until the reservoir is empty. You may need to repeat this step. It depends on the size of your reservoir.
Let the machine sit for 30 minutes with the power on. This gives the solution time to break down the mineral build-up. After 30 minutes, discard the contents of the mug and rinse it.
Fill the reservoir with fresh water and run multiple brew cycles. Continue until the water coming out is clear. This removes any remaining descaling solution from your Keurig.
| Step | Description |
|---|---|
| Add Descaling Solution | Pour the solution into the water reservoir. |
| Run Brew Cycle | Start the cycle without a K-cup. |
| Wait | Let the machine sit for 30 minutes. |
| Rinse | Run multiple cycles with fresh water. |
Rinsing The Machine
After descaling your Keurig coffee maker, the next crucial step is rinsing the machine. This process ensures all descaling solution is removed, preventing any leftover taste in your coffee. Follow these steps to properly rinse your Keurig.
Flushing With Fresh Water
Start by filling the water reservoir with fresh water. Place a large mug on the drip tray. Run a brew cycle without a K-cup. Repeat this step at least three times. This ensures all descaling solution is flushed out.
Cleaning The Water Reservoir
Remove the water reservoir from the machine. Wash it with warm, soapy water. Use a soft cloth or sponge to clean the inside. Rinse thoroughly to remove any soap residue. Let it air dry completely before reattaching.
Cleaning The Exterior
Keeping the exterior of your Keurig Coffee Maker clean ensures it looks good and works well. Follow these simple steps to keep your machine spotless and in great condition.
Wiping Down The Machine
To clean the exterior, use a damp cloth. Ensure it is not too wet to avoid water damage. Gently wipe the surfaces, focusing on the control panel and sides.
- Use a soft, damp cloth.
- Wipe the sides and control panel.
- Dry with a clean, soft towel.
Cleaning The Drip Tray
The drip tray can collect spills and coffee drips. Regular cleaning prevents buildup and maintains hygiene.
- Remove the drip tray carefully.
- Rinse it with warm, soapy water.
- Dry it completely before placing it back.
By following these steps, your Keurig will stay clean and function well.
Reassembling And Testing
After descaling your Keurig coffee maker, the next steps are crucial. You need to reassemble the parts correctly and test the machine. This ensures that your Keurig works perfectly and your coffee tastes great.
Reattaching Parts
First, make sure all parts are completely dry. This prevents any potential damage to your machine. Follow these simple steps to reattach the parts:
- Place the water reservoir back in its original position.
- Attach the drip tray and the drip tray plate.
- Insert the K-Cup holder back into the brew head.
- Secure the lid back on the machine.
Ensure each part clicks into place securely. This will help prevent leaks and ensure the machine operates smoothly. Take your time with this step to avoid any issues later.
Running A Test Brew
Now, it’s time to test the machine. This ensures that the descaling process works and the machine is ready for use. Follow these steps for a test brew:
- Fill the water reservoir with fresh water.
- Turn on the machine and wait for it to heat up.
- Place a mug on the drip tray.
- Run a brew cycle without a K-Cup.
Check the water flow and look for any leaks. If everything seems fine, repeat the process once more for thorough cleaning. Your Keurig should now be ready to make delicious coffee again.
Maintenance Tips
Keeping your Keurig coffee maker in top shape is essential. Regular maintenance ensures you enjoy fresh coffee every time. Follow these tips to maintain your machine and prevent issues.
Regular Cleaning Schedule
Cleaning your Keurig should be part of your routine. Create a schedule to keep track.
- Daily: Rinse the water reservoir and drip tray.
- Weekly: Wipe the exterior with a damp cloth.
- Monthly: Remove and clean the pod holder.
Signs Of Needing Descaling
Descaling removes mineral buildup inside your coffee maker. Watch for these signs.
- Slow Brewing: If your coffee takes longer to brew, descale it.
- Strange Tastes: A metallic or bitter taste means it’s time to descale.
- Less Coffee: If you get less coffee than usual, descale your machine.
Keeping a regular cleaning schedule and watching for signs of needing descaling will prolong your Keurig’s life. Enjoy better-tasting coffee with these simple steps. descale a Keurig coffee maker

Frequently Asked Questions
What Is The Best Way To Descale A Keurig Coffee Maker?
Descale a Keurig by filling the reservoir with equal parts water and white vinegar. Run several brew cycles without a K-cup. Rinse thoroughly by running cycles with fresh water.
Can I Use Vinegar To Descale My Keurig?
Yes, you can use vinegar to descale your Keurig. Mix equal parts water and white vinegar. Run the solution through the machine, then rinse thoroughly with water.
How Do I Clear The Descale Light On My Keurig?
To clear the descale light on your Keurig, perform a descaling cycle. Use a descaling solution or white vinegar. Follow the instructions in your Keurig manual. After descaling, rinse the machine thoroughly with fresh water. This will reset the descale light.
How To Descale A Keurig Mini With Vinegar?
To descale a Keurig Mini with vinegar, fill the reservoir with equal parts water and vinegar. Run a brew cycle without a pod. Repeat until the reservoir is empty. Rinse by running fresh water through multiple cycles.
How Often To Descale A Keurig?
Describe your Keurig every 3-6 months to maintain optimal performance and taste.
What Is Descaling A Keurig?
Descaling removes mineral buildup inside your Keurig, ensuring better coffee taste and machine longevity.
Can I Use Vinegar To Descale Keurig?
Yes, white vinegar is a popular and effective descaling solution for Keurig coffee makers.
What Happens If I Don’t Descale?
Ignoring descaling can lead to poor coffee taste, slower brewing, and potential machine damage.
Conclusion
Descaling your Keurig coffee maker ensures better taste and longevity. Follow these simple steps regularly for optimal performance. A clean machine means fresher coffee and fewer maintenance issues. Remember, consistent care keeps your Keurig running smoothly. Enjoy a perfect cup every time by keeping your coffee maker in top shape how to descale a Keurig coffee maker