
To remove peel-and-stick wallpaper, start by lifting a corner and pulling gently. If resistant, use a hairdryer to heat and loosen the adhesive.
Remove peel-and-stick wallpaper is a straightforward task that often requires no additional tools. The beauty of this type of wallpaper is that it’s designed for easy removal, making it an excellent option for renters or those who like to change their decor frequently.
Upgrading your space or preparing for a new look involves peeling off your old adhesive wallpaper, and the process can be satisfyingly simple. The key is to work slowly and carefully to avoid damaging the wall underneath. Whether you’re a DIY enthusiast or a first-time wallpaper user, understanding the proper technique to strip off that stylish pattern can ensure a smooth transition to your next design project.
Introduction To Peel And Stick Wallpaper
Peel-and-stick wallpaper has revolutionized home decor. Easy application makes it a go-to option for stylishly updating your space. Unlike traditional wallpapers, you can apply it yourself in minutes.
Popularity Of Diy Wallpaper
Do-it-yourself (DIY) projects gain more fans every day. Peel and stick wallpapers are front-runners in the DIY community. They empower homeowners to transform rooms without help from professionals.
Benefits Of Using Removable Wall Coverings
- Complete room makeovers in no time.
- No long-term commitment is needed.
- Cost-effective way to decorate.
- Ideal for renters and frequent redesigners.
:max_bytes(150000):strip_icc()/new-best-removable-wallpapers-tested-lead-tout-b6ab2b37d70546b18ab18f8c61e7200f.jpg)
Preparation Steps Before Removal
Ready to say goodbye to that old peel-and-stick wallpaper? Perfect! A successful removal starts with solid preparation. This ensures the walls beneath stay in great shape. Let’s dive into the initial steps to make this process smooth and damage-free.
Gather Necessary Tools
Having the right tools on hand is crucial for effective wallpaper removal. Create a toolkit with these essentials:
- Putty knife or plastic scraper: For gentle peeling.
- Heat gun or hairdryer: To loosen the adhesive.
- Cleaning solution: For residue cleanup.
- Rags or sponge: To apply the solution.
- Trash bags or sheets: To catch debris.
Protect Surrounding Area
Wallpaper removal can get messy. Shield your floors and furniture to avoid damage and ease cleanup.
- Place drop cloths or old sheets around the work area.
- Cover furniture and remove any hanging pictures or decor.
- Tape off edges with painter’s tape to protect trim and ceilings.
- Ensure good ventilation by opening windows or using fans.
Identifying The Type Of Peel And Stick Wallpaper
Before diving into the removal process, knowing what type of peel-and-stick wallpaper adorns your walls is essential. This knowledge is a cornerstone as each material has its unique properties. It affects how it clings to surfaces and reacts to removal techniques.
Vinyl Vs. Paper-based Wallpapers
Not all wallpapers are created equal. Peel and stick wallpapers come mainly in two types: vinyl and paper-based. The kind you have will determine the tools and methods to use for a smooth removal.
| Vinyl Wallpaper | Paper-Based Wallpaper |
|---|---|
| Water-resistant | More absorbent |
| Durable and tear-resistant | May rip more easily |
| Can be peeled off in larger sections | Requires more care when removing |
Impact Of Material On Removal Process
Understanding your wallpaper’s material is more than academic. It impacts how you’ll approach the task ahead. Vinyl wallpapers might peel away in large pieces. On the other hand, paper-based options might necessitate a gentler touch and additional steps for residue-free removal.
- Vinyl: Heat often helps in removal.
- Paper-based: You may need a solvent to dissolve the adhesive.
Starting At The Corners
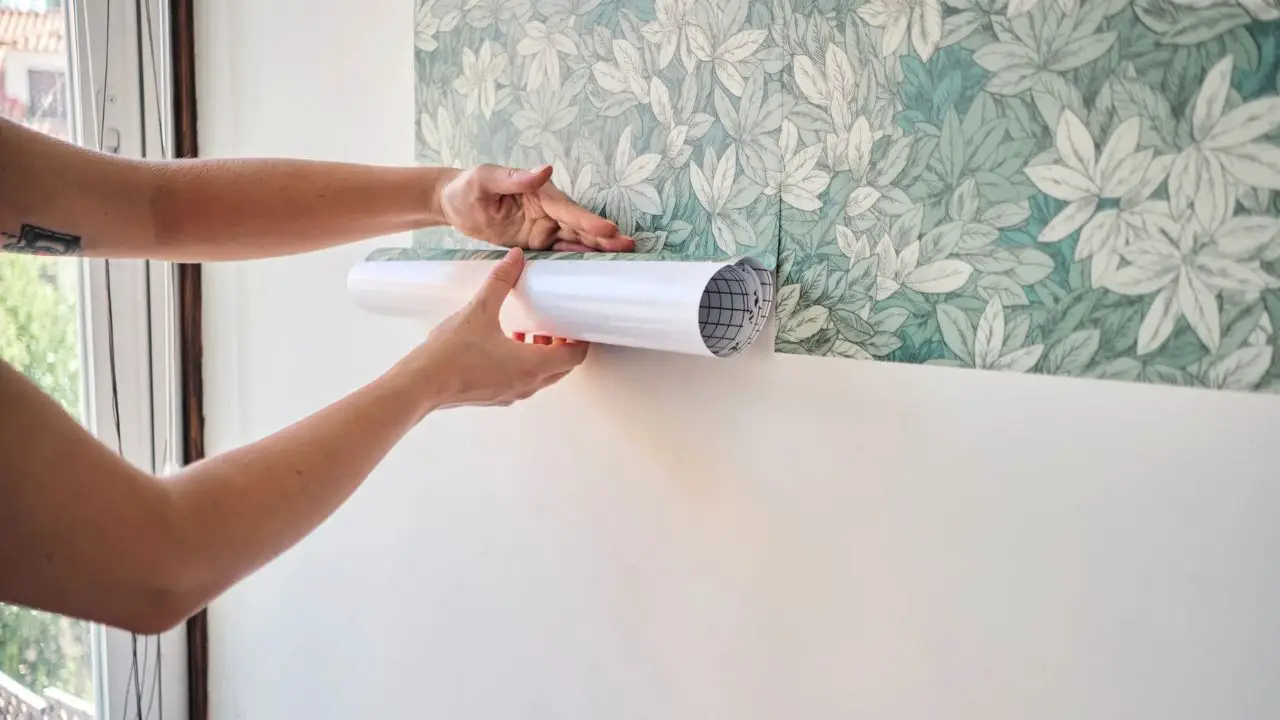
Are you ready to say goodbye to your old peel-and-stick wallpaper? Removing wallpaper can be a breeze whether you’re a DIY enthusiast or tackling your first home decor project. Let’s focus on ‘Starting at the Corners’ — the best place to begin your wallpaper removal journey.
Finding An Edge
Finding the right spot to start peeling can make all the difference. Look for the corners of the walls, as they tend to loosen over time and provide an accessible edge. Use a putty knife or fingertips to lift the wallpaper’s corner gently. Pull steadily and slowly. If the paper does not lift easily, warm it with a hairdryer on a low setting to soften the adhesive.
Peeling Techniques
Once you find an edge, it’s all about technique. Peel diagonally at a 45-degree angle to reduce the risk of tearing. Supporting the wallpaper with your free hand can help prevent unwanted rips. Move smoothly and attentively to ensure the wallpaper comes off in large strips, making cleanup easier. If resistance is met, warm the area again. Avoid using sharp objects that may damage the wall beneath.
- Begin at the corners where the edges are most accessible.
- Use minimal tools like putty knives and hairdryers.
- Peel slowly and at an angle for best results.
- Support the paper with your free hand to avoid tears.
Remember, patience is vital in wallpaper removal. Follow these simple steps, and your walls will be ready for a fresh look soon!
The Peel Process
Welcome to the Peel Process, the most crucial step in quickly transforming your space! Remove peel-and-stick wallpaper can be a breeze if done correctly. Let’s dive into the techniques that ensure a clean, damage-free removal. Slow and Steady Motion
Slow And Steady Motion
Patience is vital when removing wallpaper. Start at a corner or edge and pull the wallpaper back against itself. Keep the motion slow to avoid tearing the paper or leaving residue behind. Managing Stubborn Sections
Managing Stubborn Sections
Sometimes, sections may resist. For these areas:
- Heat gently with a hairdryer on a low setting.
- Peel off the wallpaper while the adhesive is warm.
- Move the hairdryer as you go to keep the edge pliable.
Bold strokes yield the best results! With these steps, walls will return to their original glory in no time
:max_bytes(150000):strip_icc()/roommates-rmk9080wp-marble-metallic-gold-peel-and-stick-wallpaper-peel-tout-3114753fa2b84dcf877618f05557c458.jpg)
Troubleshooting Common Problems
You might hit a few snags when revamping your space with peel-and-stick wallpaper. Don’t worry; fixing issues can be simple. This section will guide you through common problems and offer easy solutions. Keep your wallpaper project flawless with these tips!
Handling Rips And Tears
Rips and tears in your wallpaper can seem daunting. Here’s a quick fix:
- Clean the area around the tear gently with a damp cloth.
- Measure and cut a patch from leftover wallpaper.
- Apply the patch over the tear, ensuring it aligns perfectly.
- Smooth out any bubbles or creases with a flat tool.
This will make the tear nearly invisible and your wall beautiful again.
Adhesive Left Behind
After removing wallpaper, adhesive residue can be stubborn. Clean it up quickly:
- Use a putty knife to scrape off significant adhesive bits gently.
- Apply warm water and soap with a sponge to the wall.
- Let it sit for a few minutes, then wipe away the gooey adhesive.
- For more challenging residue, a specialized adhesive remover might be necessary.
With patience, your walls will be spotless and ready for their next makeover!
Cleaning The Wall Post-removal
A clean slate awaits once you wave goodbye to your old peel-and-stick wallpaper. Preparing the surface for a fresh look or paint is crucial. This phase ensures your wall’s longevity and readiness for whatever comes next. Let’s guide you through a smooth transition with essential cleaning tips.
Surface Preparation For Future Use
Prepping the wall post-wallpaper removal is a vital step. Check the wall for any adhesive remnants or minor tears. Gently scrape off any leftover glue with a plastic putty knife. Be careful not to damage the wall.
Recommended Cleaning Solutions
Select the proper cleaning solution to ensure a pristine wall surface. Here’s a list of effective cleaners:
- Warm water and soap – Perfect for general cleaning.
- Vinegar and water mixture – Ideal for more challenging residue.
- Rubbing alcohol – Use on stubborn adhesive spots.
After choosing your cleaner:
- Apply it with a soft sponge or cloth.
- Work in sections to avoid any damage.
- Finish by rinsing the wall with water and drying it with a clean towel.
| Solution Type | Purpose | Application |
|---|---|---|
| Warm Water & Soap | General Cleansing | Soft Sponge/Cloth |
| Vinegar & Water | Tough Residue | Soft Sponge/Cloth |
| Rubbing Alcohol | Stubborn Adhesive | Clean Towel |
Repairs And Touch-ups
Removing peel-and-stick wallpaper is straightforward. Yet, walls may need some care. This section guides you on repairs and touch-ups post-wallpaper removal. Ensuring a clean and neat finish is vital. Let’s revive your walls!
Fixing Minor Wall Damage
Bumps and scratches may appear after wallpaper removal. These simple steps will help fix them:
- Clean the wall with a damp cloth to remove dust.
- Fill small holes with a spackle using a putty knife.
- Smooth the area with sandpaper once the spackle dries.
- Wipe the wall to clear sanding dust.
- Apply a thin coat of primer to the repaired spots.
These repairs should be invisible beneath fresh paint or new wallpaper.
Painting After Wallpaper Removal
Painting your wall after wallpaper removal can bring a fresh look to your room. Follow these pointers for a professional finish:
- Ensure all adhesive residue is gone to avoid bumps.
- Repair any wall damage as described above.
- Prime the walls to seal the surface for new paint.
- Choose the right paint for your wall type and room.
A smooth, primed wall guarantees an even paint application and durable finish. Enjoy your refreshed space!
Alternative Removal Techniques
Are you struggling you struggling with stubborn peel-and-stick wallpaper? Don’t worry! Besides the standard peel-off method, several alternative techniques can make the removal process smoother. Heat or unique solutions could be your best friends in this task. Dive into these alternative removal techniques to determine which suits your situation best.
When To Use Heat
Applying heat helps loosen the adhesive on your peel-and-stick wallpaper, making removing it easier. Consider this method if your wallpaper is particularly stubborn.
- Heat Gun: A heat gun can be very effective but must be used carefully to avoid damage to the wall.
- Hair Dryer: An alternative to a heat gun could be a hairdryer set to high heat at a safe distance to prevent overheating.
Move the heat source over the wallpaper slowly and evenly, focusing on edges and corners. As the adhesive softens, gently peel the wallpaper away.
Utilizing Wallpaper Removal Solutions
Sometimes, heat alone won’t do the trick. In such cases, consider using a wallpaper removal solution.
- Commercial Removers: Ready-made solutions can effectively dissolve adhesive residues.
- DIY Mix: Create your mix using vinegar and water or fabric softener and water for a natural approach.
Apply the solution using a sponge or spray bottle, let it sit to break down the adhesive, then peel the wallpaper starting from the corners.
Expert Tips And Tricks
Revamping your space with peel-and-stick wallpaper offers a quick transformation. Yet, removal can be tricky if not approached with care. Expert tips and tricks are here to make the process smooth and damage-free. Let’s dive into professional advice and ways to ensure easy removal.
Advice From Interior Designers
- Start at a corner: Begin peeling from the bottom corner.
- Slowly lift: Gently pull at a low angle.
- Apply heat: Use a hair dryer to loosen the adhesive.
- Avoid harsh tools: Spatulas or scrapers could damage the wall.
Ensuring Easy Future Removal
- Clean walls first: A dust-free surface improves adhesion and future removal.
- Use primer: Apply an appropriate primer if recommended.
- Refrain from overstretching: Stretching wallpaper might tear it during removal.
- Quality matters: Choose high-quality wallpaper for ease of removal.
| Tip | Reason |
|---|---|
| Test a small area first | Ensures wallpaper will come off cleanly |
| Patience is key | Prevents wall damage and residue |
Remember, take your time, and treat your walls with respect. With these expert insights, your peel-and-stick wallpaper removal will be a breeze, preparing your space for its next aesthetic chapter.
Frequently Asked Questions Of How To Remove Peel And Stick Wallpaper
Does Peel And Stick Wallpaper Damage Walls?
Peel and stick wallpapers are designed to be easily removable and typically don’t damage walls if removed carefully.
Can Peel And Stick Wallpaper Be Reused?
Peel and stick wallpaper may be reused if kept clean, and the adhesive backing remains intact.
What Tools Are Needed For Wallpaper Removal?
A plastic putty knife, a hairdryer, or a wallpaper scorer are standard tools for aiding in wallpaper removal.
How Long Does Peel And Stick Wallpaper Last?
Properly applied, peel-and-stick wallpaper can last several years without peeling or losing its adherence.
Is Steaming Necessary To Remove Peel And Stick Wallpaper?
Steaming is unnecessary for peeling and sticking wallpaper and may damage its adhesive properties.
Will Peel And Stick Wallpaper Leave Residue?
Quality peel-and-stick wallpapers typically leave minimal to no residue upon removal.
Are There Eco-Friendly Wallpaper Removal Methods?
A warm water and soap solution is an eco-friendly method to help loosen peel-and-stick wallpaper.
Can I Paint Over Peel And peel-and-stick wallpaper?
Painting over peel-and-stick wallpaper is not recommended as it may not adhere well and could peel off.
How To Remove Peel and Stick Wallpaper From Drywall?
Gently peel off the wallpaper from a corner and progress slowly to avoid damage to the drywall surface.
What’s The Best Way To Clean Walls Post-removal?
After wallpaper removal, cleaning the walls with a mild soap and water solution will remove any lingering adhesive.
Conclusion
Peeling off wallpaper doesn’t need to be daunting. With patience and the right approach, transform your space hassle-free. Embrace change and update your decor; your walls await their next chapter. Dive into your next project confidently, remembering these simple steps for a smooth transition.


